Did you know that there is 3 different types of plungers, and there are specific uses for each one? When most people think of a plunger, they commonly think of the “sink plunger” which most of us probably have in our bathrooms.
SINK PLUNGER
This plunger is referred to as the common sink plunger. Most people think of a plunger like this when they hear the word plunger, and think this one is for plunging your toilet but this is not the correct one to use. This plunger should be used on flat surfaces to get the maximum benefits out of it. The cup needs to lay flat directly over the drain and create a vacuum that’s strong enough to dislodge the clog in the sink. When people try to use this on in the bathroom toilet, it might work, but it also isn’t the best way to get it unclogged. A toilet is curved too much for this plunger to create the vacuum that it needs to properly unclog the toilet. This one is to be used for tubs, kitchen sinks, bathroom sinks, laundry tub sinks, or anything that you has a flat surface.
ACCORDION PLUNGER
This is the plunger you should be using when you need to unclog your toilet. A lot of people do not know how to use this plunger because it’s a hard plastic that is not easy to control. It is difficult to create the vacuum seal you need over the drain. The plunger can definitely scratch the surface of your toilet, and this is why most people don’t use this one because the rubber sink plunger won’t scratch. You should only use this type of plunger for toilets.
TOILET PLUNGER/ FLANGE PLUNGER
This is called a toilet plunger, but it can be used in just about any type of drain. The cup on it can fit a sink plunger, but the flaps can fit in the curved toilet drain which can create the suction and vacuum that is needed to unclog it. This plunger is very versatile, but it is recommended to not use the same plunger on your toilet and your sinks because of the risk of cross contamination. You can use this plunger for toilets and sinks, but recommended not for both.
The average cost for plumbing services ranges between $350 and $700 for a regular job like repairing sinks, faucets, or toilets, and the average rate for hiring a technician ranges between $80 and $120 per hour depending on the day of the week and the market. Some contractors will also charge you a service fee of $100 or more for just showing up at your place, and your plumbing charges can also escalate if they do the work during an emergency event or weekend.
Plumbing services are among the most costly maintenance or repair services you can pay for. Here are a few tips to help you avoid expensive plumbing repairs in the future.
CARRY OUT REGULAR CHECKUPS WITH A CHECKLIST
Checking your pipes and fixtures regularly helps you detect plumbing problems with greater ease. To carry out these checkups effectively, you need to make a checklist. A regular checklist would include:
● Toilets
● Showers
● Washing machine
● Sump pump
● Water meter
● Sinks
● Tubs
● Shut-off valve
● Water mainline
● Outside
AVOID EXERTING EXTRA WEIGHT ON EXPOSED PIPES
Although you might be tempted, experts recommend you don’t use exposed pipes to hang your laundry. Additional weight from your clothing and the hanger strains the pipe and makes it more susceptible to leaks. So, you must find an appropriate place to hang your clothes to avoid unnecessary leaks and expensive repairs.
GO TRENCHLESS
The advantages of trenchless pipe repair make it easier for those who need to repair their plumbing system. Trenchless pipe repairs cause less damage, provide better overall service quality, and are completed much faster than other repair methods. In the long run, going trenchless will give you a pipe solution that will be long-lasting and you’ll also save more money.
AVOID USING CHEMICAL DRAIN CLEARING PRODUCTS
Clogged drains are among the most prevalent plumbing headaches, and many people clear them using products that contain chemicals, but this is a big mistake. Such products are likely to erode your drain pipes, resulting in even greater damage. Using them repeatedly can eventually cause leaks and expensive repairs. Thus, hire a plumber to snake the drain and clear away the clog. Or, if you are DIY-savvy, you can buy your own snake for about $20 and clean the drain yourself.
PROTECT YOUR PIPES FROM COLD TEMPERATURES
It gets extremely cold in the winter and your home needs sufficient insulation to protect your pipes. Even in a drafty house, it is still possible to protect your pipes by insulating exposed ones.
Choosing to insulate the pipes by yourself may not be the best option because you will only be able to access the pipes that are out in the open. But a plumber will insulate the pipes even in hidden areas of the home, particularly during renovations and remodels when the pipes are exposed. Request your plumber to install heat tape for pipeswhen they open your wall or expose the usually hidden pipes. This will maintain a water temperature of 55 degrees and above when the weather gets extremely cold.
PROTECT YOUR DRAIN FROM HAIR AND FOOD PARTICLES
Strive to ensure that grease, hair, and food don’t go down the drain. These substances often contribute to drain clogging, causing you lots of problems. There are various measures you can take to prevent potentially harmful stuff from going down the drain, including using drain strainers and alternative methods of disposing of waste.
REDUCE THE WATER PRESSURE
We all enjoy high-pressure showers; however, pressure exerts unnecessary stress on your pipes, which can reduce the lifespan of the pipes and increase the possibility of a leak. So, measure your water pressure using a hose bib gauge and ensure the pressure is between 40 and 80 psi. If it is above this range, contact an expert plumber to install a pressure reducer.
WINTERIZE OUTDOOR SPIGOTS
If the temperatures fall extremely low, outdoor spigots are likely to freeze. However, you can protect your spigots from extremely low temperatures by keeping your hoses indoors for the winter. If you have installed an in-ground sprinkler system in your home, call a professional to winterize it because the water that remains in the pipes can freeze and cause the rupturing of the pipes. Collaborate with a professional to empty your sprinkler pipes also to prevent rupturing over the winter.
If you are on a budget and you’d like to have some plumbing work done around your home, save money by finding a reputable plumber with fair rates. Don’t do the work yourself–unless you are trained to–or hire an unqualified person to do it. Working with an expert plumber will save you a huge chunk of money in the long run and help you ward off expensive plumbing mistakes.
Many would find surprise and delight if they only knew how vital staying free of clutter is to a productive workspace. So, here are five crucial organizational tips for a clean and productive workspace. Putting a bit of energy today into reorganizing where you work could pay dividends in your immediate future. So, to organize better, be mindful and consider purchasing an air purifier, limit what goes on your desk’s surface, reorganize over time, place your seat in a way that makes you comfortable, and ensure you must turn around to find a distraction.
CREATING A MINDFUL WORKSPACE
Our environment affects our mood and our productivity. Therefore it’s important to create and maintain a clean, organized, and mindful workspace. When our space is cluttered our mind is cluttered and usually vice versa. Some of the ways you can create a mindful workspace include tidying up and getting rid of dust, dirt, and germs. Getting a portable office air purifier is a great way to combat this as it can effectively reduce allergies, viruses, and bacteria. This tool can bring fresh clean air to your workspace. You can also add plants, candles, and essential oils to create a more mindful space.
TIPS FOR KEEPING YOUR SPACE FREE OF CLUTTER
Limiting what goes on the surface of your desk goes a long way with keeping clutter to a minimum, freeing you to be your most productive self. Papers will often get out of control, but you can limit how many of them stay on your desk’s surface. That will ensure that you know just what is on your desk. Also, consider cleaning your computer’s desktop. That is another way you can clean to decrease clutter and increase productivity. You might decide to keep only today’s tasks on your desk, making your workspace flow well and freeing you to concentrate on the task at hand.
It can be overwhelming to clean your workspace because it might be rather messy. So, know there is a better way. Take it one day at a time and clean a portion of your workspace at a time. One day, you might clean your desk, and another rearrange the furniture. If you are consistent enough with the cleaning, you will soon have an office free of clutter, letting you become a more productive worker bee. So, stay the course because, like at the company where you work, a reorganization does not need to disrupt your workflow completely.
ORGANIZATION TIPS FOR INCREASING PRODUCTIVITY
When attempting to increase your productivity through better organization, ensure that you are comfortable when sitting. You will sit longer and work harder if you feel you belong where you are sitting. Nobody wants to feel out of place. Suppose you prefer to sit at the corner of the room wherever you go because it makes you feel safe to get lost in whatever you are doing. In that case, it would be incredibly unwise to put your desk somewhere where your back was to other people.
Another thing that will help dramatically increase your work productivity is making sure you must turn around to use a distraction. For example, avoid letting yourself see your phone unless you turn around to pick it up. That way, you will reduce the temptation to get sidetracked and ensure that you only leave your workspace when something is genuinely vital. So, you can try to lengthen the time you spend working straight before you take a small mental break in this way. You will find your work productivity soaring if you do.
FOSTERING PRODUCTIVITY BY CLEANING CLUTTER
Creating an organized, germ-free workspace is possible with a bit of effort. Still, thinking smarter and not harder about keeping your workspace clean and organized is part of the solution. So, to create a productive workspace free of clutter, be mindful and consider buying an air purifier, limit what stays on your desk, clean a bit at a time, practice mindfulness about where you are sitting, and minimize distractions. Clutter and a lack of productivity often go hand-in-hand. So, here is to you, making your office as clutter-free as possible.
Homeowners often ask themselves, “When is the right time to paint?” They might want to freshen up their walls, or completely re-imagine their living space, but no matter the reason, the decision to paint your home, it’s not one taken lightly.
Sure, there are ways you can speed up the process, but at the end of the day, painting a room can use up a fair share of time and resources.
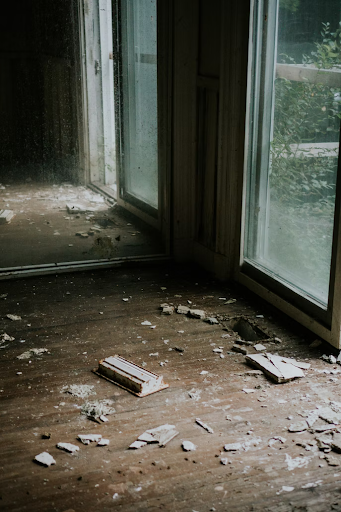
Sometimes, that decision is made for you. Especially when you’ve suffered smoke damage to your home. When there’s been a fire in your house, apartment or condo, it’s a traumatic experience. And no matter the size of the fire, you’re bound to be left with some smoke damage to your walls that you’ll want to address immediately.
The good news? It’s actually fairly easy to clean and paint over smoke damaged walls. Just follow these easy steps, and you can get your home looking spotless again in no time.
STEP 1: ASSESS YOUR DAMAGE
Before you get to work, look at the damage you’re dealing with. If you’re lucky, the smoke damage is only superficial. There may be soot from fire or ash on the walls, but no structural damage to the walls themselves.
In that case, the amount of work you’ll put into painting over smoke damage should be pretty straightforward, and you can jump to the third step.
However, if there is more significant damage, you’ll want to address that before you get to work painting over smoke damage.
STEP 2: REPAIR ANY SMOKE DAMAGE
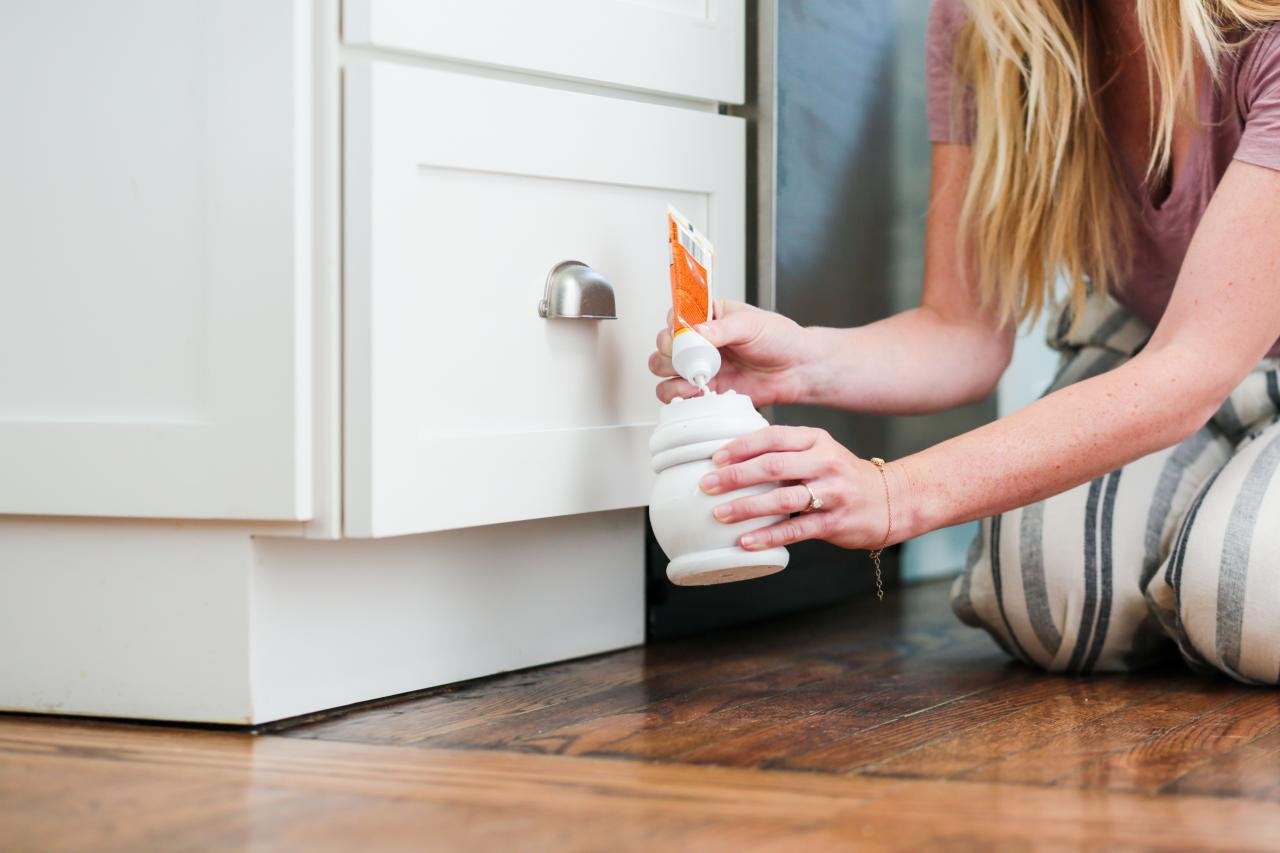
If you’ve found damage to your wall, you might need to bring in a professional to put up a new wall, or repair more extensive damage. But if there is damage just to the drywall, you could take it upon yourself to fix that damage yourself.
For small to medium sized holes in the wall, you can fill the hole with plaster, wait for it to dry, and then sand it down. Once you’ve patched your holes and repaired the damage of your wall, it’s time to prep the area to clean and paint over smoke damage.
STEP 3: DRY-CLEAN YOUR SMOKE-DAMAGED WALL
Now you’re ready to start the process of cleaning your smoke damaged walls. That’s where dry cleaning sponges come in. Made of vulcanized rubber, these dry cleaning sponges are great for cleaning soot off of walls.
For this step, you’ll need the following materials.
Gloves to protect your hands as well as walls, since natural oils in your skin can blot on the wall, complicating your efforts to clean your smoke damaged walls.
Plastic Sheeting to place around the smoke damaged walls. Debris and ash might fall during the cleaning process, and you’ll want to avoid any ash or soot staining your floors as you clean your walls.
Eye Protection such as googles will be good to make sure no soot from the fire or ash gets in your eyes.
Dry Cleaning Sponges are, of course, essential. The good news is that if you have extra dry cleaning sponges, you can still use these in the future. They’re effective at cleaning up more than just soot from fire, they also can blot out nicotine stains or candle soot on walls.
The actual cleaning process to get the damage of smoke off your walls is relatively straightforward. Starting from the top of your smoke damaged walls, and working your way down, use your dry cleaning sponge with straight, overlapping strokes. Do not scrub, as that can drive soot into your walls and make it harder to get soot off your walls in the long term.
After each stroke of the sponge, check it for debris and coloration. If it becomes clogged, or blackens noticeably, take a razor-blade or safety knife to cut off just the surface area of the sponge.
You shouldn’t try to clean or wash these sponges, since their absorbent nature will be negated by soaking it with water or soap, but by cutting away used layers, you can get a lot of use out of each sponge, and hopefully will be able to absorb most of the soot and ash from your fire damaged walls and ceilings.
After going through the entire affected area and cleaning soot off your walls, you’re not done yet. There’s another step for cleaning smoke off walls before you can paint over the smoke damage.
STEP 4: WET-CLEAN YOUR SMOKE-DAMAGED WALLS
Now that you’ve started to clean smoke from your walls, removing much of the soot and ash from your fire damage, it’s time for a more intense clean using a deep-cleaning product. You can use a grease-cutting agent, or a deep cleaner. The important thing is to avoid using standard, run-of-the-mill cleaning products for this step.
Your goal here should be to remove as much soot and ash as possible. This is the last step for how to clean smoke off walls, and ensures that no lasting smoke damage causes problems down the line once you’ve begun painting.
Using your heavy-duty cleaning product, take a rag, or regular cleaning sponge, and apply it to the walls like you used the dry sponge—starting from the top and working your way to the bottom. You’ll likely want gloves for this step as well, as the cleaning agent may be caustic to your skin.
When you thoroughly clean the area, you should be ready to begin the process of smoke painting, or painting over your smoke damage to make your walls and ceilings look like new.
STEP 5: PRIMING YOUR SOOT AND SMOKE-DAMAGED WALL
Now it’s time for the show to begin—priming your smoke damaged walls, so you can effectively paint over them. If you’re wondering about any lingering odor, and are considering an odor blocking paint, the primer is where you can begin to help make sure that the smoke damage does not bleed through and require future paint jobs in the future.
If you’re dealing with strong odors, such as those you find from nicotine stains, make sure that the primer you choose is a pigmented shellac primer, since that will be more effective than standard oil-based primers.
As for applying that primer, we have numerous guides on how to paint your walls quickly and efficiently. There’s no real difference between applying primer and applying your actual layer of paint, just make sure to choose the correct primer, and apply your primer consistently and liberally.
STEP 6: PAINT OVER THE SMOKE DAMAGE
You’ve repaired damage, cleaned the area, and primed it for painting. Now is the time to paint! You can go with the same color you had before, or you can take this as an opportunity to completely reinvent your room with a brand new color.
When you paint over smoke stains on walls, if you’ve done the previous steps to clean and prime the area, painting the wall on its own isn’t any different from painting a wall without smoke damage. Once you’ve prepared your walls for painting, take an interior latex paint and apply two coats, until everything looks like new!
FINAL STEP: ENJOY YOUR NEWLY PAINTED HOME
And that’s how to clean clean smoke off walls, using paint and primer. Of course, cleaning and painting over smoke damage does more than just spruce up your walls. A fresh coat of paint can increase your home’s value, or completely change the feel of a room. And hopefully, with this guide at your disposal, you can paint over smoke damage and renew your home without breaking a sweat!
Your home is one of the most essential things in your life. It keeps you and your family safe, holds all your belongings and becomes your most valuable asset over time. As such, you want to take care of your house so it continues to serve you well. These signs will let you know if it’s time for a little TLC.
1. YOU HAVEN’T CLEANED IN A WHILE
Life gets busy, and sometimes, it’s hard to keep up with the cleaning. Your house may fall into disrepair after gathering so much dirt and dust — leaving room for pests and other detrimental things to sneak in and feel right at home. The best plan is to attack one room each day with cleaning supplies. If you don’t have the time to clean, consider hiring a maid service that can take care of the hard work for you. Then, you’ll appreciate your clean home and won’t have to worry about anything lurking around in the dark and dusty corners.
2. YOU HAVE HIGH ENERGY BILLS
The average American’s monthly energy bill is nearly $120. Some people may see this price as a symptom of living in the wrong place, but you can reduce that cost by giving your home a little TLC. Switch to more energy-efficient options, like lightbulbs and appliances, to reduce your consumption. This can also reduce your carbon footprint and positively affect the environment. Upgrading these parts of your home can lower your electric bill.
3. YOUR NEEDS HAVE CHANGED
Starter homes don’t fit their owners forever, and that’s OK. You may find that your current house doesn’t suit your needs as your family grows. Many people sell at this point, but that doesn’t mean you have to. If you’re attached to your home, it might be time to look at renovations.
Most homeowners choose to remodel the kitchen first, but if you’re running out of space, you may consider converting one area into another, like an office space into a bedroom. If you love your home, rearranging your space to allow new rooms, furniture and features could help meet all your needs.
4. YOUR HOUSE HAS APPRECIATED
You may not be able to tell whether your house has appreciated without getting it appraised, but you can examine the area to know whether it’s earning value over time. Homes in a growing neighborhood with an excellent school districtwill likely see higher price tags. Selling your home while the market is hot means you’ll get the most bang for your buck.
Even if you choose not to move out of your home, its appreciation should make you care about it a little more. It could be valuable one day, and the idea of eventually selling it should motivate you to keep it up and take care of it. That way, it will fetch a finer price than you could have imagined. Besides, living in a valuable home may make you choose nicer belongings and care for your current ones.
5. YOU STRUGGLE WITH YOUR FURNITURE
How long has it been since you upgraded your furniture? It can wear down over time and be detrimental to those who use it. Consider replacing your living room suite when your couch starts to creak, as that can indicate it may fall apart soon. Similarly, mattresses need to be upgraded if you’ve used them for too many years — neglecting them is detrimental to your sleep, which can impact your physical and mental health.
6. YOU CAN’T HANDLE THE UPGRADES
Sometimes, it feels like everything falls apart at once. You can expect your appliances to start failing at the same time if they’re the same age. Planning might reduce this money burden, but saving isn’t always an option for some families. Replacements can get costly fast. You may have to prioritize one upgrade over another until you have the funds to deal with all of them.
Similarly, you may want to renovate parts of your home but cannot afford it. In many cases, a family might outgrow a house and need to remodel it. Most people spend over $10,000 on home remodels, which can be a hefty chunk of cash and potentially hurt a wallet if not saved up. If you can’t handle the costs of upgrading your house, you may look to fix it up just enough to get it ready to sell — and then find a home that suits all your needs.
7. YOU CHOOSE TO LIVE WITH BROKENNESS
How many things in your house are broken that you simply live with? You may have found a way to work around uncomfortable situations or accept things as damaged, but doing this is no way to live.
Start by making a list of all the broken things in your home. Then, prioritize these items by how difficult it is not to have them functional. Do you need your fireplace in the winter, or is having a working sink more important to you? Once you have your list, start working on it and give your home the love and care it deserves.
LOVING THE HOME YOU LIVE IN
Moving is inevitable sometimes. Still, if you live in your dream home, you shouldn’t feel like you have to leave it just to make it suit your needs. Upgrades, fixes, and a lot of love and care can make your house the perfect fit.
Even if you’re a pro at various DIY projects, sometimes it’s best to hire an experienced contractor for larger or more complex home renovations.
Since the beginning of the pandemic, when more people started staying at home, Google trends indicated an 8% increase in searches for general contractors in one year. However, choosing the right one for your remodeling project is essential and requires you to dig deep into their qualifications and expertise.
Thankfully, finding a good contractor is not impossible. Here are six things you should look for when hiring someone to work on your home.
1. LICENSE
Always begin your search for a contractor by making sure whoever you find is licensed. Each state has its own licensing board and requirements that general contractors must meet. Visit your state’s Department of Labor website to find a directory of contractors in your area.
Keep in mind that hiring a licensed contractor is essential if you intend to sell your home in the future. Otherwise, your renovation project can decrease the value of your home and will likely be excluded from the transaction.
Homeowners may also need to pay to redo the work by a licensed professional or potentially end up with other legal liabilities, even if they were unaware that the contractor they initially hired wasn’t licensed.
It’s important to know upfront that your contractor has met industry and state standards to work.
2. CERTIFICATE OF INSURANCE
Whoever you decide to hire as a contractor should maintain general liability and workers’ compensation insurance. Always be sure to ask right away to see their certificate of insurance to verify the policy is still in effect.
General liability insurance ensures your contractor is covered for injuries that may happen on your property and any unnecessary damage they may cause to your home. However, it does not cover injury to their employees or subcontractors.
If your contractor hires additional people to work on your renovation, workers’ compensation insurance is a must to protect others from accident expenses and industry-related fatalities. Most states require general contractors to carry workers’ comp even if they only employ one person.
Sole proprietor contractors may choose to opt-out of holding workers’ compensation for themselves to drive down their premiums.
3. EXPERIENCE
You will want to look for a contractor with ample experience in the project you need completed.
Search for contractors specializing in painting if you’re looking for a color makeover. Hire a roofing expert for repairs or replacements. Other specializations may include kitchen or bathroom remodels, plumbing, electrical, flooring or new construction.
You should ask the following question when interviewing a general contractor:
● How long have you been in business?
● What sort of experience do you have with this kind of job?
● Do you have before-and-after photos of work you’ve done?
● What’s your vetting process to ensure subcontractors are qualified?
● How long have you worked with your subcontractors?
● What steps will you take to protect my property?
Communicating your project needs and inquiring about their skills and backgrounds will give you better insight into who will be working for you. You’ll have a good idea of their professionalism and ability to do a great job.
4. COST OF SERVICE
You should be getting multiple estimates and bids as you search for a contractor. Find out the estimated cost of your project — materials, labor and contingency fund — as well as payment options, payment schedules and your right to cancel.
Do they accept credit cards or checks? Do they require a down payment before starting the project?
Some red flags to be aware of when it comes to costs of services include:
● Never pay for a project in cash. Many times, this may mean it’s a scam. You can also then use your cashed checks as a receipt.
● Always make checks payable to a company rather than an individual.
● Never pay more than one-third of the project costs as a down payment.
5. TURNAROUND TIME
Nobody wants to wait around forever for a home project to be completed, especially if it’s large enough to displace you or gets in the way of everyday life.
Ask your contractor how long they expect a project to take from start to finish. Remember that delays sometimes occur, such as poor weather conditions or supply chain issues in obtaining the materials.
Regardless of the turnaround time outlined in your contract, be prepared to adjust your timeline and have a little bit of flexibility when unforeseen circumstances arise.
Ask friends, family and neighbors who worked on their houses and how they liked the finished product. It would help if you also looked the contractor up on Google, Yelp or another site where customers can leave reviews.
Research the company’s profile on the Better Business Bureau (BBB) to read through any complaints and search for keywords that indicate a scam. You may even ask the contractor if they have a list of local references you can contact.
These tools can be beneficial as you decide who to hire.
BE CONFIDENT IN YOUR HIRING DECISION
Searching for a good contractor may seem like a project on its own, but the more you know about them, the more trust you’ll have in the work they can do. Following these six steps should help you make the right choice.
Home renovations can be a daunting task. There are so many things to consider before starting, from the budget to the type of renovation you want to do. Here are some tips on what you should know before starting your complete home renovation.
One of the most important things to consider before starting a renovation is what you want the end result to be. Do you want a complete home renovation, or are you just looking to update certain parts? Knowing what you want will help make sure that your renovation goes as smoothly as possible and that you don’t spend money on renovations that you won’t be pleased about in the end.
HAVE A REALISTIC IDEA OF YOUR BUDGET
Planning a home renovation can be stressful and confusing. What should you do first? How much will the project cost? Where should you start? It is important to have realistic expectations about what the budget will be before starting; otherwise, it can lead to frustration and disappointment. One way that people often underestimate their budgets is by not planning out all aspects of their renovations beforehand or by overestimating how long the renovation process will take them.
CREATE A REALISTIC BUDGET AND STICK TO IT
In order to create a realistic budget, it’s important to understand exactly what needs renovation, how much time it will take, and what materials are needed for each phase of work that needs to be done. If you are unsure, or if you have limited knowledge of your home renovation project, it is best to speak with a contractor to get their advice on what will need doing, how much time it will take, and why. It can also help to look at similar projects in your area for guidance. Another reason that budgets may not be realistic is that they fail to account for materials and supplies.
Often there are unexpected expenses that people hadn’t taken into consideration before starting, such as replacing all of the cabinets with new ones, or any appliances that may need to be replaced. It is best to create a separate budget for materials and supplies in case any of these expenses come up. Budgeting for things like appliances, lighting fixtures, paint, and flooring is important to avoid any excess costs after the renovation is complete.
KEEP A POSITIVE ATTITUDE THROUGHOUT THE PROCESS
It is extremely important to keep a positive attitude throughout the process. By staying positive, you will be able to better handle any problems that come up and will be more likely to finish the renovation on time and within budget. Here are a few tips for keeping your spirits high during your home renovation.
Pick a project you will enjoy Even with a positive attitude, some parts of the renovation process can be exhausting or frustrating. If you pick a project that you truly enjoy, you will be able to stay engaged in the process and hopefully push through any rough parts. If you truly can’t stand your project and don’t feel comfortable starting it, consider getting help from a friend or relative who might be able to assist.
Create a schedule and stick to it. Making a schedule will allow you to create a timeline for the project and ensure that you finish all of your tasks within a reasonable amount of time. If you happen to run out of time, it is okay to finish the project another day or ask for help.
ENJOY YOUR NEW HOME!
It is true that you will have some inconveniences as a result of your renovation. However, it is also true that those inconveniences will be temporary and the benefits far outweigh them. Most people find their new space more comfortable, attractive, and enjoyable than their old one after they finish renovations. Imagine coming home to a house just how YOU want it! Instead of being surrounded by everything someone else wants for you or what was handed down from generations ago. You’ll have all the modern conveniences with none of the clutter or outdated items you don’t care for anymore. In addition to feeling better about yourself in your own home, there are many other benefits associated with renovating: lowered utility bills from upgraded insulation and energy-efficient appliances, additional living space, and less maintenance.
Renovating a home can be a large pill to swallow in the beginning, but it is worth the effort in the end. By creating a realistic budget, staying positive, and following a schedule, homeowners can minimize stress and ensure that their renovation goes smoothly. After the renovation is complete, homeowners will enjoy living in their new space and reap the benefits of having updated appliances, insulation, and more living space.
It’s no cakewalk to complete a big home project because they tend to stack up when in the renovation process. It’s best to not lose your focus and concentration on the task ahead and take one step at a time. With these viable methods, you will be able to save time and money on your big home projects without any concern. Sometimes projects can pop up unexpectedly when things break down, and you may need ways to buffer the expenses and time consumption!
HAVE AN ORGANIZED BUDGET
Maximum efficiency when it comes to your monetary goals can be tricky when building home projects. It’s very easy for a few smaller projects to pile up and become a large task overall. As the needs of your home increase, so does the demand for more funds to accomplish everything. Keeping a receipt of everything you purchase is important to document in your organized budget. Spontaneity is your enemy when it comes to home renovation, and letting your emotions take hold can drive the prices up. If you’re looking to save money, then calculate your budget and leave a bit of wiggle room because plans can fluctuate. Staying organized will give you a sense of confidence and a grasp over the situation so the final price isn’t a shock.
TAKE YOUR TIME PLANNING OVERALL
When it comes to the materials, design, and matching the quality of your new projects, you must plan it out well for the best results. This phase can take some time so it’s best to accept it and not rush through the process. Otherwise, you risk hasty decisions that could be regretted later. This is a time for brainstorming and contemplation regarding any particular design. For example, you could simply put a square of a particular wallpaper design up to see if it hits your eye right. There are many ways to plan out your project, but it’s definitely a creative and individual process. You can benefit from other ways to save money on big home projects and never pay full price again! You will be looking at whatever work is accomplished for a long time which is why it’s imperative this step is taken into consideration.
SELL THINGS YOU DON’T USE FOR PROFIT
One unique way to save money and space is to sell things you come across around the house that you don’t need. Many people don’t bother and throw things away, but you can shave off a percentage of the project cost if you are patient and sell it instead. Clearing out your home will also give you an advantage when conducting the projects as there is more space to work and less clutter. If you have a lot of stuff you don’t use, then this is the perfect time to have a garage sale or consider selling online. This will really help you save a lot of money depending on how many possessions you own. It’s definitely a handy way to potentially cut the cost of any given project in half!
BENEFITS OF PURCHASING POWER EQUIPMENT
When renovating outdoors, it’s important to have all the logistics covered and OPE Dealers helps you with cutting costs and saving precious time. Time is definitely money when it comes to renovating, and it’s easy to waste time without professional guidance with outdoor projects. These dealers utilize outdoor power equipment software to effectively carry out tasks like inventory management, sales, and attaining the necessary equipment. Experience is another valuable quality because they are aware of many facets of the industry that a novice might miss while taking on a solo venture. Outdoor renovations can be particularly labor-intensive and you need whatever equipment you may need to get the job done
THESE METHODS WILL HELP YOU SAVE MONEY ON YOUR BIGGEST PROJECTS!
These are the right concepts to keep in mind when furthering your interests in larger home projects. You will gain more control over the situation and can save resources with a wiser approach. This is a modern time full of opportunities to handle certain projects yourself with instructional videos online. This type of specialized knowledge for renovation used to be more elusive and is available to access in detail regarding the subtleties of any home craft.
Once you begin preparing for a move, one thing is sure: This won’t be an easy period. And that’s true regardless of your age. However, organizing the complex logistics of a household move can be more stressful for seniors or for someone who’s helping their elderly loved ones transition to a new home.
Luckily, plenty of experienced professionals can assist — most notably, moving companies that offer senior moving services and specifically cater to the elderly. Here’s how to make this transition an easier one.
DEALING WITH STRESS
Moving to a new home is an emotionally difficult process, especially for older individuals that are not fond of huge changes in their lives. With this in mind, easing the transition is important, especially if you’re an elderly person moving into a smaller home.
Hiring the right movers will go a long way towards dissipating stress — a senior moving company can help with every aspect of the relocation, from the planning and logistics to the physical work.
There are, of course, other services that can contribute to dispelling downsizing and moving stress. These include contractors to make improvements to your home to support any mobility problems and clear it of fall hazards.
HELP WITH DOWNSIZING
Downsizing is a frequent part of moving as a senior citizen — people in their golden years tend to look for quality-of-life features in their communities rather than an abundance of space. However, that doesn’t mean that moving from a larger home into a smaller one is easy.
Adjusting to “less” of anything is not pleasant, and that includes living space. For instance, you need to find enough room for all of the household possessions you kept in your larger home. Don’t worry, though. Experienced senior movers know how to deal with downsizing. Plenty of moving companies also manage storage facilities, and movers specializing in senior relocations are no different. You can employ their services in that regard and keep any extra items in a rented storage unit until you find room for them elsewhere.
ASSISTED PACKING
Completing any kind of move requires handling all kinds of menial chores. However, there’s one task that’s particularly demanding: packing. It tends to take more time than people plan for, and you need to do a lot of preparation beforehand — finding all of the packing materials that you need can be tiresome.
As a senior citizen looking to relocate to a new community, this isn’t something you want to deal with on your own. Even if you buy all of the cardboard boxes, packing tape, and box filler yourself, you’ll still need to spend endless hours carefully arranging and packing all of your stuff.
For someone who tires easily, this can be just too demanding. Luckily, senior movers can help you with that, as well. A moving company can buy all of the necessary materials for you, bring them to your home, and pack everything without you lifting a finger. Also, once they move everything into your new home, the movers can unpack all of your possessions and arrange them however you like.
HIRING THE RIGHT MOVERS
While you choose the best professionals for your senior moving services, make sure to ask them a series of questionsto determine their competence:
● Do you have any references from previous clients?
● What rates do you offer?
● Are they provided in writing?
● Do you have all the necessary insurance and licenses?
● What are your credentials?
● How much experience do you have with senior moving?
Planning a move for your loved one can be a complicated process. By hiring senior movers, you can ease their transition.
When you’re ready to sell your senior loved one’s home, connect with the dedicated real estate professionals at Schwab Realty. Call 360-683-4015 to set up an appointment!
Water damage can be a huge headache. It can cause extensive damage to your home or business and can be very costly to repair. There are several common causes of water damage, and knowing what they are can help you take steps to prevent these from happening.
BURST PIPES
This is probably the most common cause of water damage. If your pipes are old, they may corrode over time, leading to small leaks that can quickly become big problems. Even if there aren’t any signs of corrosion (e.g., rust), your pipes might still burst if the strain on them is too high or if they’ve been poorly installed. If you have a burst pipe, shut off the water right away and contact your local plumber for assistance or your local water restoration specialists. When a pipe bursts, it typically means there is a crack in the pipe that has allowed water to escape quickly from inside the pipe. The pressure from the water escaping often results in a loud noise, and depending on where your plumbing is located it may cause serious damage to surrounding areas.
FAULTY APPLIANCES
Your appliances might be operated by electricity or gas, but either way, they use up an enormous amount of water. Appliances that use up lots of water include hot water heaters, dishwashers, washing machines, and toilets. Each appliance has the potential to act as a bottleneck for your plumbing system. If you have faulty appliances, it can result in poor circulation of water through your pipes which can lead to leaks or damage.
STORMS AND BAD WEATHER
If you live in an area that is prone to storms, make sure you are prepared. If you know your home is at risk for storm damage, install guttering and downspouts around the perimeter of your home to protect your roof from heavy rain. You should also consider investing in water-resistant building materials if you are concerned about flooding or heavy rains. Poorly draining areas of your yard should also be fixed to prevent flooding. For example, if water has trouble draining out of your lawn, you might consider installing drainage systems underneath the grass or hiring a landscaper who can install elevation systems that will help water move away from where it may cause damage.
Storms can cause flooding if the volume of rainfall is high enough, or if the drains can’t handle the volume of water coming down from the sky. Even if you aren’t in a flood zone, too much rainfall over a short period can cause problems.
FLOODING
Flooding is perhaps one of the most obvious causes of water damage. Floods typically occur due to heavy rains, broken dams or levees, or tsunamis. If your home is located in a flood zone, it’s important to be aware of this potential cause of water damage and take necessary preventive measures.
On the other hand, you might also experience flooding due to broken pipes inside your home which can be extremely dangerous. If you suspect that there is a burst pipe, shut off the water right away and contact your local plumber or restoration specialists for help.
OVERFLOWS
If you keep filling up a tub and forget you’re doing it, it’s easy to imagine the overflow that may occur. Leaky toilets can also contribute to overflows; sometimes the water fills up the tank of your toilet and finds its way out of small cracks on the base, on top of the toilet, through the flush handle, or the seat. Toilet overflows can quickly lead to extensive water damage, so it’s important to stay on top of this potential cause by paying attention to any signs of moisture or unusual sounds coming from the toilet.
DRIPPING FAUCETS AND LEAKS
Dripping faucets are typically easy to ignore, but they can account for a lot of wasted water over time. Dripping faucets may also indicate that there is an underlying issue with your plumbing system, which could result in more serious problems if not dealt with immediately. Some drips only waste a few drops of water at a time, but others drip more constantly.
Dripping faucets are very common in homes where hot water is used constantly (e.g., in a household with several members who enjoy long showers). The constant flow of hot water wears down the washers in your faucets and causes them to leak. If you notice any leaking, you should fix the problem immediately before it leads to further damage.
To prevent some types of water damage, be sure to regularly check for any signs of moisture or issues with your appliances. Rainstorms, floods, burst pipes, and overflowing toilets can cause serious damage if they go unnoticed for too long. The best thing to do if you suspect a problem is to call a trusted plumber or emergency restoration company.