Did you know that low-quality air can have a negative impact on the overall health of your family and you?
Air filters seem to be an indispensable part of any air conditioning machine. Their main purpose is to make sure that the air you get is clean and safe to breathe. However, by the time they work, they invariably lose their power and need to be replaced. If, however, it does not get its replacement, it may lead to various health and other problems.
To that end, here are some important 6 tips to know when you should replace your air filter and thus keep your family, home, and yourself safe!
DIRTY FILTER
As the air filter constantly filters the air, it, in turn, accumulates dirt and everything that should not go together with your air. However, the filters have their working lives and capacity. In that way, over time, when they accumulate enough dirt, their efficiency falls, and they become less and less effective in filtering the air. Therefore, once enough dirt is accumulated, it is definitely the time you need to replace it with a new one.
To that end, it is useful to pull out the filter at least once a month and check for dirt accumulation. For instance, in certain seasons, filters can accumulate more dirt than in others. Therefore, if you find your filter dirty, replace it. You can find great air filter solutions if you click here and find more useful information on how to properly replace your filter. Getting proper and quality filters will prevent low-quality air from coming into your house.
POOR PERFORMANCE
Unclean air filters can lead to different and multiple imperfections in the work of your machine. Firstly, it will lead to poorer performance of the HVAC in general. This may also lead to a rather noisy functioning. Secondly, during the allergy season, it will be less capable of preventing allergens from coming into your house. It may bring dust and debris into your house. Lastly, it may cause system failure, which may be costly to repair. Obviously, there are a number of harmful effects unclean filters can have both on you and your machine. In that way, make sure that, based on the size and type of your air machine, you change the filter in a timely manner.
THE MACHINE IS HEATING EXCESSIVELY
If you can notice that your air machine is overheating, then the possible answer to that may lie in a dirty air filter. Due to a clogged filter, the machine takes more energy to pump air through it, which, in effect, results in larger electricity consumption and overheating. This can have multiple disadvantages. First, the air you get is not healthy. Second, you may face a larger electricity bill. What is more, the lifetime of your machine may be significantly reduced due to the excessive work and heating on a daily basis. All these facts may cost you much in different ways, and the easiest way to get rid of them is to simply change your air filter regularly.
BLACK SMOKE
If you happen to notice black or brown smoke getting out of the exhaust, you should certainly check your HVAC. One of the reasons may be that the filter is clogged due to the accumulated dust and dirt, so make sure you change it.
BAD SMELL
If you can notice a bad odor coming out of your air conditioning machine, then this is certainly a reason to check it in more detail and probably replace the old air filter as it can often be the cause of it. This way, you will also avoid dust coming into your house. What is more, you will ensure you have cleaner air, and will possibly even prevent fire from coming out of it!
YOU CAN’T RECALL THE LAST TIME CHANGED IT
Filters can sometimes be dirty and clogged for a long time but with no salient symptoms. However, don’t let this fool you, for although there are no visible traces of an overdue filter, the air that goes through it is still not clean and healthy. Therefore, if it ever comes to your mind, and you can’t remember the last time you changed the air filter, know it is the high time you did it.
Lastly, air filters should be changed approximately every two months. However, if you notice any of these bad signs from the list, then you should do it immediately, in order to be on the safe side.
Our air machines do their best to provide us with the best possible air quality. However, we, in turn, have to give our best in doing our part properly and timely. To that end, it is essential that we replace the air filters regularly, and use those filters with a long tradition and high quality!
The key to the lock of healthy life is definitely healthy water. Water is used for literally every segment of our lives; we cook, wash, shower, and bathe with it, and most importantly we drink it to keep us alive and hydrated, and this is why the struggle with clean water is the real struggle. Because of the various factors, it is desirable to test your water once in a while on the solids and presence of any kind of chemical substances that can seriously affect our health. Therefore, having the whole house water filter is a necessity if you want your family to always be given enough clean water. Here are some detailed reasons why a whole house water filter is a worthy investment.
BENEFITS OF WATER FILTRATION AT HOME
BASIC INDICATORS THAT YOUR WATER IS NOT SAFE
You can sense when something is off with your water and it usually has to do with taste and bad odor. Once you pour the tap water into the glass, you will notice the cloudy appearance, color, feel the fishy odor or even chlorine odor, and that is the moment when you should conduct a water check that will prove that something is off with your water. Water filters eliminate chlorine and other chemicals from your water and the odor caused by these chemicals. Substances like fluoride, chlorine, lead, aluminum and other heavy metals are easily removed from water by the use of various water filtration techniques. One of them is reversed osmosis which marks the presence of the membrane that collects all the toxic particles leaving the water crystal clear.
IT WILL PAY ITSELF OFF
Every filtration system is a long-term investment and will eventually pay itself off. It is true that there should be a hefty sum of money invested, but it is also true that almost the same sum of money would be invested into the bottled water purchase. Additionally, this will give a hand in the attempt to reduce the amount of plastic being thrown around and will save most of the devices using water such as dishwashers, washing machines, and the other devices using the water as the source.
PHYSICAL BENEFITS
You are probably asking yourself what kind of physical benefits a water filter provides. Well, this is closely connected to the very quality of water. Once it is completely stripped from the particles affecting the quality and therefore our overall health, our state of being will change for the better. In essence, cleaner water promotes detoxification and makes our body throw out the toxins, improves our digestion, and makes nutrient absorption much better. Besides this, cleaner water will have a positive effect on your skin and hair since it will make them feel softer. It is funny how all of these small things are underestimated yet they make a huge impact on our better lifestyle.
MAINTENANCE
Possessing a whole house water filter will spare you some struggles that other water filters can make. You will not have to worry about changing filters, constant refilling, fixing hoses, and dealing with constant system failures. Once you have the whole house filtration system, you will not ever have to worry about if there is enough water, since some filtration systems have a limited amount of water they can purify in a certain period. It is fascinating how a single water purification system can keep all the water in the house clean long-term by changing the filters every couple of years.
CONS OF THE WHOLE HOUSE WATER SYSTEM
Pricey- normally, these systems cost loads of money and are a serious investment, besides all other utilities you need for a normal everyday functioning. Besides the filtration system, you will also need to pay the setup fee as well. On top of it, if your plumbing system does not apply to the filtration system, then your plumbing setup will need to undergo certain modifications to fit the frame. Therefore, the very expense required for the system installation turns off the possible consumers, however, some people decide to take a risk and even take a loan in order to use the system that will improve the water quality once and forever.
Even though the price of the whole house filtration system is a serious question to be discussed, it should be taken into consideration since it is the system that will give long-term results and that will provide clean water for the entire house without some regular problems with filtration systems. This is a serious investment in your home, but definitely worth one.
Moving to a new home is a great time to declutter and get rid of household items you no longer need. Giving those things to charities that offer donation pick up helps further the life-cycle of your gently used belongings, enabling you to stay organized and give back. Paring down will also be a huge time saver as you pack!
But who takes used furniture for free? Many organizations, including the Salvation Army, Goodwill, and Furniture Bank, offer furniture donation pick up right at your doorstep. They’ll take household goods, furniture, clothes, and other donations, so you don’t have to do the driving and heavy lifting!
GreenDrop is a program serving the east coast, selected by the American Red Cross, Military Order of the Purple Heart, the National Federation of the Blind, and the Society of St. Vincent de Paul of Philadelphia to raise funds through donation pick up as well as other donation services.
In addition to the free donation pickup, GreenDrop offers Home Clean-Out, a free service that helps you sort and donate large volumes of clothing and household items — ideal for pre-move organization. A professional concierge identifies which items can be donated, and helps you prepare for the drivers who will pack and remove your donation.
Currently, this service is only available in the Philadelphia metro area, New Jersey, Delaware, Baltimore metro area, DC, and Northern Virginia.
How your donation helps: After collecting your items, GreenDrop sells your donations to area thrift stores, and the funds go to support the charities listed above. In 2018, proceeds from these sales totaled over $3.1 million.
Items that GreenDrop accepts: GreenDrop accepts a variety of items such as clothing, household goods, electronics, tools, toys, and more. Being a company that takes used furniture for free, they made a detailed list of items they specifically won’t accept, saving donors time and doubts.
The Salvation Army is an international organization that was founded in 1865. They help people with a variety of different needs, including disaster relief, hunger, poverty, addiction, human trafficking, and more. Salvation Army donation pick up is just one way they support their programs.
Online services for scheduling aren’t available for all ZIP Codes for the salvation army donation, but The Salvation Army website provides a local phone number you can use to arrange a furniture donation pick up. There’s also an online form to schedule a pick up for a future date.
Due to recalls or government rules on re-selling, there are certain things The Salvation Army donation center won’t accept, such as particle board furniture, metal desks, TV armoires, and baby items (such as high chairs and car seats). Don’t sweat it, though. You can use an app to sell those things. For a more detailed list of what items are acceptable or are not unacceptable for their furniture pick up, feel free to call them and ask before scheduling a donation pick up.
How your donation helps: When you donate items to The Salvation Army, they sell your items in their Family stores. Salvation army donations contribute their proceeds toward their Adult Rehabilitation Centers, which help those who are struggling with drugs and alcohol to overcome their addictions, build work skills, and restore their families. The Salvation Army assists 25 million people each year they do a lot of good and you can too if you choose The Salvation Army donation centers.
Items that The Salvation Army accepts: They will take your furniture donations (other than those listed above), clothing, appliances, kitchen items, automobiles, and more.
Habitat for Humanity is a nonprofit organization that helps build safe and affordable homes for families who need them. They work in all 50 states across the U.S., as well as 70 countries internationally. In addition, they also act as a furniture pickup and donation center.
Habitat for Humanity offers free donation pick-up once a week for furniture pick up donations. Call the Habitat for Humanity location closest to you to schedule a pickup.
How your donation helps: Furniture donations are sold at their ReStores, Habitat for Humanity’s improvement/furniture resale locations that sell gently used furniture, appliances, and building materials to the public. Proceeds from sales go towards building homes, as well as the repair of homes by the organization. Remeber if the furniture is too big they also offer furniture pick up for donations.
Items that Habitat for Humanity accepts: Habitat for Humanity will accept furniture, appliances, and building materials. They also accept most vehicles, including cars, trucks, motorcycles, recreational vehicles, boats, snowmobiles, farm equipment, construction equipment, and even airplanes.
Goodwill stores work on the local level to provide job training and employment services. They have 157 community organizations across the U.S., Canada, and 12 other countries, as well as 3,300 stores across North America. In 2018, the organization served over 35 million people and helped train more than 242,000 individuals for new careers.
In addition to a clothing donation pick up and drop off, Goodwill also offers to donating furniture and other home pieces. Most of their locations offer donated furniture pick ups for free. Visit the websiteto find out whether or not Goodwill pickup service is available in your community and donate furniture today as a “charity near me”.
How your donation helps: Goodwill sells your furniture donation in Goodwill stores and on Goodwill’s online auction site to raise money for employment training and job placement services for people in your community. Goodwill pickup also offers you a chance to donate bigger items that are hard to transport. They also allow for easy furniture donation center near you.
Items that Goodwill accepts: Goodwill takes furniture donations, clothing donations, accessories, dishes and glassware, collectibles, and electronics. They also accept most cars, trucks, SUVs, boats, RVs, campers, riding lawn mowers, and more (they don’t even have to be in working condition!). If you have a junker car or a rusty mower that you don’t want to transport to the new house, arrange for a free pick up. The next time you find yourself asking “who accepts donations near me?” Goodwill will often have a location in your area.
Pick Up Please is a program of the Vietnam Veterans of America (VVA). Pick Up Please handles scheduling through an easy-to-use online calendar, and your furniture donation can often be picked up within 24 hours — you don’t even have to be home when the truck arrives. Just box up the items and label them “VVA Donation Pick up,” and the driver will load the boxes and leave a tax deduction receipt.
Where to donate with Pick Up Please? Currently, the service is available in California, Colorado, Connecticut, Delaware, Florida, Louisiana, Michigan, New Jersey, New York, Oregon, Pennsylvania, Maryland, and Virginia. You can visit its website to see where to donate.
How your donation helps: VVA sells the items you donate to private companies in order to fund their local, state, and national programs.
Items that Pick Up Please accepts: They will pick up your gently-used household goods, clothing, toys, electronics, and smaller furniture, such as nightstands and office chairs.
Everyone deserves to have basic furniture in good condition. Your furniture donation to the Furniture Bank help battered women and children in retreat, immigrants, the unemployed, the working poor, and the previously homeless set up their home with the furnishings others probably take for granted. Furniture donations are appreciated and furniture pickup is also availble.
The Furniture Bank is available in 34 states. Head to their website to find a location near you, and call to schedule a free furniture donation pick up.
How your donation helps: When you donate furniture to Furniture Banks, they redirect your items directly into the hands of families in need. They offer free furniture donation pickup to help the most amount of people, so donate your furniture today.
Items that Furniture Bank accepts: In addition to furniture, they also accept cars and recreational vehicles in any condition, and they offer free donation pick up and towing.
With over 600 local chapters and over 1,000 national and community programs, the Arc helps those who have intellectual or developmental disabilities. One of their key initiatives is free donation pick ups.
You can see if your local chapter accepts free donation pickups by visiting The Arc’s website. That way you can get a quick answer to your questions on “where to donate furniture near me”.
How your donation helps: The arc sells your donated items in its thrift stores in order to support its programs.
Items that The Arc Accepts: The Arc will take your furniture, clothing donations, shoes, books, toys, kitchen items, electronics, decor, cars, and more.
AMVETS, or American Veterans, supports local veterans and their families by providing assistance, jobs, and other service programs.
To see where to donate in your area, you can visit its website to fill out the donation pick up form. If they offer pick up services, you’ll pack everything into boxes, mark them for AMVETS, and leave them outside of your door by 7:30 a.m. the day of pick up. For larger items such as couches, you’ll want to contact the local chapter to see how they handle these services.
How your donation helps: AMVETS sells your items in thrift stores in order to generate revenue for its Veterans Programs.
Items that AMVETS accepts: AMVETS needs clothing donations (for men, women, and children), electronics, small appliances, kitchenware, lamps, curtains and drapes, books, bicycles, bedding, and more. They also take flat-screen TVs, computers, and exercise equipment if they are less than 5 years old. If you have an item not on this list, they may still be able to take it! Just call and ask.
Packing your home into boxes, remaining tidy, and decluttering take up time and energy. Make giving away the things you don’t need simple by scheduling a free home pick up donation. Here’s how:
STEP 1: FIND YOUR LOCAL DONATION COMPANY THAT DOES FURNITURE DONATION PICKS UP.
Go online or call one of the companies above to locate the nearest branch. Double-check that they’re offering free home pick up donations and ask them about their COVID-19 safety procedures. Furniture pickup looks different in today’s time, make sure to take extra precautions like using proper PPE.
Note: Make sure to sanitize and disinfect any items, boxes, and furniture you plan to donate. This extra step ensures you keep organization workers and donation recipients safe.
STEP 2: MAKE SURE THE ORGANIZATION ACCEPTS THE FURNITURE DONATION OR OTHER ITEM YOU’RE DONATING.
A company that takes used furniture for free may have different requirements for what they do and don’t accept. While the ones we mentioned above a good bet for furniture donations if you choose to donate furniture that may be more used be sure to ask if they will accept or pick up furniture in that condition. A torn, soiled, stained, or otherwise damaged item will not be accepted in most cases. GoGreenDrop has made a donation guideline that is general enough to be used for other companies, although it is recommended to call the company that takes used furniture for free so that they may clarify your items’ qualifications.
STEP 3: ARRANGE AN APPOINTMENT AT A SUITABLE HOUR AND SETTING, ESPECIALLY IF YOU’RE DONATING FURNITURE THROUGH FREE FURNITURE PICK UPS.
After deciding on a company to help your decluttering process, choose an hour and day that suits both of your needs. The day of the week can impact availability, so if you may squeeze in this process during weekdays, your options will expand from there. Most declutter and moving operations occur during the weekend which increases demand and perhaps wait times.
Another circumstance to be wary of is weather. A warm day is great for moving. A cloudy day is even better. Consider avoiding rainy or windy days as these settings may compromise moving safeties and the integrity of the items being donated for furniture pickup.
To make sure your appointment makes it on the organization’s calendar, schedule the pick up at least two weeks before Moving Day. The earlier you schedule, the better!
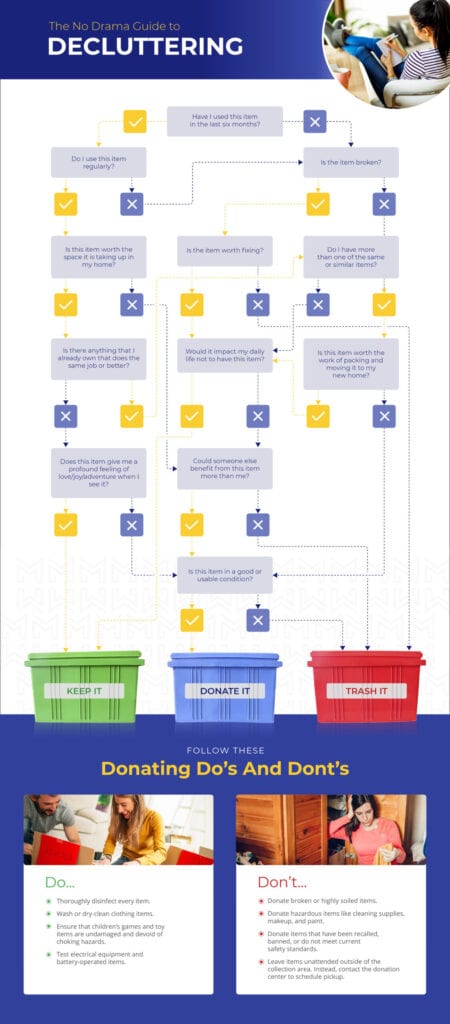
HOW TO DECIDE WHAT YOU SHOULD KEEP, DONATE, OR TRASH:
Do you need help decluttering? Use our donation decision tree to decide if an item is worth bringing to your new home, dropping off at the charities above, or simply throwing away.
Donating items you no longer use is a great way to get organized and make your packing process easier. Different companies have made the process even easier by offering free furniture donation pick up. Apart from making life easier on your end, your contributions to a donation company can empower and assist those that would benefit from your gently used furniture, clothes, and home goods. When you arrange a donation pick up, it removes the hassle of having to move and dispose of your bulkier things. Great companies like Salvation Army donation center, Goodwill furniture donation and Habitat for Humanity pick up furniture for free. Make sure you schedule your free donation pick up with a company that accepts the items you hope to pass on, like the ones previosuly mentioned. And remember: The coronavirus pandemic might impact the times and services these organizations offer, so contact your local charity to learn more.
Disclaimer: Free pickups will be specific to your location, and COVID-19 could affect hours of operation, so calling your local agencies is advised.
MYMOVE is here to help make moving easier. We’re an authorized affiliate of the USPS® that connects more than 5 million movers per year to exclusive savings and valuable resources before, during, and after their move.
Did you know that there is 3 different types of plungers, and there are specific uses for each one? When most people think of a plunger, they commonly think of the “sink plunger” which most of us probably have in our bathrooms.
SINK PLUNGER
This plunger is referred to as the common sink plunger. Most people think of a plunger like this when they hear the word plunger, and think this one is for plunging your toilet but this is not the correct one to use. This plunger should be used on flat surfaces to get the maximum benefits out of it. The cup needs to lay flat directly over the drain and create a vacuum that’s strong enough to dislodge the clog in the sink. When people try to use this on in the bathroom toilet, it might work, but it also isn’t the best way to get it unclogged. A toilet is curved too much for this plunger to create the vacuum that it needs to properly unclog the toilet. This one is to be used for tubs, kitchen sinks, bathroom sinks, laundry tub sinks, or anything that you has a flat surface.
ACCORDION PLUNGER
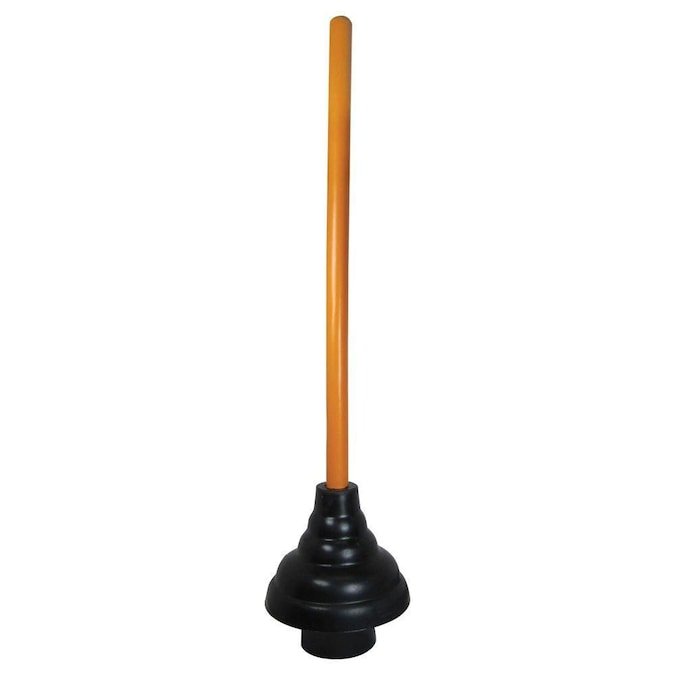
This is the plunger you should be using when you need to unclog your toilet. A lot of people do not know how to use this plunger because it’s a hard plastic that is not easy to control. It is difficult to create the vacuum seal you need over the drain. The plunger can definitely scratch the surface of your toilet, and this is why most people don’t use this one because the rubber sink plunger won’t scratch. You should only use this type of plunger for toilets.
TOILET PLUNGER/ FLANGE PLUNGER
This is called a toilet plunger, but it can be used in just about any type of drain. The cup on it can fit a sink plunger, but the flaps can fit in the curved toilet drain which can create the suction and vacuum that is needed to unclog it. This plunger is very versatile, but it is recommended to not use the same plunger on your toilet and your sinks because of the risk of cross contamination. You can use this plunger for toilets and sinks, but recommended not for both.
The average cost for plumbing services ranges between $350 and $700 for a regular job like repairing sinks, faucets, or toilets, and the average rate for hiring a technician ranges between $80 and $120 per hour depending on the day of the week and the market. Some contractors will also charge you a service fee of $100 or more for just showing up at your place, and your plumbing charges can also escalate if they do the work during an emergency event or weekend.
Plumbing services are among the most costly maintenance or repair services you can pay for. Here are a few tips to help you avoid expensive plumbing repairs in the future.
CARRY OUT REGULAR CHECKUPS WITH A CHECKLIST
Checking your pipes and fixtures regularly helps you detect plumbing problems with greater ease. To carry out these checkups effectively, you need to make a checklist. A regular checklist would include:
● Toilets
● Showers
● Washing machine
● Sump pump
● Water meter
● Sinks
● Tubs
● Shut-off valve
● Water mainline
● Outside
AVOID EXERTING EXTRA WEIGHT ON EXPOSED PIPES
Although you might be tempted, experts recommend you don’t use exposed pipes to hang your laundry. Additional weight from your clothing and the hanger strains the pipe and makes it more susceptible to leaks. So, you must find an appropriate place to hang your clothes to avoid unnecessary leaks and expensive repairs.
GO TRENCHLESS
The advantages of trenchless pipe repair make it easier for those who need to repair their plumbing system. Trenchless pipe repairs cause less damage, provide better overall service quality, and are completed much faster than other repair methods. In the long run, going trenchless will give you a pipe solution that will be long-lasting and you’ll also save more money.
AVOID USING CHEMICAL DRAIN CLEARING PRODUCTS
Clogged drains are among the most prevalent plumbing headaches, and many people clear them using products that contain chemicals, but this is a big mistake. Such products are likely to erode your drain pipes, resulting in even greater damage. Using them repeatedly can eventually cause leaks and expensive repairs. Thus, hire a plumber to snake the drain and clear away the clog. Or, if you are DIY-savvy, you can buy your own snake for about $20 and clean the drain yourself.
PROTECT YOUR PIPES FROM COLD TEMPERATURES
It gets extremely cold in the winter and your home needs sufficient insulation to protect your pipes. Even in a drafty house, it is still possible to protect your pipes by insulating exposed ones.
Choosing to insulate the pipes by yourself may not be the best option because you will only be able to access the pipes that are out in the open. But a plumber will insulate the pipes even in hidden areas of the home, particularly during renovations and remodels when the pipes are exposed. Request your plumber to install heat tape for pipeswhen they open your wall or expose the usually hidden pipes. This will maintain a water temperature of 55 degrees and above when the weather gets extremely cold.
PROTECT YOUR DRAIN FROM HAIR AND FOOD PARTICLES
Strive to ensure that grease, hair, and food don’t go down the drain. These substances often contribute to drain clogging, causing you lots of problems. There are various measures you can take to prevent potentially harmful stuff from going down the drain, including using drain strainers and alternative methods of disposing of waste.
REDUCE THE WATER PRESSURE
We all enjoy high-pressure showers; however, pressure exerts unnecessary stress on your pipes, which can reduce the lifespan of the pipes and increase the possibility of a leak. So, measure your water pressure using a hose bib gauge and ensure the pressure is between 40 and 80 psi. If it is above this range, contact an expert plumber to install a pressure reducer.
WINTERIZE OUTDOOR SPIGOTS
If the temperatures fall extremely low, outdoor spigots are likely to freeze. However, you can protect your spigots from extremely low temperatures by keeping your hoses indoors for the winter. If you have installed an in-ground sprinkler system in your home, call a professional to winterize it because the water that remains in the pipes can freeze and cause the rupturing of the pipes. Collaborate with a professional to empty your sprinkler pipes also to prevent rupturing over the winter.
If you are on a budget and you’d like to have some plumbing work done around your home, save money by finding a reputable plumber with fair rates. Don’t do the work yourself–unless you are trained to–or hire an unqualified person to do it. Working with an expert plumber will save you a huge chunk of money in the long run and help you ward off expensive plumbing mistakes.
Many would find surprise and delight if they only knew how vital staying free of clutter is to a productive workspace. So, here are five crucial organizational tips for a clean and productive workspace. Putting a bit of energy today into reorganizing where you work could pay dividends in your immediate future. So, to organize better, be mindful and consider purchasing an air purifier, limit what goes on your desk’s surface, reorganize over time, place your seat in a way that makes you comfortable, and ensure you must turn around to find a distraction.
CREATING A MINDFUL WORKSPACE
Our environment affects our mood and our productivity. Therefore it’s important to create and maintain a clean, organized, and mindful workspace. When our space is cluttered our mind is cluttered and usually vice versa. Some of the ways you can create a mindful workspace include tidying up and getting rid of dust, dirt, and germs. Getting a portable office air purifier is a great way to combat this as it can effectively reduce allergies, viruses, and bacteria. This tool can bring fresh clean air to your workspace. You can also add plants, candles, and essential oils to create a more mindful space.
TIPS FOR KEEPING YOUR SPACE FREE OF CLUTTER
Limiting what goes on the surface of your desk goes a long way with keeping clutter to a minimum, freeing you to be your most productive self. Papers will often get out of control, but you can limit how many of them stay on your desk’s surface. That will ensure that you know just what is on your desk. Also, consider cleaning your computer’s desktop. That is another way you can clean to decrease clutter and increase productivity. You might decide to keep only today’s tasks on your desk, making your workspace flow well and freeing you to concentrate on the task at hand.
It can be overwhelming to clean your workspace because it might be rather messy. So, know there is a better way. Take it one day at a time and clean a portion of your workspace at a time. One day, you might clean your desk, and another rearrange the furniture. If you are consistent enough with the cleaning, you will soon have an office free of clutter, letting you become a more productive worker bee. So, stay the course because, like at the company where you work, a reorganization does not need to disrupt your workflow completely.
ORGANIZATION TIPS FOR INCREASING PRODUCTIVITY
When attempting to increase your productivity through better organization, ensure that you are comfortable when sitting. You will sit longer and work harder if you feel you belong where you are sitting. Nobody wants to feel out of place. Suppose you prefer to sit at the corner of the room wherever you go because it makes you feel safe to get lost in whatever you are doing. In that case, it would be incredibly unwise to put your desk somewhere where your back was to other people.
Another thing that will help dramatically increase your work productivity is making sure you must turn around to use a distraction. For example, avoid letting yourself see your phone unless you turn around to pick it up. That way, you will reduce the temptation to get sidetracked and ensure that you only leave your workspace when something is genuinely vital. So, you can try to lengthen the time you spend working straight before you take a small mental break in this way. You will find your work productivity soaring if you do.
FOSTERING PRODUCTIVITY BY CLEANING CLUTTER
Creating an organized, germ-free workspace is possible with a bit of effort. Still, thinking smarter and not harder about keeping your workspace clean and organized is part of the solution. So, to create a productive workspace free of clutter, be mindful and consider buying an air purifier, limit what stays on your desk, clean a bit at a time, practice mindfulness about where you are sitting, and minimize distractions. Clutter and a lack of productivity often go hand-in-hand. So, here is to you, making your office as clutter-free as possible.
Homeowners often ask themselves, “When is the right time to paint?” They might want to freshen up their walls, or completely re-imagine their living space, but no matter the reason, the decision to paint your home, it’s not one taken lightly.
Sure, there are ways you can speed up the process, but at the end of the day, painting a room can use up a fair share of time and resources.
Sometimes, that decision is made for you. Especially when you’ve suffered smoke damage to your home. When there’s been a fire in your house, apartment or condo, it’s a traumatic experience. And no matter the size of the fire, you’re bound to be left with some smoke damage to your walls that you’ll want to address immediately.
The good news? It’s actually fairly easy to clean and paint over smoke damaged walls. Just follow these easy steps, and you can get your home looking spotless again in no time.
STEP 1: ASSESS YOUR DAMAGE
Before you get to work, look at the damage you’re dealing with. If you’re lucky, the smoke damage is only superficial. There may be soot from fire or ash on the walls, but no structural damage to the walls themselves.
In that case, the amount of work you’ll put into painting over smoke damage should be pretty straightforward, and you can jump to the third step.
However, if there is more significant damage, you’ll want to address that before you get to work painting over smoke damage.
STEP 2: REPAIR ANY SMOKE DAMAGE
If you’ve found damage to your wall, you might need to bring in a professional to put up a new wall, or repair more extensive damage. But if there is damage just to the drywall, you could take it upon yourself to fix that damage yourself.
For small to medium sized holes in the wall, you can fill the hole with plaster, wait for it to dry, and then sand it down. Once you’ve patched your holes and repaired the damage of your wall, it’s time to prep the area to clean and paint over smoke damage.
STEP 3: DRY-CLEAN YOUR SMOKE-DAMAGED WALL
Now you’re ready to start the process of cleaning your smoke damaged walls. That’s where dry cleaning sponges come in. Made of vulcanized rubber, these dry cleaning sponges are great for cleaning soot off of walls.
For this step, you’ll need the following materials.
Gloves to protect your hands as well as walls, since natural oils in your skin can blot on the wall, complicating your efforts to clean your smoke damaged walls.
Plastic Sheeting to place around the smoke damaged walls. Debris and ash might fall during the cleaning process, and you’ll want to avoid any ash or soot staining your floors as you clean your walls.
Eye Protection such as googles will be good to make sure no soot from the fire or ash gets in your eyes.
Dry Cleaning Sponges are, of course, essential. The good news is that if you have extra dry cleaning sponges, you can still use these in the future. They’re effective at cleaning up more than just soot from fire, they also can blot out nicotine stains or candle soot on walls.
The actual cleaning process to get the damage of smoke off your walls is relatively straightforward. Starting from the top of your smoke damaged walls, and working your way down, use your dry cleaning sponge with straight, overlapping strokes. Do not scrub, as that can drive soot into your walls and make it harder to get soot off your walls in the long term.
After each stroke of the sponge, check it for debris and coloration. If it becomes clogged, or blackens noticeably, take a razor-blade or safety knife to cut off just the surface area of the sponge.
You shouldn’t try to clean or wash these sponges, since their absorbent nature will be negated by soaking it with water or soap, but by cutting away used layers, you can get a lot of use out of each sponge, and hopefully will be able to absorb most of the soot and ash from your fire damaged walls and ceilings.
After going through the entire affected area and cleaning soot off your walls, you’re not done yet. There’s another step for cleaning smoke off walls before you can paint over the smoke damage.
STEP 4: WET-CLEAN YOUR SMOKE-DAMAGED WALLS
Now that you’ve started to clean smoke from your walls, removing much of the soot and ash from your fire damage, it’s time for a more intense clean using a deep-cleaning product. You can use a grease-cutting agent, or a deep cleaner. The important thing is to avoid using standard, run-of-the-mill cleaning products for this step.
Your goal here should be to remove as much soot and ash as possible. This is the last step for how to clean smoke off walls, and ensures that no lasting smoke damage causes problems down the line once you’ve begun painting.
Using your heavy-duty cleaning product, take a rag, or regular cleaning sponge, and apply it to the walls like you used the dry sponge—starting from the top and working your way to the bottom. You’ll likely want gloves for this step as well, as the cleaning agent may be caustic to your skin.
When you thoroughly clean the area, you should be ready to begin the process of smoke painting, or painting over your smoke damage to make your walls and ceilings look like new.
STEP 5: PRIMING YOUR SOOT AND SMOKE-DAMAGED WALL
Now it’s time for the show to begin—priming your smoke damaged walls, so you can effectively paint over them. If you’re wondering about any lingering odor, and are considering an odor blocking paint, the primer is where you can begin to help make sure that the smoke damage does not bleed through and require future paint jobs in the future.
If you’re dealing with strong odors, such as those you find from nicotine stains, make sure that the primer you choose is a pigmented shellac primer, since that will be more effective than standard oil-based primers.
As for applying that primer, we have numerous guides on how to paint your walls quickly and efficiently. There’s no real difference between applying primer and applying your actual layer of paint, just make sure to choose the correct primer, and apply your primer consistently and liberally.
STEP 6: PAINT OVER THE SMOKE DAMAGE
You’ve repaired damage, cleaned the area, and primed it for painting. Now is the time to paint! You can go with the same color you had before, or you can take this as an opportunity to completely reinvent your room with a brand new color.
When you paint over smoke stains on walls, if you’ve done the previous steps to clean and prime the area, painting the wall on its own isn’t any different from painting a wall without smoke damage. Once you’ve prepared your walls for painting, take an interior latex paint and apply two coats, until everything looks like new!
FINAL STEP: ENJOY YOUR NEWLY PAINTED HOME
And that’s how to clean clean smoke off walls, using paint and primer. Of course, cleaning and painting over smoke damage does more than just spruce up your walls. A fresh coat of paint can increase your home’s value, or completely change the feel of a room. And hopefully, with this guide at your disposal, you can paint over smoke damage and renew your home without breaking a sweat!
Your home is one of the most essential things in your life. It keeps you and your family safe, holds all your belongings and becomes your most valuable asset over time. As such, you want to take care of your house so it continues to serve you well. These signs will let you know if it’s time for a little TLC.
1. YOU HAVEN’T CLEANED IN A WHILE
Life gets busy, and sometimes, it’s hard to keep up with the cleaning. Your house may fall into disrepair after gathering so much dirt and dust — leaving room for pests and other detrimental things to sneak in and feel right at home. The best plan is to attack one room each day with cleaning supplies. If you don’t have the time to clean, consider hiring a maid service that can take care of the hard work for you. Then, you’ll appreciate your clean home and won’t have to worry about anything lurking around in the dark and dusty corners.
2. YOU HAVE HIGH ENERGY BILLS
The average American’s monthly energy bill is nearly $120. Some people may see this price as a symptom of living in the wrong place, but you can reduce that cost by giving your home a little TLC. Switch to more energy-efficient options, like lightbulbs and appliances, to reduce your consumption. This can also reduce your carbon footprint and positively affect the environment. Upgrading these parts of your home can lower your electric bill.
3. YOUR NEEDS HAVE CHANGED
Starter homes don’t fit their owners forever, and that’s OK. You may find that your current house doesn’t suit your needs as your family grows. Many people sell at this point, but that doesn’t mean you have to. If you’re attached to your home, it might be time to look at renovations.
Most homeowners choose to remodel the kitchen first, but if you’re running out of space, you may consider converting one area into another, like an office space into a bedroom. If you love your home, rearranging your space to allow new rooms, furniture and features could help meet all your needs.
4. YOUR HOUSE HAS APPRECIATED
You may not be able to tell whether your house has appreciated without getting it appraised, but you can examine the area to know whether it’s earning value over time. Homes in a growing neighborhood with an excellent school districtwill likely see higher price tags. Selling your home while the market is hot means you’ll get the most bang for your buck.
Even if you choose not to move out of your home, its appreciation should make you care about it a little more. It could be valuable one day, and the idea of eventually selling it should motivate you to keep it up and take care of it. That way, it will fetch a finer price than you could have imagined. Besides, living in a valuable home may make you choose nicer belongings and care for your current ones.
5. YOU STRUGGLE WITH YOUR FURNITURE
How long has it been since you upgraded your furniture? It can wear down over time and be detrimental to those who use it. Consider replacing your living room suite when your couch starts to creak, as that can indicate it may fall apart soon. Similarly, mattresses need to be upgraded if you’ve used them for too many years — neglecting them is detrimental to your sleep, which can impact your physical and mental health.
6. YOU CAN’T HANDLE THE UPGRADES
Sometimes, it feels like everything falls apart at once. You can expect your appliances to start failing at the same time if they’re the same age. Planning might reduce this money burden, but saving isn’t always an option for some families. Replacements can get costly fast. You may have to prioritize one upgrade over another until you have the funds to deal with all of them.
Similarly, you may want to renovate parts of your home but cannot afford it. In many cases, a family might outgrow a house and need to remodel it. Most people spend over $10,000 on home remodels, which can be a hefty chunk of cash and potentially hurt a wallet if not saved up. If you can’t handle the costs of upgrading your house, you may look to fix it up just enough to get it ready to sell — and then find a home that suits all your needs.
7. YOU CHOOSE TO LIVE WITH BROKENNESS
How many things in your house are broken that you simply live with? You may have found a way to work around uncomfortable situations or accept things as damaged, but doing this is no way to live.
Start by making a list of all the broken things in your home. Then, prioritize these items by how difficult it is not to have them functional. Do you need your fireplace in the winter, or is having a working sink more important to you? Once you have your list, start working on it and give your home the love and care it deserves.
LOVING THE HOME YOU LIVE IN
Moving is inevitable sometimes. Still, if you live in your dream home, you shouldn’t feel like you have to leave it just to make it suit your needs. Upgrades, fixes, and a lot of love and care can make your house the perfect fit.
Even if you’re a pro at various DIY projects, sometimes it’s best to hire an experienced contractor for larger or more complex home renovations.
Since the beginning of the pandemic, when more people started staying at home, Google trends indicated an 8% increase in searches for general contractors in one year. However, choosing the right one for your remodeling project is essential and requires you to dig deep into their qualifications and expertise.
Thankfully, finding a good contractor is not impossible. Here are six things you should look for when hiring someone to work on your home.
1. LICENSE
Always begin your search for a contractor by making sure whoever you find is licensed. Each state has its own licensing board and requirements that general contractors must meet. Visit your state’s Department of Labor website to find a directory of contractors in your area.
Keep in mind that hiring a licensed contractor is essential if you intend to sell your home in the future. Otherwise, your renovation project can decrease the value of your home and will likely be excluded from the transaction.
Homeowners may also need to pay to redo the work by a licensed professional or potentially end up with other legal liabilities, even if they were unaware that the contractor they initially hired wasn’t licensed.
It’s important to know upfront that your contractor has met industry and state standards to work.
2. CERTIFICATE OF INSURANCE
Whoever you decide to hire as a contractor should maintain general liability and workers’ compensation insurance. Always be sure to ask right away to see their certificate of insurance to verify the policy is still in effect.
General liability insurance ensures your contractor is covered for injuries that may happen on your property and any unnecessary damage they may cause to your home. However, it does not cover injury to their employees or subcontractors.
If your contractor hires additional people to work on your renovation, workers’ compensation insurance is a must to protect others from accident expenses and industry-related fatalities. Most states require general contractors to carry workers’ comp even if they only employ one person.
Sole proprietor contractors may choose to opt-out of holding workers’ compensation for themselves to drive down their premiums.
3. EXPERIENCE
You will want to look for a contractor with ample experience in the project you need completed.
Search for contractors specializing in painting if you’re looking for a color makeover. Hire a roofing expert for repairs or replacements. Other specializations may include kitchen or bathroom remodels, plumbing, electrical, flooring or new construction.
You should ask the following question when interviewing a general contractor:
● How long have you been in business?
● What sort of experience do you have with this kind of job?
● Do you have before-and-after photos of work you’ve done?
● What’s your vetting process to ensure subcontractors are qualified?
● How long have you worked with your subcontractors?
● What steps will you take to protect my property?
Communicating your project needs and inquiring about their skills and backgrounds will give you better insight into who will be working for you. You’ll have a good idea of their professionalism and ability to do a great job.
4. COST OF SERVICE
You should be getting multiple estimates and bids as you search for a contractor. Find out the estimated cost of your project — materials, labor and contingency fund — as well as payment options, payment schedules and your right to cancel.
Do they accept credit cards or checks? Do they require a down payment before starting the project?
Some red flags to be aware of when it comes to costs of services include:
● Never pay for a project in cash. Many times, this may mean it’s a scam. You can also then use your cashed checks as a receipt.
● Always make checks payable to a company rather than an individual.
● Never pay more than one-third of the project costs as a down payment.
5. TURNAROUND TIME
Nobody wants to wait around forever for a home project to be completed, especially if it’s large enough to displace you or gets in the way of everyday life.
Ask your contractor how long they expect a project to take from start to finish. Remember that delays sometimes occur, such as poor weather conditions or supply chain issues in obtaining the materials.
Regardless of the turnaround time outlined in your contract, be prepared to adjust your timeline and have a little bit of flexibility when unforeseen circumstances arise.
Ask friends, family and neighbors who worked on their houses and how they liked the finished product. It would help if you also looked the contractor up on Google, Yelp or another site where customers can leave reviews.
Research the company’s profile on the Better Business Bureau (BBB) to read through any complaints and search for keywords that indicate a scam. You may even ask the contractor if they have a list of local references you can contact.
These tools can be beneficial as you decide who to hire.
BE CONFIDENT IN YOUR HIRING DECISION
Searching for a good contractor may seem like a project on its own, but the more you know about them, the more trust you’ll have in the work they can do. Following these six steps should help you make the right choice.
Are you trying to find the perfect lighting for your home? There are many factors to consider when choosing the right lighting solution for your home or office. The type of light, the color of the light, and even how the light is positioned can all affect how you feel and how well you’re able to see. This article will discuss six different types of lighting solutions and how to choose the right one for your needs. Let’s get started.
LED LIGHTING
LED lighting is a great option for both home and office use. LED lights are energy-efficient, long-lasting, and come in various colors and sizes. They can be used as task lighting or ambient lighting and are perfect for areas where you need a bright light or want to save on energy costs. You can learn more here about the different types of shoebox LED lighting and how to choose the right one for your needs. If possible, get the right bulb that is made for the fixture.
When choosing LED lighting, you have to consider factors such as the brightness of the light, color, size and type of fitting, and the bulb’s lifespan. Also, you will need to create a considerable budget since some of the LED lights can be quite expensive. Ensure also to buy the same from reputable sellers to ensure you’re getting a quality product.
HALOGEN LIGHTING
Halogen lighting is incandescent lighting that uses a tungsten filament in a gas-filled bulb. It produces a bright, white light and is popular in track lights, recessed cans, and pendants. Halogen bulbs are available in various shapes and sizes, but they are more expensive than other types of lighting.
When choosing halogen bulbs, you should consider the wattage, lumens, and beam angle. You will also need to make sure that the fixtures can handle the heat from the bulb. Halogen lights produce a lot of heat, so be sure to factor that into your decision when choosing a fixture.
FLUORESCENT LIGHTING
There are many different types of fluorescent lighting. The most common type is the T12, which has been around for a long time. However, it is being phased out because it is not as efficient as other options. The newer option is T16, which is more energy-efficient and offers better light quality. There are also compact fluorescent light (CFL) bulbs, smaller than traditional fluorescents and can be used in various fixtures.
When choosing fluorescent lighting, you need to consider the brightness of the light, the color temperature, and how long it will last. It would be best to make sure that the fluorescent bulbs are compatible with your ballast. This means that you have to check on the wattage of the bulbs and the voltage of your ballast.
INCANDESCENT LIGHTING
Incandescent lighting is one of the oldest types of lighting, and it is still popular today. It uses a tungsten filament that is heated until it glows. This light is very warm and provides a soft, natural light. It is available in various shapes and sizes, but it is the least energy-efficient option.
When choosing incandescent lighting, you need to consider the wattage, lumens, and color temperature. You will also need to make sure that the fixtures can handle the heat from the bulb. Incandescent lights produce a lot of heat, so be sure to factor that into your decision when choosing a fixture.
HID LIGHTING
High-intensity discharge (HID) lighting is a gas-discharge lamp that uses an arc light to produce a bright, white light. It is popular in streetlights, parking lots, and industrial applications. HID lighting is available in various shapes and sizes, but it is the most expensive option.
Like other bulbs, you have to make the right choice for what type of HID you want. Metal halide (MH) is the most popular choice for general lighting, while high-pressure sodium (HPS) is often used for streetlights and security lights. When choosing an HID bulb, you need to consider the wattage, lumens, and color temperature.
SMART BULBS
One of the most popular types of smart lights are LED bulbs. They’re energy-efficient, long-lasting, and controllable with a smartphone or tablet. You can usually dim them, change their colors, and even set schedules. Some brands allow you to control your bulbs remotely so that you can turn them on or off when you’re not home.
One downside to these smart bulbs is that they can be a bit pricey, but the long-term savings make them worth it in the end. Consider a smart LED light strip if you’re looking for an affordable option.
There are many different types of lighting available on the market today. When choosing a type of lighting, you need to consider the brightness of the light, the color temperature, how long it will last, and the cost. You can choose any option from the above list, depending on your needs and budget.


