TIPS ON HOW TO ENTERTAIN GUESTS OUTDOORS THIS WINTER 

Entertaining outdoors is quite challenging, especially in winter. It’s cold and freezing outside, which is why some homeowners would rather stay inside instead of inviting guests for a get-together. 

It’s not a lost cause, though. There are exciting and creative ways you can entertain outdoors, even if the winter season is in full swing. Your residential patio misting system will now be replaced with a heater, but you can still party and have fun. 

Prepare your patio and backyard, get those party plates ready, and check out these cool tips for entertaining outdoors in the cold wintertime.


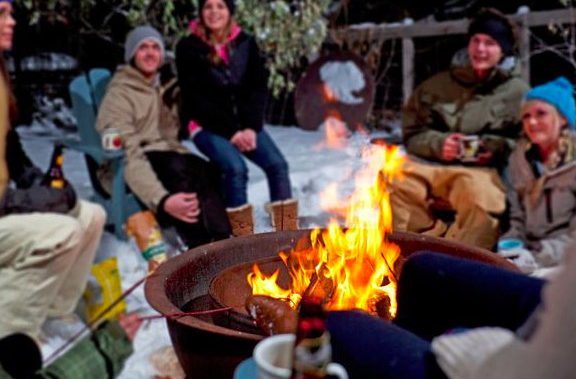
USE OR BUILD A FIREPLACE OR FIRE PIT


A little bit of rearranging and redecorating will be good. So, move things around and find space for an outdoor fireplace or a fire pit. Adding some warmth to your party venue will make it cozy and comfortable. Your guests won’t mind the cold winter air or the snow if they’re all snug and relaxed. 

Use the fireplace as the focal point of your venue. Spice it up by adding some decorations. If you can, find a permanent one so you can use it whenever you need to. If your budget does not permit you to do so, you can always go for portable fireplaces that come with DIY kits. 

If you want a more practical option, buy a portable or DIY fire pit from your favorite home improvement center.

Creating a tabletop fire is your third and most affordable option. Use fire pots and torches and arrange them in such a way that they’ll illuminate the place. They can be your centerpiece, or you can line them up on the edges of the patio.

If you’re entertaining in the backyard, an open space, building a small bonfire is a great idea.

Lastly, adding a patio heater is a good investment, especially if you plan to have more outdoor get-togethers in winter. 


LEVEL UP ON YOUR OUTDOOR FURNITURE 

Change your regular cushions, throw pillows, and living room furniture isn’t suited for the cold winter outdoors. It would be best if you leveled up your outdoor furniture. Metal, wood, or plastic chairs should have thick cushions. 

If you have an outdoor sofa, look for big cushions that you can place on top of it. Find as many as you can and cover your couch with these cozy pillows. 

Also, take out your thick blankets and comforters and arrange them around your furniture. Your guests will appreciate it if you prepare one for each of them.

Be sure you have enough tables so your guests won’t have to hold their drinks the whole time.


COVER YOUR PATIO FLOOR WITH RUGS 

Even if you have a fireplace or fire pit, your patio floor will still be cold. Sometimes, the floor will be a little moist and damp, too. So, find thick rugs and use them to cover your patio floor. Better yet, if you have an extra carpet, place it on the floor. Add some fluffy floor cushions to make the area cozier and more comfortable. 

Likewise, you can add curtains to cover your patio and generate a little heat. It can be a regular outdoor curtain, or you can use bamboo roll-up shades. Be careful and make sure that your curtain is far from your fireplace, fire pit, or tabletop fire.


SERVE WARM DRINKS 

Instead of the usual ice-cold drinks, serve warm drinks. There are many options to choose from – hot chocolate or hot cocoa, hot white chocolate milk, hot vanilla cinnamon milk, eggnog, and warm or spiced cider. Don’t forget the marshmallows! 

Brewed coffee is also a good choice, especially if you add some Irish cream or peppermint syrup. Alcoholic drinks like beer and wine are perfect for those who want a little kick. 

To add some fun, try putting up a minibar, one that specializes in warm drinks. Experiment on some drinks for a memorable winter adventure; add some honey or mint on your tea, or sprinkle a little cinnamon on your friend’s coffee.


PREPARE WARM-UP FOOD 

Warm-up food is food that makes you feel all warm and satisfied. Examples for this are soup (any kind), chili (paired with warm toasted bread slices), and beef or lamb stew. 

If you have enough space, prepare an area for roasting marshmallows and hotdogs. The kids will love this!


DON’T FORGET TO REMIND GUESTS TO DRESS APPROPRIATELY

The appropriate outfit for a winter outdoor get-together includes a pair of gloves, beanies, boots, scarves, and winter clothes. When you send out the invites, specify that it is an outdoor event so your guests will know how to dress for it. 

Make dressing up more fun for everyone by coming up with a theme or a wardrobe requirement, such as a winter hat, an ugly Christmas sweater, or colorful scarves.


PREPARE GAMES AND ENTERTAINMENT

 If your guests have exciting things to do, they won’t feel the freezing winter air. So, be sure to prepare games and some unique entertainment. It doesn’t have to be traditional party games like relays. Go with games everyone is familiar with, like Monopoly or Pictionary, for example. 

For entertainment, bring out the guitar and sing some songs with your guests. Setting up an outdoor cinema is also a cool idea.

Follow these tips and have a fun and memorable outdoor winter entertainment get-together with family and friends!

Guest Contributor: Anna Fox

TOP TIPS TO CONSIDER BEFORE DIVING INTO A SWIMMING POOL PROJECT

Swimming pools make great additions to a property, especially when you or your loved ones love frolicking in the water. 

However, you have to first be aware of certain factors before you dive deep (pun intended) into your pool project.  

From deciding on what kind or design of the pool that you want to secure the services of expert swimming pool builders, read on and discover helpful tips to get you chilling and swimming in no time.

DIVING IN

If you want to have your own aquatic haven right in your own home, then you can’t just dip your toes in, so to speak. You have to make sure you have fully immersed yourself in the whole scenario of owning one.  

Sure, it’s thrilling to have your own pool where you can lounge and splash around anytime you feel like it. However, pool ownership also entails responsibility. So when you are toying with the idea of having a swimming pool, it is best to do some careful thinking and thorough planning.  

You have to look at it from different angles and see if you can really commit to this home improvement project. Adding a pool to your home can make or break the value of your property, too. 

Before you go and take the plunge, it would be prudent if you at least have a basic idea of the things involved. You don’t just need to decide on the type or design, you also have to consider things like plumbing, landscaping, ensuring that your contractor uses waterproof paint on applicable surfaces, and other building, cleaning, maintenance, and upgrading factors. 

It would also be wise if you can secure the services of a master swimming pool builder. Look for one that has years of experience in constructing pools as well as creating a beautifully landscaped area around it. 

To help you tread carefully into your swimming pool project, we have put together some salient tips that will help you decide and properly build a spectacular swimming pool:

1. KNOW WHAT YOU WANT 

Do you want a hot tub, a lap pool, or a full-on spa? What is the size and shape that you have in mind? Is it an indoor or outdoor pool? 

There are plenty of designs and types of swimming pools to choose from. In fact, it is easy for you to get overwhelmed by the sheer number of designs and materials out there. There are concrete, fiberglass, or vinyl pools. There are above-ground pools and in-ground pools. You can even opt for resort-style infinity pools. 

To help you decide on what you want, you have to first identify the purpose.  

Why do you want a swimming pool? Are you the type who wants swimming as a part of your exercise regimen?  

Then perhaps a lap pool will do. If you have small kids who are not yet fully trained to swim, then maybe you can include a wading pool in your design.  

If being around water relaxes you and helps you stay calm, then a pool with a hot tub can help massage away the worries of the day.

2. SET A BUDGET 

A swimming pool is an investment that you have to decide on carefully. A properly designed pool can add value to your property whereas a one that has been haphazardly and poorly made can do the opposite.  

You should also consider how long you are going to stay in that property. Are you going to stay in that house for good or do you have plans of selling it in the future? 

Aside from the initial investment that you will be shelling out for the pool, you also have to take account of the maintenance costs. Depending on what kind of swimming pool you like, you have to be ready to finance it.  

You don’t want to scrimp on a swimming pool because, for one, you don’t want to risk your safety. Secondly, should you decide to sell your property, you want the swimming pool to contribute to upping the ante in terms of value.

3. DISCUSS, AGREE, FINALIZE 

If you live alone, then you’ll have to decide on the design of your swimming pool on your own. However, if you are living with a partner, or your family, then you need to consider their thoughts and feelings about the pool project, too

For example, including your family in the design or decision process may help in having a pool that will be enjoyed by everyone in the house. If the money that will be used for building the pool will come from a joint account, then it would only be respectful to also discuss it with the other party. 

You also need to consider the specific needs of other family members who will use the pool. For example, the elderly might use it for therapeutic purposes, or you may have young kids who’ll need a shallow pool they can use safely with adult supervision. These considerations will affect both the design and cost of building the pool.


4. BE AWARE OF LEGALITIES 

Before you build a pool, make sure that you are aware of the zoning laws and other community or housing rules that apply. Ensure that you are not breaking any regulations before you set out creating your swimming haven. 

There are cities or housing communities that are very strict when it comes to liability and maintenance rules.

5. THINK ABOUT TECHNICAL STUFF 

It is also very important to know about the technical factors that will affect how you will enjoy your pool. This includes considerations as to your current plumbing and water lines. You might also consider adding other features such as a cascading waterfall, dynamic jets, or underwater lighting. Add-ons such as water and lighting features must be thought of beforehand to avoid messy, time-consuming, and costly renovations. 

It is also crucial that you choose the correct water circulation system to ensure that your pool water remains clean and fresh. A reputable swimming pool contractor will be able to recommend the best one based on your requirements.

6. REMEMBER THE LANDSCAPING

Part of a glorious swimming pool experience is the environment. Having a setting that is both pleasing to the eyes and soothing for the soul can greatly enhance your pool encounters. 

Don’t forget to include the landscape design in your pool project. Whether you’re after creating a coastal, modern, or rustic vibe, the landscaping will surely create an ambiance that will round out your swimming pool fantasies.

7. CHOOSE THE BEST CONTRACTOR


When you want a pool that satisfies all your personal requirements, then it is important to seek the services of an established contractor. The experience and expertise of swimming pool specialists will ensure that you have a proper pool that is safe and fun to use. 

It will also be advantageous if you choose a swimming pool contractor that can also offer maintenance services for your swimming pool and garden landscaping. This way, you’ll only be dealing with one company.

TIME TO MAKE A SPLASH

Make sure you consider the above tips before you decide to start your pool building project. Thoughtfully plan out the steps, weigh the pros and cons, and go for a reliable pool contractor. 

By following these tips, you can dive into your pool project with confidence.


AUTHOR BIO

Rachel Hennessey manages the Pools and Landscaping Division of Hennessey LLC. She also works on Tender and Pre-Qualification and brings in new business to the company’s Construction, Interiors, and Civils Division.

Guest Contributor: Rachel Hennessy

THINGS TO CONSIDER WHILE PURCHASING A NOTCHED TROWEL

THINGS TO CONSIDER WHILE PURCHASING A NOTCHED TROWEL

There are many types of trowels available in the market and people have to think about many things before purchasing a trowel. One of these trowels is notched trowels. Some of these things, which people have to consider have been described in this article. It is the best one that you can get for spreading adhesive and setting up any type of construction.

USAGE OF THE NOTCHED TROWEL:

The main task of the notched trowels is to skim, mix, scoop, and spread the stucco on the surface. Besides this, trowels are also used for the installation of

membranes, backer boards, glass, and many more. A proper-notched trowel has to be purchased for the application of stucco on the surfaces. This is the reason why tile and flooring installers use the notched trowels for different sorts of applications.

TYPE OF TROWELS

People need to think about the type of trowels, which they have to use in their house. Trowels are of many types and one of them is notched trowels. Besides this, margin trowel, flat trowel, bucket trowel, trowels having round or pointed corners, etc.

Measurement of the trowels

Notched Trowels are available in different shapes and sizes. They can be small, medium, or large, as they have to be used on wide areas as well as narrow corners. The corners of the trowels are also either round or pointed.

Size of the trowel for tile installation

The size of the notched trowel should be equal or almost equal to the size of the tiles, which are to be installed. Along with size, thickness and surface type should also be considered. The size has to be considered so that the tiles can be properly installed and they properly cover the surface on which they are being installed. There are many trowel manufacturers in India and you can get the best varieties from the online portals also.  

Proper use of the trowel

The trowel and the mortar should have a good chemical bond so that applying the mortar on the surface does not become a problem. The mortar should be applied in a straight line and if needed more mortar can be added.

The mortar will also be distributed evenly if it is applied in one direction only.

Buttering of the surface may also be needed but it depends on the surface or the walls on which the tiles are to be installed.

THE NUMBER OF TROWELS THAT YOU CAN CHOOSE:

The number of notched trowels that people have to use depends on the number of tiles and their sizes. It also depends on the preparation for the installation of the tiles.

Cleaning of the trowel

Cleaning the trowel is very easy has it can be with hose sprayer. A clean sponge and hot water can also be used after using the trowel. When mortar or adhesive has the property to become hard on the notched trowels. In such a case, an electric grinder is a good option to clean it. There is the carbon steel material that can work a long way in ensuring you get the best application techniques.

Replacement of the trowel

There are situations when the notched trowels have to be replaced and such a situation occurs when the corners become bent and worn out. If the tools are not cleaned properly, their life will be shortened. There will also be an improved adhesion possible if you have the right tools with you. The polished metallic finishes can go a long way in ensuring that you buy a better variety of items.

Wrapping Up

These are some of the things that people have to think before purchasing notched trowels. Shape and size must be checked and trowels should also be cleaned properly so that their life can be increased.

Guest Contributor: Emma Smith

THE BEST CORDLESS ELECTRIC CHAINSAWS

The Best Cordless Electric Chainsaws

A chainsaw that is battery powered has lots of positive features, such as being fast cutting, quiet, and lightweight. This makes them perfect for a variety of different jobs and goes some way in explaining why they have become so popular over recent years. With their popularity, there has been a rise in the number of conventional chainsaw manufacturers, such as Stihl and Milwaukee, turning their hand to producing battery power chainsaws. So with so much choice currently on the market, it can be difficult to know which model is the best one.

In this review of the best cordless electric chainsaws we will let you know which model that we like the best, as well as listing some of our other favorites. These include the CRAFTSMAN V60 Cordless Chainsaw, the Stihl MSA 200 C – B Chainsaw, the Snapper XD 82V MAX Cordless Electric 18-Inch Chainsaw, the DEWALT FLEXVOLT 60V MAX Chainsaw, the Makita XCU07PT 18V X2 (36V) LXT Lithium-Ion Brushless Cordless (5.0Ah) 14″ Chain Saw, and the EGO Power+ CS1604 16-Inch 56-Volt Lithium-ion Cordless Chainsaw.

However, the best cordless chainsaw that is currently available on the market is the Milwaukee Electric Tools 2727-21HD Chainsaw. What we particularly like about this model is that it is made by a well known chainsaw manufacturer that produces high quality power tools. For anyone that is interested in efficient and effective cordless power tools such as this one, then take a look at the following article – click here for best cordless jigsaw. What is great about this chainsaw is that although it is cordless, it still comes with all of the power of a corded model. 

Because it is so powerful, it can be used for more large scale commercial type jobs. The speed and power of the chainsaw comes from the highly efficient REDLITHIUM HIGH OUTPUT HD12.0 battery that it has. This will run for a long time before it needs charging up and when it comes to charging the battery, this is a very fast process. What is also helpful when it comes to the battery is that this model is compatible with any of the company’s M18 model of battery. What is also useful is the onboard storage that the chainsaw has. 

Boasting a speed trigger that gives you full control of the speed of the Milwaukee Electric Tools 2727-21HD Chainsaw, you are able to perform accurate and good quality cuts. For an increased level of productivity, the power tool features an automatic oiling system that works to keep the cutting chain well lubricated at all times. Also, for further improved retention of the chain and bar, the chainsaw has a dual stud. For these many reasons, we recommend this cordless chainsaw ahead of all of the other models that we mentioned.

Guest Contributor: Helen Bell

WHY IS MY SUMP PUMP NOT WORKING

Why Is My Sump Pump Not Working

A lot of homeowners at night sleep well despite the rain because they know that they have a reliable sump pump in the basement. They no longer have to worry about potential flooding or water damage expenses because the sump pump does all the work for them in the background. So imagine coming home to your basement and finding out that your sump pump is not working. Close to being a nightmare, isn’t it? What can be the reasons behind it? If you are clueless about why your sump pump stopped working, check out this list.

REASONS WHY YOUR SUMP PUMP IS NOT WORKING

There are a couple of reasons why a sump pump may not work. Yours may have the same problem as these; check out each one to know what intervention should be done to make it work again.

YOUR PUMP MAY NOT BE INSTALLED PROPERLY

A common mistake made by many is the failure to install a check valve on the discharge line. This causes a backflow that causes the motor to unscrew the motor shaft. You may have the impression that the motor is still running because of the sound. However, when the pump impeller rotates backward because of the backflow, it stops pumping water and leads to further damage over time if not attended to immediately. So when installing your sump pump, make sure to follow the instructions in the manual carefully.

THERE MAY BE A POWER OUTAGE

If your sump pump is electric powered, it may stop working once a power outage occurs. This is not a once-in-a-blue-moon experience especially if your place is prone to experiencing a lot of storms and heavy rains. A short power outage may be harmless, but a prolonged power outage may cause your sump pump to completely stop pumping water down the drain and cause flooding in your basement. A good way to prevent this and to lessen the damage caused by power outages, you can opt to invest in a backup generator to keep it functioning even when the electricity goes out.

YOU MAY HAVE TO CHECK YOUR SWITCH FOR STUCK UPS

Sump pump maintenance and regular checkups are important because it prevents this circumstance. As days go by, the possibility of debris lodging or jamming the float is more likely to happen. There is also a possibility that the float may cause the switch to rest against the pump’s sides. These instances usually lead to a problem with the switch as it gets it lodged and stuck instead of functioning properly.

YOU MAY HAVE THE WRONG SUMP PUMP

When choosing a sump pump to install on our basements, we are advised to check the horsepower you need first. Sump pumps have different horsepower variants to cater to different water draining needs. If you get a sump pump that is too big compared to what you really need, it may end up working too much that its lifespan may be shorter than you want it to be. On the other hand, if your sump pump is too small, it may not be able to pump out all the water entirely. It may be forced to work on its maximum capacity continuously which may also lead to wearing out.  

YOUR PIPES MAY NOT BE WORKING

There are a lot of reasons why your pipe may not be functioning the way it should be. One is the possibility of it being clogged with debris and the other one is it can possibly be frozen. Pipes normally freeze especially during the winter, however, you have to make sure that your discharge lines are working smoothly too. Proper maintenance usually does the trick. Always inspect for the presence of debris to prevent pipe clogging.

YOUR SUMP PUMP MAY BE CORRODED AND OLD

Everything has a limit and your sump pump has one too. No matter how heavy duty and high quality your sump pump is, it is still prone to corrosion especially if there is a huge amount of water being drained. If corrosion is your main problem, it might help to call an expert to help you check if it can be fixed. However, if your sump pump stops functioning because of old age, then you may have to consider replacing it with a new one.

Conclusion

Sump pumps are made to last for a long time especially if you go for high-quality models. If your sump pump stops functioning, then there may be a problem that you need to address. A sump pump that does not function right after purchase may indicate a defective unit. However, if your sump pump has been around for some time, you can check out the following examples mentioned above to have an idea of what to check if in case your sump pump stops functioning. Among all the factors mentioned above, one thing remains to be evident. Proper maintenance is essential to keeping your sump pump working effectively and lasting for a long time.

Guest Contributor: Gourav Sharma

RUSTIC LIVING ROOM DESIGN GUIDE

What do you imagine when you hear the words “rustic design”? You probably think about cozy cabins in the woods, snowy peaks and hot cocoa in your hand. Or you might think about tiny cottages surrounded by orchards and wildflowers. However, you don’t have to live in the Swiss Alps or English countryside to enjoy this level of comfort and peace. You can introduce rustic design into your home and surround yourself with relaxing décor and comforting peace.

REIMAGINE YOUR WALLS WITH STONE WALLPAPER 

If you don’t want to tear down walls or do any major work on your home, you can simply grab some rustic wallpaper, pick a wall and create a beautiful nature-inspired statement item in your living room. Today, you can find all sorts of practical wallpaper designs that are easy to put up and take down in case you get bored with one look. Combine your statement wall with some faux wood beams and you’ll feel like you stepped into a fairytale cabin every time you enter your home (and all that without too much work).

WARM UP THE SPACE WITH WOOD ACCENTS

photo-1577614739132-81b2b774038c.jpeg

One of the key elements in rustic interiors is the use of wood. This is the best way to give your home a rustic vibe, even if you’re aiming for a more modern approach to this style. You can go for anything from wood art installations to heavy coffee tables and warm wood accessories. There’s only one rule to wood: try to use the same wood tones throughout the space to achieve a coherent look. For that warm feel to your space, focus on rich colored accents when matching accessories to your wood, and if you prefer a cooler atmosphere, opt for grey tones.

ADD A FEW NATURE ITEMS 

Rustic design is very closely connected to nature, so make sure to include a few items that come straight from the outdoors. For instance, you can brighten up the space with a wicker or driftwood chandelier or create a gorgeous fall-inspired centerpiece for your coffee table. If you want to go a little bit darker and mysterious when it comes to your design, you can look into taxidermy and mount a hand-carved animal skull onto your wall. If this idea tickles your mind, you can learn more about it and include a gorgeous conversation-starter piece into your home.

GET COZY IN FRONT OF A FIREPLACE 

photo-1577263964214-e8bfed8b53fd.jpeg

A fireplace is a staple in rustic design, so if you have any means to include it into your home, don’t hesitate to invest in this item. Of course, a fire-burning hearth is tricky to construct and maintain, so if you want to avoid the fuss, you can opt for one of those gas fireplaces. These are easier to install and require zero effort when it comes to maintenance and getting the fire going. Just turn it on, enjoy the dancing flames and curl up to your loved ones (pets are a great replacement for humans too).

SOFTEN UP THE VIBE WITH TEXTILES

No rustic home is complete without plenty of cozy textile elements. No matter if you’re aiming for a traditional look or you want to achieve the fusion between rustic and modern design, textiles will balance out the space, so they are a must. Integrate softness and texture into your space with pillows and throws, but don’t neglect your window treatment. Besides these elements, you can also pay attention to your furniture pieces—a mix of upholstered and bare furniture is a great way to achieve the harmony between warmth, coziness and elegance. 

Rustic design is perfect for everyone who craves comfort and relaxation but is not willing to sacrifice any style. Incorporate some of these interior design elements into your home and you’ll fall in love with your space all over again!

Guest Contributor: Michael

10 TIPS TO MAINTAIN A CLEAN WATER RESERVOIR

Without a consistent water supply, it’s hard for animals and humans to survive for a longer period. Water is key to survival and improves a lot of ongoing activities in the body. Daily routines are almost incomplete without the use of water. When going about these routines, we could simply be struggling with keeping a clean water reservoir since it doesn’t seem like an everyday activity. People focus primarily on water purification rather than cleaning the water reservoir. The truth is, every little action goes a long way in keeping the tank safe for use. 

Water tanks are quite the investment and maybe on the pricey end. As they sit on the surfaces or plain ground, with time, sediments and algae deposits on the walls and ceilings of water reservoirs are inevitable because of prolonged use or their sitting positions. These deposits pollute water, making it unfit for cooking, drinking, or general-purpose. That goes to show that tank cleaning is necessary to maintain hygiene. A water reservoir should be cleaned depending on the water type. For example, hard water needs sedimentation more often than soft water, and annual cleaning does not cut it. How then can you avoid water pollution and reduce the harmful effect on your health? The ideal way is to keep your reservoir clean. These are some useful tips to maintain a clean reservoir.

Check your outdoor surfaces first

Before you decide to put your tank anywhere outdoors, consider checking the surfaces very well. Be sure to test the firmness of the surface you intend to put the tank on. Make sure to keep the surrounding area of the tank clean by sweeping and mopping it clean of dirt. Keep the area free of jagged edges or hidden stones that could puncture the tank. Again, be sure there are no insects beneath the spot in case of a sudden infestation or burrowing of holes.

Furthermore, to maintain the reservoir, consider raising your tank with platforms made of steel or wrought. This helps maintain an even weight hence keeping the tank away from debris. 

Install a water filter system at the main inlet  

Impurities cause damage to the reservoir and make water unfit for use. Install a suitable water filter system at the eye of the main channel. Although there are several systems you could use, a disposable filter fabric or a mechanical system keeps unwanted material from the main body of water.

If you use gutters to carry water into the reservoir, inspect the gutter area regularly. Sometimes, the contamination occurs in rain gutters and inlets. As a result of climate change, gutters could accumulate dry leaves, weed, clogs, and even build up sludge. Rather than let rubbish accumulate, it would help if you considered using a gutter mesh. In addition to this, if your water reservoir has a pump system, avoid taxing or stressing it. With a pump, you can use gravity to your advantage.

Check the water level of your tank regularly

Put ‘checking the water level’ on your daily or weekly to-do list. Checking helps you know the frequency of water used per time while helping you determine a reasonable period for cleaning. If the water level depletes faster than usual, there could be a leak and, ultimately, an avenue for microorganisms to grow.

Drain out all the water from time to time

Regular inspection of the water level helps you know the level of sediment. Sediment, by its nature, settles down at the bottom of your water tank. To determine the sediment levels of your tank, a visual inspection of the water tank is better. Usually, you would expect to see the bottom of the tank underneath the water. If you don’t, drain water out of the tank, wash the internal surfaces manually with a soft sponge, and flush off.

When picking a tank for use, ensure that the crevices are easy to clean and accessible. Accessibility is curtailing dirt accumulation in sharp corners and providing hassle-free cleaning. When you have an easy-to-clean tank, cleaning is easier.

Devise a cleaning system within many years

An interval cleaning is perhaps the most important aspect of water reservoir maintenance. Water tanks usually last for years. Also, they tend to withstand shifts in temperature, wind and wear and tear. As a result, deterioration or corrosion can be determined as early as possible. When you see such changes, these issues should be attended to as quickly as possible to prevent long term damage.

In addition to conducting daily or weekly checks, it is good to have a full inspection of the tank for around three to five years. Although some people do it annually, adding new water tank liners to the containers is a great idea. For the best of liner products, check out a range of products, and make a good selection best suited for water reservoirs.

Prevent Odor with Baking Soda

Each time you empty your water reservoir, add a touch of baking soda into space and rinse it with some fresh water. Thus helping you keep odor check.

Install an automated tank cleaning device. 

Sludges are substances you don’t want in your food, and body system via ingestion. To keep your tank sludge-free, you could install an automated tank cleaning device. The device works automatically upon installation. 

Alternatively, you could hire a professional to handle the tank cleaning, although it may cost some cash. 

Take care of tank coating

Since tanks are made for extended use, they often come with top quality coating. However, maintaining a tank coating is essential to reducing maintenance costs throughout the years. The coating on tanks is a primary defense against corrosion. Corrosion tends to change the color of the water as well as the taste. Maintaining a good layer keeps the reservoir in good working conditions, including humidity, dew point, and air. 

Keep up with technology 

Every new day ushers us into new technological means of maintaining good hygiene. Even though access to the latest webinars and conferences may not be necessary, being aware of new tech helps you learn new ways to work equipment and ultimately maintain your reservoir. 

Sanitize your reservoir 

If your tank is old or has been sitting on surfaces for too long, it may begin to harbor unwanted substances. As a result, the reservoir can emit an unpleasant smell that makes drinking water taste bad.

You can combat this challenge with some bleach. To be sure, pouring bleach straight into the water reservoir is not ideal. But you could use diluted bleach with this foolproof method.

  • Add one cup measure of bleach into four gallons of water for a 40-gallon tank. One and a half measure for six gallons of water for a 60-gallon tank. Two cup measure into eight gallons of water for a 100-gallon tank.
  • Place bleach solution directly into your water tank and fill with fresh, clean water.
  • Run solution throughout every faucet until you’re sure bleach has touched everywhere.
  • Then empty the tank. Fill up again with fresh water and let it stay for a night. On the next day, drain the tank again through all faucets. Fill up again with clean water and repeat until the smell of bleach is gone.

Guest Contributor: David Smith 

HOW TO PREPARE RECLAIMED WOOD FOR REUSE

Reclaimed wood has been adored by many people for its look. The character, history, uniqueness, and structural integrity these wood possess are features that homeowners greatly appreciate. Working with reclaimed wood be very meticulous so it will take careful planning, preparation, and patience to get the best out of the reclaimed wood that you have.

Determining the Wood Species

Just like any other wood, reclaimed wood can come from different species of wood. One good parameter in choosing what species of reclaimed wood to choose is the strength of the wood. It’s best to consult with a structural engineer to confirm that the chosen size and length of the reclaimed timber are adequate for your design. 

Staging and Material Inspection

After determining to wood species of your choice, we need to have our timbers inspected on-site. It’s best to do the inspection on a site where there is very large space for the timbers to lay out. 

There are various features that you can check on the timbers on inspection day. It can be irregular cuts and notches. It can be the ageing features of the wood. The features of your choice will entirely depend on your taste

The next step is to have a professional look on the timbers of your choice to see the structural grade of each piece. This process can take as long as five hours as the process includes poking and prodding each wood. Chunks of dry rot are removed sometimes during these inspections. The inspector will give a formal report of the inspection afterwards. 

Corn Cob Blasting and Fumigation

After the design drawings and the construction contract has been finalized, it’s time to clean and fumigate the timbers as preparing reclaimed wood for use is a very critical step. The last thing you want once reclaimed timbers are erected are loose organic particles constantly falling over from the beams. 

The first thing to do is to manually scrape the wood beams to remove any loose barks or wood chips. The next step is blast those wood beams with corn cob. This process will remove any excess bark, dry rot, and debris from the wood gently enough that it will not destroy the surface.

The last step is fumigating the wood. This is done by applying a solution of borate glycol onto the wood surface. This solution penetrates the wood and kills any bugs left.

Now your reclaimed wood is prepared and ready for construction!

Guest Contributor: Maria Espievidal

5 CREATIVE DIY BASEMENT RENOVATION PROJECTS

The best houses put every inch of space to good use, from the powder room all the way up to the master bedroom. However, basements are often overlooked. Maybe it’s because they lack natural light, or because they tend to be a little cooler in temperature. Another reason might be that many newly built homes are sold with unfinished basements. Whatever the reason is, basements tend to be neglected as viable and useful spaces.

The truth is, however, that any finished or unfinished basement has the potential to provide untapped utility. The best part is, you might not even have to hire an expert or break the bank to do it. With a little bit of creativity, you can convert this underused and underappreciated space into a private oasis.   

Here are 5 creative DIY basement renovation projects you can take on.

Home Theatre

You don’t need a 100” flat screen television or an elaborate surround sound system to create a home theatre that’s fun and cozy. Because of the lack of natural light, basements are the perfect place for a home theatre, even one that’s built on a budget. To start, installing a projector on your ceiling is as simple a drill and a few screws. You can also install a motorized or non-motorized projector screen over a wall that doesn’t have to cost a lot of money. Even simpler, if you have an unfinished basement with exposed concrete walls, you can paint one of the walls white to make it a screen.

Workshop

With some lumber, simple tools, and a little bit of handiness, you can build your own heavy-duty workshop in your basement. Some items you might want to put together include a workbench and a shelving unit for storage. You can also drill holes in a shelf as a way to store different kinds of screwdrivers. As well, a store-bought peg board and some hooks provide a great way to store your tools while showing them off. Extra touches could include a whiteboard for jotting down notes, and a work stool.

 Storage Area

Basements are the perfect place to store items you don’t need readily at hand every day. With either built-in or freestanding shelves, clothing racks, and closets, you can effectively store a lot of belongings you don’t want to look at every day. If you have an unfinished basement with exposed studs, you can easily install shelves in between these studs to create very usable storage space. You can also convert your area under the stairs that might have otherwise gone unused into storage for larger seasonal items like Christmas decorations.

thomas-litangen-SP9HcRASMPE-unsplash.jpg

Art/Music Studio

It doesn’t take much to turn the basement of your home into a loft-style space that fosters creativity. If you’re a visual artist, laying down some area rugs, placing some comfortable spaces to sit, and creating storage for your materials can transform your space into a studio. If you’re a musician, you can improve the acoustics and create a home studio feel with foam egg cartons or real acoustic paneling.

Home Gym

Looking to stay out of the gym while staying in shape? Your basement could make a great home gym without a huge investment. To make it a safe space, lay down some padded flooring, which is often as simple as cutting it with a pocketknife. From there, things like a chin-up bar and free weights are readily available online.


About The Author: Alex Capozzolo is the owner of the Brotherly Love Real Estate blog and a content writer for the real estate industry. We buy houses in Philadelphia, PA. Our focus is on helping people through one of the most important investment decisions of their lifetime by seamlessly providing fast, honest, and professional real estate services.

Guest Contributor: Alex Capozzolo

LOUSY SHOWER HABITS THAT RUIN YOUR PLUMBING

Having daily showers is part of most people’s routine. A good shower can do wonders for your mind and body. Cold showers can increase alertness, help with muscle recovery, and even improve our immune system, while hot showers can aid in detoxing your body, repair cells, and ease anxiety. 

The typical shower habits that cause damage to our plumbing are probably not the first thing that comes to your mind when you turn the knob to get the water going. Still, the way we get ready every morning can significantly affect our plumbing system. These ordinary shower routines might be beneficial, but they might also affect your plumbing. Here are some of the lousy shower habits that you should avoid. 

  1. Ignoring Small Plumbing Issues

Many plumbing problems come with different warning signs before accurate disaster strikes. It is especially the case in the bathroom, where your shower is likely to give you a fair bit of prior warning if all is not well. The constantly dripping faucets or showers may not seem like a significant problem, but it could be a hint that you need to adjust water pressure before you ruin the plumbing. 

Similarly, hot water not lasting as long as you hoped is not only annoying, but it may also be a sign of a severe problem with your water heater. It’s always better to call a plumber as soon as you notice the minor problems than to ignore and risk them escalating. You can consider installing louvered access doors and panels for you to have easy access to your plumbings during minor check-ups. 


2. Leaving Puddles on the Bathroom Floor

We might often forget to drain up small water puddles in our bathroom, especially if we’re in a rush. Leaving water on the floor of your bathroom is a recipe for disaster. That water could cause mold growth, ruin your base, and can potentially cause much more widespread problems. Investing in a bath mat and cleaning up water spills after a shower will help to prevent severe water damage. 

3. Not Removing Falling Hairs From The Drain

Obstruction in your pipes is one of the most dangerous things for your plumbing system. As time goes by, hair that accumulates in your drain can slow and eventually block the drain completely. Use a drain cover or another hair-catching device like filters, then remove the hair after every shower, so it doesn’t create potential problems in the future. 

4. Not Removing Calcium Deposits 

You might not notice it, but it can leave deposits overtime when hard water dries, blocking the showerhead nozzle and reducing water flow. But you don’t have to worry; this common issue has a straightforward solution! You can add a little white vinegar, and it can easily remove calcium deposits, improving the function and appearance of your shower head in less than minutes. 

5. Staying in the Shower for Too Long

If you enjoy taking long showers, you might want to rethink that habit because it is one of the main reasons your bathroom may be a perfect place for mold growth. The steam that builds up in your bathroom during long showers can result in mold, which is unsuitable for your family’s health. Mold can quickly spread to every edge of your bathroom if good ventilation is not present. Shower curtains and loofahs are also breeding grounds for mold and bacteria and may need regular cleaning if you’ve noticed signs of decay. 


One way to eliminate mold growth is by reducing the temperature and length of your shower. You can also increase ventilation and reduce mold by opening a window or installing an exhaust fan. 


6. Using Chemical Drain Cleaners 

If you’ve noticed a clog in your drain, whether from hair or other debris, using a chemical cleaner is the worst thing you could do for your health and your bathroom. Chemical cleaners may eliminate the clog, but they could leave you with a more severe problem. Not only are chemical cleaners bad for the environment, but they’re also harmful to your plumbing. These harsh chemicals can corrode your pipes, which can cost more than cleaning a simple clog. 

These bathroom habits may be simple, but you sure don’t want to ignore them, for it can open to more severe issues that can cause you a lot more repairs. Always remember to have your plumbings regularly checked by trained professionals. 

Guest Contributor: Chris Jackson