HOW YOU CAN BEST PREVENT WATER LEAKS IN YOUR HOME

HOW YOU CAN BEST PREVENT WATER LEAKS IN YOUR HOME

A flooded home is every homeowner’s worst nightmare. However, much of the water damage in American homes comes from inside the house. Roof, pipe, and slab leaks can cause thousands of dollars in damages and require extensive cleanup. In this article, we’ll review what commonly causes indoor leaks, what their economic consequences are, and how you can work to prevent them from occurring in your own home.

WHAT COMMONLY CAUSES HOME WATER LEAKS?

Most indoor water leaks have one of two origin points: your roof or your pipes. As you might imagine, roof leaks are caused by an issue with your home’s roof. In most cases, this problem starts small—a few missing shingles, or a piece of flashing out of place—but soon evolves into a major mess. Your roof’s shingles or tile are its protective shield against the elements. Any gaps in this armor exposes the underlayment, and then the roof structure itself, to moisture from rain and snowmelt. Under these conditions, a roof leak is only a matter of time.

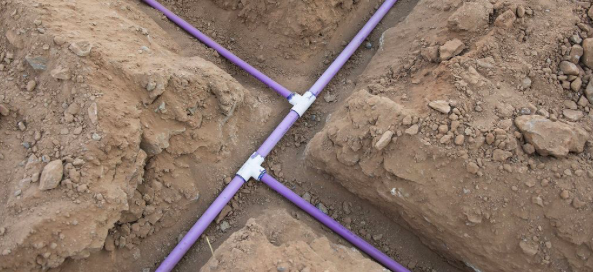
Pipe leaks are generally caused by either the deterioration of the pipe—which can happen to metallic pipes in older homes—the shifting of the home, or, perhaps most commonly here in the Midwest, the pipe freezing on a cold winter night. As the water in your pipes freezes, it expands, putting incredible pressure on the pipe itself. This stress can cause the pipe to pop open like a frozen soda can, sending water flooding into your home. As we’ll discuss below, frozen pipes require the intervention of a professional who has the right tools and slow approach to safely thaw the pipe out.

Some pipe leaks occur underneath your home’s foundation slab. Appropriately, these are known as “slab leaks,” and they can be difficult to access or detect. Most homeowners first notice a slab leak when they see massive usage increases on their utility bill. As with other pipe leaks, you’ll need to bring in a professional plumber to help you pinpoint the leak’s location and access it.

WHAT ARE THE CONSEQUENCES OF WATER LEAKS?

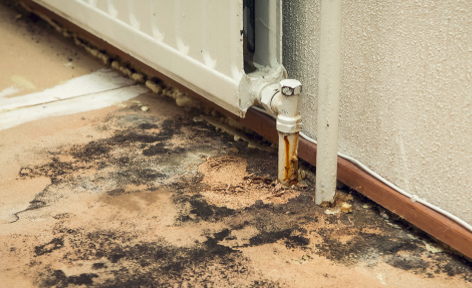
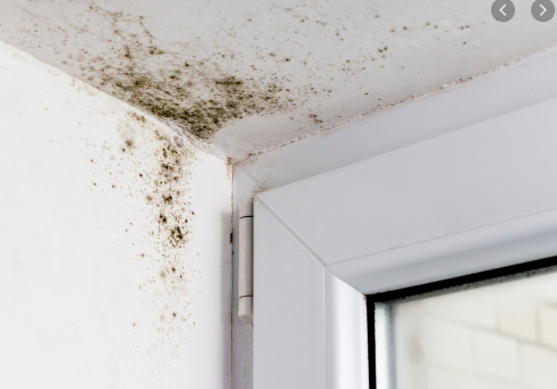
In a home, water is a highly destructive force. A pipe leak, burst pipe, or leaking roof can damage your floors, foundation, drywall, ceilings, and furniture—nothing in your home is immune. Indoor water damage creates the ideal conditions for mold to grow, causing a potential safety hazard for you and your family. All-in-all, insurance claims for water damage and leaks top $2.5 billion annually, making it one of the most expensive home repairs out there. What’s worse is that insurance doesn’t cover every type of leak, which means homeowners end up paying about $2,800 out-of-pocket for cleanup and repair.

PREVENTING WATER LEAKS

Just like all home problems and needed repairs, not every leak can be prevented. Some things are just out of your control. However, the right preventative maintenance and proactive forethought can make a difference and help you avoid many potential disasters.

ROOF LEAKS

Preventing roof leaks is as simple as keeping your home’s roof in good shape. We recommend you have a roofer out to your home at least once-per-year in the spring to assess your shingles and make sure your roof made it through winter okay. Then, in the other seasons of the year, get up on a ladder and take routine looks at your roof. If you notice ripped-off shingles after that latest storm, it’s time to take action. Call a roofer and get it fixed before the underlayment is damaged.

OLDER PIPES

If you own an older home, it’s probably a good idea to talk to your local plumber and get a report card on the property’s pipes. Most metal pipes need to be replaced every 70-80 years. If your home was built in 1950, for instance, you’re probably coming up on the maximum lifespan of your copper, brass, or galvanized steel pipes. A home plumbing inspection might be a good idea.

FROZEN PIPES

To keep your pipes from freezing, you should schedule your annual furnace tune-up with an HVAC professional. This inspection and preventative maintenance ensures that your heater is in its best-possible condition heading into the freezing nights of winter, making it far less likely to break down and expose your pipes to below-freezing conditions. For long-term added protection, you might also want to talk to your plumber about sheathing your pipes in insulating material. This slows down the temperature exchange, buying your pipes many extra hours in the event your heat goes out on a January night.

As it turns out, there’s a lot homeowners can do to prevent water leaks and avoid major problems. Be sure to check out the infographic below,, for even more advice on avoiding water damage and expensive cleanup costs.

Guest Contributor: Amanda L

TOP 5 TIPS ON SMART HOME REPAIR 

Home automation is becoming prevalent because of its convenience, to the point where it practically works like magic. You can control your entire house with a click of a button, the sound of your voice, and sometimes, from anywhere in the world. In fact, it is estimated that the global smart home market will exceed $53 billion. But every now and malfunction can occur. 

Technology may not always be 100% perfect and is one of the arguments against smart homes, but sometimes, all it needs is a simple fix. 

In this guide, we will provide solutions to 5 smart home repair problems that are experienced with smart home products. 

1. Have You Tried Restarting? 

We have all heard this advice when working with any device and albeit for good reason. The IT department or customer service agent is not just being lazy when they ask this question. Turning your device off and switching it back on again can fix the problem. 

If the problem persists, it might be your modem or router that needs rebooting, or it might even be the problem itself, more on smart home Wi-fi problems in the next step. 

2. Check Your Wi-Fi

You may experience hiccups with the connection, such as your smart switch not connecting to Wi-Fi. When it comes to the placing of your modem or router, your device may have trouble staying connected or respond slowly due to an unstable bandwidth. 

This is what technicians refer to as a “dead zone”. The best solution is to move it to the middle of your house and preferably on higher ground such as an upper floor. Devices work better the closer they are to the Wi-Fi source. Signals also travel downward, so placing it higher can improve your Wi-Fi significantly. 

Your router may also be transmitting two wireless frequencies: 2.4 GHz and 5Ghz. Simply put, your smartphone might be connected to one of the frequencies and your smart home device to another, so make certain they are all connected to the same one.  

3. Update Your Software

Smart home failures can be avoided by merely updating your software. All devices, including routers, will need to be updated periodically for the purposes of seamlessness and security, which are highly prioritized in a smart home.  

While most modern devices update automatically, older models may need you to manually do it yourself, so don’t be too worried if your device confirms your email address, password, location, or asks you to download a file. Of course, do be careful as not all pop-up messages are for updates. 

If it states there is an error, you may have to read up on the manual, check forums or FAQs on the site, or contact a customer service agent for your product. 

4. Fix Hardware

When you pertain to smart home repair it may require you to probe into your hardware too but only if you are an expert in the fields of electrical or hardware, no one wants to get into any serious accidents. 

If you’re like the rest of us who might be able to spot these issues but don’t know how to fix them, the best thing to do at this point would be to contact the manufacturer or consult handyman professionals such as HandyKith, for example.

5. Power Problems


Our last tip on the list of smart home complaints would be to ensure that you have a dependable power supply. Being a smart home, everything will be running on power, so it is important to correct any power issues causing the problem.  

There is no harm in guaranteeing that your cord hasn’t come loose or that you don’t have other wiring problems before looking for other possible malfunctions. You can also start supplying yourself with rechargeable batteries and adjust settings to conserve energy. Most devices will come with an LED indicator to display whether your device is receiving power. 

Conclusion

Next time you stumble upon problems with your smart home, keep these tips in mind. If you have any problems setting up, let us know as there might just be a simple solution.

About the Author 

The author has experience working with a few fully-equipped, high quality rated, professional contracting companies like HandyKith, that specializes in all kinds of house repairs and installations, including smart home repair. She has been a smart home enthusiast over the years and educates about the advantages of having smart homes.

Guest Contributor: Clyde Kincaid

A SIMPLE GUIDE TO CREATING A COOL SUMMER GARDEN

Summer is coming and the warm months are perfect for parties and relaxation out in the garden. But the intense sunlight can also turn your barbecues and gatherings into a nightmare. Nobody likes to heal their sunburn the next day. So what’s the solution? Should you take your festivities inside? Not necessarily. Check out our creative garden ideas to prepare your oasis for the heat. 


1. RELAXING WATER ELEMENTS 


Misting systems are great to relieve some of the stress from the heat. If you’re looking for fairy garden ideas, you might want to consider installing a little pond. Other great small garden ideas are little fountains that add atmosphere to your garden and attract butterflies and birds. The best part is that the flowing water can ease your stress levels simply with its sound. Backyard garden ideas for cooling the air can be something as simple as installing an oscillating sprinkler. The kids are going to love it. 

Water also creates a perfect environment for plants to grow. When the weather gets cooler after summer, you can even plant some trees for the future. These will be excellent cover from light. But let’s look at some items for protection that you can start using right away. 


2. GARDEN IDEAS FOR EXTRA SHADE

If your garden doesn’t have a leafy tree to protect you from the blazing sun, you still have plenty of options to create some cover. The most simple solution is to get a patio umbrella. You can use it to cover your favorite place in the garden. The colorful umbrellas will liven up your garden. Use some lawn edgers to trim around the flowerbeds and your garden will be ready to host even formal dinner parties. 


But if you have some spare time, you can also put up something more complex for a shade. What are we talking about? A pergola! Put some honeysuckle vines growing on it and soon you’ll have a nice cool shade in your backyard. A pergola covered with beautiful vines is also a neat choice for flower garden ideas. 

If you love building and it comes easy to you, we’d recommend you to put up the ultimate shelter from the beams. 

3. SCREEN HOUSE – FOR THE AMBITIOUS ONES


What is the ultimate cover from the sun? It’s the stand-alone screen house. To build one, make sure you follow a detailed plan for your project. The cool part is that you can design the screen house to look exactly like you want. The design options are limitless. 

Here’s another reason to put up a screen house: it will keep the pests away from your vegetable garden. If you’ve been looking for some vegetable garden ideas, don’t forget to start with building protection for it. 

CONCLUSION

Summer months can get hot and to fully enjoy your garden, you need to get prepared for the heat. Add some water to your garden, create shades, and if you have enough time, put up a screen house. June is not far anymore, so best get started with creating your cool summer garden now. 

What did you think of our tips for keeping your garden cool? Did we give you some new ideas on how to improve your garden? Got a great tip of your own? Leave comments below, we’d love to know about your gardening experiences. Your opinion is important to us! 


Author’s Bio: 

Malcolm Cano is a professional florist and hobby gardener. He loves spending time building his little backyard garden. It has a calming effect on his similar to meditation.  As a dad, he really appreciates making parenting easier with his tips. Also, he had a lot of home improvement ideas to share. Over the years Malcolm has discovered lots of gardening hacks and loves to share these in blog posts.

Guest Contributor: Malcolm Cano

TOP CAUSES OF SEWER LINE CLOGS AND WAYS TO PREVENT THEM IN YOUR HOME

When your home’s sewer line is working like normal, it’s more than easy to just forget about it. Out-of-sight, out-of-mind. A clogged sewer line, however, spells major trouble for your home. This problem not only prevents you from using your kitchen sink, showers, and toilets, but can result in a disastrous—and expensive—sewer line backup. Here’s what you should know about the common causes of sewer line issues and why you should call a plumbing professional for drain cleaning services if you suspect your home has a sewer line clog.

WHAT ARE THE COMMON CAUSES OF SEWER LINE CLOGS?

Overall, clogs represent more than half of all drain failure issues, and most clogs are caused by the homeowner. Clogs form steadily over time as grease, oil, and other food waste becomes trapped deep in the sewer line and begins to accumulate. This messy situation is only made worse by homeowners who put trash—including “flushable” wipes—down the toilet. Eventually, this will clog the line partially, and then fully. When that happens, the wastewater from your home has nowhere to go but up. 

In some cases, sewer line clogs are caused by tree roots or a sunken length of pipe. In the former scenario, the thirsty roots—detecting a small leak or fissure in the buried line—grow toward it. Eventually, with enough time, these roots will envelope and break into the line, forming a hardy blockage that prevents wastewater from exiting the system into the municipal sewer. Finally, a sunken pipe is a part of the sewer line that is no longer level with the rest of it. The entirety of the line is slightly angled so that the part connected to the home is higher than the line connected to the sewer. This allows gravity to carry water and waste more efficiently. A sunken line disrupts this gravity-based system and allows wastewater and material to get stuck.

These drain failure issues apply to both sewer lines attached to municipal sewer systems and to personal septic systems. Most Americans have a system attached to a municipal sewer, so sending items down the drain that can cause a clog may affect more than just your home.

DANGERS OF A DAMAGED SEWER SYSTEM

A damaged or clogged sewer line can be a costly repair. First, if you have had any sewer backup into your home, you will need extensive water damage repair and, potentially, mold remediation. Then, you’ll need to have the line itself cleared of the clog and repaired. In total, this can cost you thousands of dollars.

If you suspect that you may have a clog forming in your sewer line, now is the time to act. Call a local plumbing professional in your area and have them out for a sewer camera inspection. Using an endoscopic snake tool with a tiny camera attached to the end, the plumber will be able to feed the line deep into the drain and see into the sewer line. As the feed travels through the sewer line, they’ll be able to spot any clogs that are forming, or any leaks in the line. This preventative service is only a small fraction of the cost of a sewer backup, so, for most homeowners, it’s well-worth the peace of mind.

In the event you do have a partial or full sewer line clog, your plumber will provide you with several options for clearing the clog. This may include using a hydrojet to blast out the debris from the line. Or, a plumber may elect to use a specialized snake tool that can cut through the blockage and clear it out.

If you do have a cracked or damaged sewer line, talk to your plumber about trenchless repairs. Most plumbers have equipment today that allows them to replace the line without having to dig the entire thing up. One of the most common methods for doing this involves feeding the new line (with a slightly smaller diameter) into the older one. 

WHAT WASTE CAN LEAD TO A CLOG?

What kind of debris causes a clog? Here are the most common culprits that build up in your line and slow or stop your water drainage:

  • Flour
  • Rice
  • Eggshells
  • Coffee grounds
  • Grease, fat, and oil

These items mix with water to create a slurry or sludge that sticks to the walls of your drain lines. Over time, this can create a complete clog that causes your sink to overflow. There are many other materials—both organic and non-organic—that can accelerate the growth of a clog. This includes orange rinds, hair, flushable wipes, paper towels, hygiene products, and more. The central lesson here is this: if you want to prevent sewer line issues, avoid flushing or putting any of these items down the drain. Put them in the trash instead. When it comes to cooking oil and grease, pour it in a disposable glass jar to cool and solidify. Then, you can throw it away.

PROFESSIONAL SOLUTIONS

Don’t let a minor clog create a major headache. Contact a local professional for drain cleaning services and help with your sewer line. To learn more about sewer line issues and how they can be prevented, check out this new infographic .

How to Take Good Care of Your Drains.png
Guest Contributor: Amanda Lee

HOW TO PREVENT MOLD FROM GROWING IN YOUR BASEMENT

Mold can grow anywhere in your home, but it thrives in dark, damp conditions. It’s those conditions that make your basement the perfect breeding ground for mold. Once mold spores begin to develop and spread, they can be very challenging to remove. To prevent basement mold growth, follow these simple tips:

Reduce moisture and seal off areas that could allow water to enter the basement, like foundation cracks, leaking pipes, and doors and windows.

Examine your sump pump. A sump pump is designed to collect excess water and redirect it away from your home, but if it fails, your basement could flood, leading to water damage and mold growth. 

Screen Shot 2020-05-11 at 1.14.08 PM.png

Install the right flooring. Mold grows easily in carpet, which soaks up moisture and is difficult to clean. When it comes to flooring, choose a washable surface, like ceramic or vinyl. 

Perform exterior waterproofing. Plan your landscaping around basement flood prevention, position gutter downspouts away from the home, and clean your gutters regularly. 

Declutter your basement to eliminate congestion that blocks air from flowing freely throughout the space.

Insulate your basement, including pipes, walls, and windows to prevent condensation and to lower humidity.

Keep plants and wood upstairs. Mold feeds on organic materials, so keep greenery and wood in spaces where dry air flows freely.


Install proper ventilation. If your laundry room is in your basement, make sure your washer and dryer have proper ventilation. The steam produced by these appliances will otherwise have nowhere to escape and your ceiling and walls will trap moisture.

Guest Contributor: Austin Werner

TOOLS USED BY DIY EXPERTS WHEN THEY HAVE LESS GARDENING EXPERIENCE?

TOOLS USED BY DIY EXPERTS WHEN THEY HAVE LESS GARDENING EXPERIENCE?

Everyday gardening could be a challenge if you have to call for a handyman to fix or maintain your garden. Thanks to the DIY experts who know how to save money and yet keeping the yard look beautiful always. These DIY handyman gardening tools can save you ample money that you can use on other activities. Perhaps, getting more plants would be an amazing idea for a healthier life.

Take a quick read of this article as we have listed some of the best gardening tools recommended by the precioushandyman.com or DIY experts. These tools come handy when you have lesser experience in gardening and do not wish to experiment on anything with little knowledge.

Tools Used by DIY Experts

1. Gardening gloves:

No task is possible without proper gardening gloves especially with less experience. You cannot afford to face any injury by sharp gardening tools or objects thus, buying a pair of gardening tools will cost you less and save more than on injuries.

2. Shovel:

Shovel is made with some amazing creative ideas too online. You may wish to check some videos by the DIY experts. Shovels could be of different types such as post hole diggers, drain spades, digging shovels, scoop shovels, etc.… Based on your requirement you may buy a shovel within your budget. These come handy as you cannot afford to dig every pot of plant or portion of your grass with a knife.

3. Hose:

No DIY activity works without a watering hose. Watering is more comfortable with the help of a good basic hose. Depending on the garden size, you may buy the tool to water plants. You can cover a larger area than otherwise by bringing a watering hose in your garden. Getting the right nozzle will further help you to reach extra and difficult areas too.

4. Rake:

Rake could be built of metal, plastic, or bamboo. Metal rakes are most preferred by DIY experts for longer durability and quality. You can also choose an adjustable rake to make life easier with gardening. Rakes are one of the most essential tools for gardening especially for beginners. The purpose of buying these is to collect piles of leaves with ease and comfort. The different types of rakes are, lawn rakes, shrub rakes, hand rake, and thatch rake. 

5. Wheel barrow:

Wheel barrows are essential if you have unwanted soil that needs to be moved around from your garden. These come handy to settle compost in the garden bed areas. There are some maintenance tips that need to be followed if you go for a traditional wheel barrow. You may find the basic tips along with the product or you can check these online. Choose a wheelbarrow that you can easily move especially after loading it.

Few other tools that come handy for gardening beginners as suggested by DIY experts are watering can, watering wand, Hoe, garden fork, Loppers, and some small tools. Hope you are all set to settle the beauty of your garden with these cost saving tools. 

 Guest Contributor, Maninder Singh

PLANNING OUT YOUR BATHROOM REMODEL? HERE ARE SOME PLUMBING MISTAKES YOU’LL WANT TO AVOID

PLANNING OUT YOUR BATHROOM REMODEL? HERE ARE SOME PLUMBING MISTAKES YOU’LL WANT TO AVOID

Next to a kitchen makeover, a master bathroom remodel is one of the best things you can do for your home’s value. Plus, a reimagining of your bathroom can make it a much more enjoyable and usable space. Yet, many homeowners put off this project for years. After all, just where do you start, and how much should you budget? In this article, we’ll review how you can get your bathroom remodel moving forward again, and some of the common pitfalls you’ll want to avoid when planning your project out.

TRYING TO DO EVERYTHING YOURSELF

When working within a tight budget, it’s tempting to simply remove the cost of labor and take on the entire remodel by yourself. After all, how hard could it be? While there’s a fair amount of a bathroom remodel that homeowners can complete themselves, there are certain aspects that need to be handled by a professional. For example, bring in a licensed plumber to help with anything involving plumbing.

If you’re feeling like you’re in over your head, you may want to consider hiring a remodeling contractor near the start of your project. There are several advantages that come with working with the right person:

  • Experience: A trusted local remodeler has remodeled dozens, if not hundreds, of bathrooms. They can put together an accurate budget and scope while also helping you avoid common pitfalls.
  • Timeline: A contractor will set a deadline and strive to meet it. If you’re only able to work on your remodel over the weekends, set to your own deadline, who knows when your bathroom will be usable again?
  • Results: There’s always a risk with DIY work that the end result might look shoddy or be low-quality. For obvious reasons, working with a good contractor eliminates this risk.

PUTTING TOO MUCH INTO THE PROJECT

One of the biggest challenges of a bathroom remodel—and perhaps a significant reason why many homeowners put off the start of their remodel year-after-year—is not knowing where to start. After all, everyone has a basic concept of what a remodeled master bathroom looks like. But, translating that general idea into a detailed roadmap that outlines all the tools and materials needed is another thing altogether. 

To add to that challenge, there are so many choices and decisions to make. Quartz, granite, or marble on top of the vanity? What kind of lights should you buy? Does this shower tile and this shower glass go together? Cumulatively, this can lead to something called choice paralysis, where the overwhelming number of options and variables leads to homeowners endlessly talking about their project, but never actually getting going.

Start with the budget. On average, people spend around $19,000 on a mid-range bathroom remodel and later net a 70.1% return on investment. If you work backwards, you can start to make choices informed by your budget: if you’re looking to keep costs down, keep the current layout in place, choose granite over marble, and prioritize the shower over the bathtub. This is setting the scope for your project. You want your punch list of things that need to be completed to realistically fit within both your budget and timeline.

HIRING THE WRONG CONTRACTORS

If you’ve made the decision to hire a remodeler, plumber, or electrician for your project, make sure you find the right one. This is another place where things often go very wrong, very fast: in an effort to fit a professional into their budget, homeowners will accept the lowest bid out there. Often, instead of getting a great deal, you get someone who doesn’t know what they’re doing, makes mistakes, shows up late, causes the project to go over its original deadline, or is not honest.

Instead, submit multiple bids with professionals in your area who can be trusted. Read online reviews and talk to your friends and neighbors: there is bound to be a few people in your community who are willing to attest to the bathroom remodeling work of good contractors. Once you’ve narrowed down your list, be sure to ask these professionals about their experience remodeling bathrooms like yours, as well as what kind of insurance and certifications they have.

A little bit of homeowner homework ahead of hiring someone can save you a ton of money and headache down the road. Trust us: the right plumber, remodeler, or electrician makes all the difference.

IT’S TIME TO MOVE FORWARD

If you’ve been dreaming of a bathroom remodel for years, but have put it off time-and-time again, there’s no time like the present to get started. Follow the tips above to ensure your remodel starts right and goes smoothly. For even more helpful advice about plumbing mistakes to avoid, check out this infographic:

Plumbing mistakes to avoid.png

Guest Contributor: Amanda L

10 BACKYARD POND WATERFALL IDEAS YOU’LL ABSOLUTELY LOVE

GARDEN POND WATERFALL IDEAS EVERY BACKYARD NEEDS

Every home needs to have a waterfall pond in their backyard. Since most of us are going to be stuck at home for the rest of the Summer, due to Covid-19, why not add an appealing feature to your backyard that will bring joy into your life? It doesn’t have to be anything to elaborate. Here are 10 pond waterfalls that you’ll absolutely love.

Waterfall with small koi pond
Koi pond with water feature
Water pond with bridge and bench
Small Koi pond with water feature
Water stream with rock display
Small pond with rock features
Waterfall with lights
Waterfall with bridge to heaven
A Zen Dream
A Zen Dream
Backyard Waterfall Heaven

There you have it, 10 backyard pond waterfall ideas that should bring absolute happiness and joy into your life!!!!

EASY AND SIMPLE DIY TIPS TO UPGRADE YOUR BATHROOM

Your bathroom is probably the second most personal area in your house next to your own room. This is where most of your self-care routines take place, and it is also an area that is often considered when it comes to selling a house aside from the kitchen. That’s why it’s important to make it a space you actually like spending time in.

Upgrading your bathroom actually doesn’t necessarily mean that you have to have a major overhaul. You can also improve your bathroom yourself. All you need is to allot time to do it.

Do-it-yourself bathroom makeovers have an advantage because they cost less than typical remodeling, which normally involves tearing down and removing a lot of stuff. If you are interested in making this project happen, then this article can help you out. The following are easy and simple DIY tips to upgrade your bathroom.

UPDATE FIXTURES AND HARDWARE

In the grand scheme of things in your bathroom, something so disproportionately small as hardware and fixtures are so important for providing that chic finishing touch. And it will only cost you less for something that has a major impact.

You can start by replacing your bathroom faucet by installing something that’s sleeker and more functional and/or more contemporary. You may also swap shower fixtures if you’re planning to remodel your shower anyway. Another option is to install new wall hooks where you can keep your towel and clothes from falling to the bathroom floor.

There are plenty of options for these upgrades that can be found in a quality hardware store like Magnificent Marketing.

STYLISH BATHROOM LIGHTINGS

It may sound intimidating, but most people can switch out a light fixture safely and successfully by being careful and following instructions. Fresh lighting also makes a huge difference for your bathroom. This is another simple DIY bathroom upgrade that you can do in just under an hour or so.

For people who have large mirrors inside the bathroom, installing a light directly onto the bathroom mirror is a unique and useful idea. Since your mirror occupies space, most of the time you won’t be able to get lighting directed to your face. By installing a light directly onto your mirror, you will be able to see yourself clearly and do what you need to do in front of the mirror much quicker.

MAXIMIZE STORAGE SPACE

Maximizing storage space in your bathroom includes utilizing underutilized areas to store items. One area of your bathroom that you can use for storage is the wall. Take advantage of your wall space by mounting ledges, shelving, or racks to achieve this.

You can put your hygiene and vanity items such as your toothbrush, toothpaste, perfume bottles, and your comb on racks above your sink and below your mirror. Using the wall for storage space will help avoid clutter inside your bathroom.

MAXIMIZE THE MIRROR

Mirrors are beneficial particularly in upgrading small bathrooms. They reflect a lot of light and make the tiniest feel a bit more spacious than it actually is. Aside from ensuring that it is well-lit, your bathroom mirror should be large enough to see at least your entire head when you stand in front of it.

WRAP UP

These simple DIY tips are exactly what you need for your bathroom. Something simple, but will have a great overall effect on how it looks and how comfortable you feel when you use it.

Author’s Bio:

Rosette has a knack for anything DIY. She spent her younger years learning about the different hardware tools and equipment in the hopes of establishing a hardware business in the future. Her career options may have changed, but today, she continues to write so passionately about her first love.

TOP 8 SPECTACULAR OUTDOOR LIVING SPACES

TOP 8 SPECTACULAR OUTDOOR LIVING SPACE

When Summer rolls around, most of us like to spend it outside. You will want to have an outdoor area that is perfect for entertaining, or the perfect space for you to spend outdoors with your family. The last decade people have started to put a lot of effort in their backyards, or what we would rather call it, outdoor living space. When you live in or around Chicago, you’re use to having bipolar weather year round. That doesn’t mean you shouldn’t spend your time and money on your outdoor living area. The perfect outdoor area would be usable Spring, Summer and Fall. Let me show you some great ideas, that will make you want to run out and start working on your perfect outdoor living space.

Outdoor fire pit with sitting area in between the pool
Outdoor kitchen with swim up bar
Outdoor kitchen with breakfast bar
Outdoor grill station
Outdoor bar and grill station
Outdoor fireplace and sitting area
Outdoor kitchen and dinning area

What did you learn? Your outdoor area should have good seating, fire pit, bar, kitchen, grill station, and cover. Start utilizing your backyard. Make it a living space. Not only will you enjoy it, it will bring up the value of your home.