DIY OR CALL A PRO – EVERYTHING YOU NEED TO KNOW

What you understand of the skilled trades is likely heavily dependent on many factors, including your family life growing up, your parent’s career tracks, your own educational background, and your current circle of friends and partnerships. Even if you have a strong knowledge of the skilled trades, we bet you didn’t know that well over 100 trades qualify under-skilled trades certifications? If you have an interest, even an obscure one, there’s probably a trades program for you. Love plants and gardening? You could be a Horticulture Technician or an Arborist. If you’re a master in the kitchen, Cooks and Bakers are skilled trades, as well. Get into building and construction in a more niche area by becoming an Architectural Glass and Metal Technician. The options are nearly endless. Trades are critical to the growth of any society because, at their core, they provide expertise in areas that require specialized knowledge over and above what even the most dedicated DIY master can provide. They are the people getting things done and keeping things running worldwide, and we will always need them. You can be mechanically inclined, but when your fridge breaks down, you might not have the experience under your belt to feel confident tinkering with such an essential appliance – but a Refrigeration and Air Conditioning Mechanic does! 

There’s a lot to be said for honing your own skills so that you’re not in a position of having to call a pro every time there’s a small issue in your home. That being said, some essential skills are important to master before you move out on your own for the first time. (Or, for some of us, to catch up on after moving out—that’s okay!) When you have the basics down, you’ll be more confident in what you can handle on your own and when it’s time to call in a pro in a skilled trade to fix something more specialized.  

LIFE SKILLS V. SKILLED TRADES

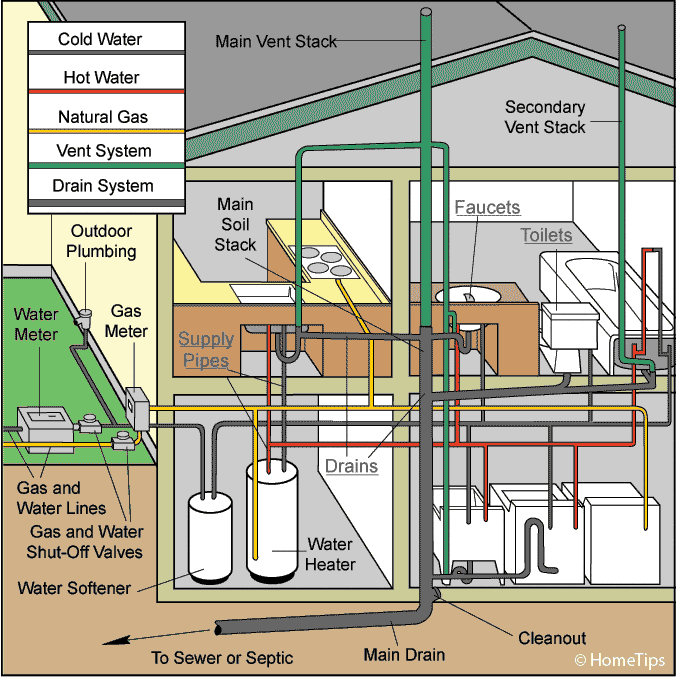
How do basic life skills connect to skilled trades? Many tradespeople will tell you—overwhelmingly often, household breakdowns come from lack of knowledge and maintenance. Learning some key skills beforehand can help you prevent problems with critical elements in your home like plumbing, refrigeration, heating, or damage to your drywall and flooring. Let’s talk about some life skills and how they’ll save you money in the future.


Grocery shopping and cooking – Learning what you like to eat, how often you eat at home, and how much food you need to get weekly at the grocery store are essential. Not only will you be wasting money if you overbuy every week, but you’ll also be adding to systemic food waste, increasing your environmental impact, and even potentially creating future issues with your kitchen appliances. Refrigerators and freezers have optimal operating conditions, and when they get stuffed full, they have to work overtime to compensate. If this is a temporary issue because you have friends staying with you and there’s more food in the fridge for a couple of weeks, no problem. If it’s something that consistently happens over time, your fridge and freezer will wear out more quickly. Chances are you’ll start to notice things like your fridge not getting as cold as it used to and your food spoiling more quickly. Or, even worse, your freezer failing and finding a melted puddle of liquid in the middle of your floor. This is the point that you’ll have to call in a pro to do some maintenance that could have been prevented. Planning ahead and knowing your needs can save tons of future headaches.


Cleaning and organization – Cleanliness and tidiness might seem like no-brainers until you’ve experienced the hectic pace and responsibility that comes with living on your own. Once you have, you’ll know that sometimes these can be the things that fall to the wayside. In the best-case scenario, you’ll learn that you don’t like living in a dirty and cluttered space and adjust accordingly with no dire repercussions. On the flip side, you might also become the victim of a dreaded pest infestation. Critters of all kinds (silverfish, roaches, mice, rats) thrive in environments where dirty dishes are left in the sink and drains are not cleaned properly. When these infestations get too far along, you’ll need to bring in a pest control worker and potentially a skilled tradesperson like a Carpenter or Plumber if the issue involves more critical elements in your home.


Laundry – You might not realize how much you take your washing machine and dryer for granted until they break down! These appliances are the workhorses of your home, and with some knowledge and maybe a Post-It or two as a reminder, you can go a long way to lengthening the life of these machines. 


Your washing machine doesn’t need a lot of TLC. Mostly, it just wants to remind you that it doesn’t like getting small objects from pockets stuck under the drum. This can cause issues that affect its functionality and mean you’ll have to call a repair person, but all you need to do is remember to empty your pockets! 


Your dryer does a hero’s job in removing all sorts of hair and fibers from your clothes so that they come out looking refreshed and clean. It does that by pulling all of that into your lint trap, and it needs to be cleaned out! Once it gets blocked, your dryer has to work a lot harder to do its job. Your clothes will take longer to dry, have more lint on them, and you’ll be shortening the life of your dryer. Not to mention that dryers get super hot inside, and having a blocked lint trap is a potential fire hazard. 


Managing time and finances – Many of the small preventative actions we’ve talked about so far come back to managing your time well. Creating routines that include things like cleaning out your fridge to prevent it from becoming overloaded and cleaning out your dryer trap are quick and easy things that can save you time and money in the long run. The same goes for managing your finances and knowing how much money you have coming in, what goes towards your rent and essential expenses, and what is getting saved. When it comes time to call in a pro to fix something in your home or apartment, you’ll need to be prepared for the expense. Regular maintenance will be covered by your landlord if you’re renting, but if there’s an accident that’s on you to fix—you’ll need to have money set aside for that.

Want a pet? Get Ready! Having a pet is a wonderful and enriching experience. Pets are great for your mental health and provide a whole different level of energy in your life. They can come with some potential challenges, though. Lower-maintenance pets like a snake, hedgehog, or hamster are easier to manage and less likely to cause damage in your home. Dogs and cats, however, can be a different story. 

Be prepared for the run-of-the-mill things like ruined furniture and shoes, but also for harder to fix things like stains on carpet or chewed-up baseboards. Having a pet means you’ll have to be ready to learn some DIY skills or have the budget to call a pro when the inevitable happens.


Home maintenance and improvement – Your maintenance priorities will depend on whether you own or are renting and if you’re in standalone or high-density housing. For a more specific list, look for resources that provide you with a good reminder of what to look for on a weekly, monthly, and yearly basis. Consider setting reminders on your phone so you remember!

When it comes to making improvements to your home or apartment, there is a lot you can learn to do on your own. A great place to get your DIY start is painting a room. If you’re renting, clear this with your landlord before putting one bristle on the wall! Painting is an easy DIY project that can completely change the feel of a room, and it doesn’t require a ton of skill. Get prepared by watching tutorial videos from qualified sources like this one from Home Depot, making sure you have all of the necessary materials, and voila! You’ll be amazed by your own DIY prowess. 

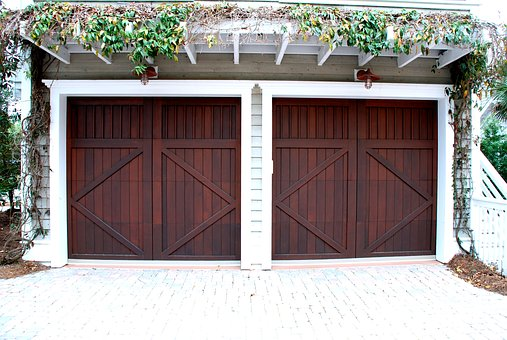
For things like flooring, tiling, and drywall, consider calling a pro for your first projects. Unless you have someone that has done projects like this before that can teach you, trying to learn on your own can be costly and more time-consuming than paying for the right skilled tradesperson to come in.

BUILD YOUR OWN BASIC TOOL KIT

Having a basic toolkit that lives in your house or apartment is key, even if you have a separate garage or workspace. A small but well-planned toolkit will let you make quick repairs without searching high and low for each item that you need.  

There are many starter toolkits on the market that will get you going with basics, but to be well-prepared, there are some extras that you’ll want to add. You never know, maybe getting into some basic home DIY will lead you to a career as a tradesperson!


SKILLED TRADES – WHY ARE THEY SO IMPORTANT?

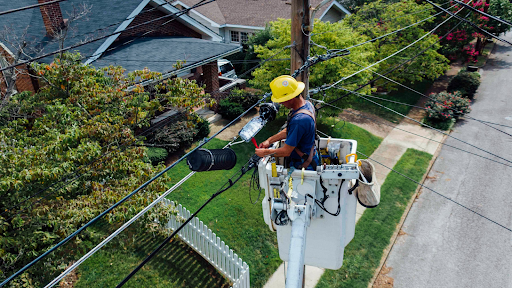
Skilled trades are what allow us as a society to keep building and growing—literally. University and college degree programs are important in a very distinct way from the skilled trades, and they help us to keep growing as well, but differently. Trades are the foundation of our construction, industrial, power, and services. They are the people making things happen in very tangible ways, but over recent years and for several reasons, we have seen a decline in the number of skilled tradespeople. You might have noticed this, particularly if you live in a rural area that has a shortage of plumbers, electricians, and mechanics and have had to wait three weeks for an appointment that could have been made within a couple of days only a few years ago.


The skilled trades labor shortage is rooted in the Baby Boomer generation’s retirement, who focused more on trades careers than university or college degree careers, combined with the emphasis on four-year programs for students coming out of high school, exacerbated by the 2008 recession. That’s a lot of factors combining to cause a huge shortage of skilled tradespeople in the labor force, right when peak demand for those skill sets is expected to happen. 


There’s another consideration to factor in. If the ongoing COVID-19 pandemic has made you reconsider the potential security of your job or career, a skilled trade is an option to think about that could provide you with a more stable career in the future. Service trades, in particular, are consistently in demand since no matter what’s happening in the world, we’ll always need skilled people to fix our plumbing, electrical, appliances, etc. Below are some of the skilled trades that are highly in demand at the moment. 

●      Repair and maintenance technicians

●      Construction trades

●      Farm equipment technicians

●      Heavy-duty mechanics

●      Diesel mechanics

●      Truck drivers

Skilled trades are an integral part of our daily lives, whether we know it or not. From planning your grocery schedule and doing your dishes to teaching yourself how to make improvements to your home, learning new skills will keep you independent and savvy with your money. And you never know, maybe it’ll even become a career!


Originally Posted on Porch.com

6 TIPS ON HOW TO IMPROVE YOUR GARAGE

Your home is a reflection of your personality. You take care of it, and you work hard to make sure that everything in it is always clean. And one way to ensure that your space stays organized and clutter-free is by routinely cleaning every corner of the house, including the garage. The garage may not be as crucial as other rooms in your home. But it does serve as an extension of the living room, bedroom, hallway, or kitchen. So if you want to give your visitors or guests the impression that you are super meticulous about the cleanliness of all areas in your home, then insist on having this particular room neat at all times.

Here’s how to do that.

1. REMODEL YOUR GARAGE WITH CABINETS

If your garage is filled with many items that you do not use anymore, then there’s a high possibility that you have already searched for options on how to make this room more functional. One of the best ways to optimize space in this outdoor area is by investing in cabinets and other organizational tools. You can check out this website where you can get more information about different types of garage cabinets. If possible, ask others who have installed storage systems for their recommendations because finding inspiration would be the first thing you should do when revamping your garage. According to the function, several online videos can provide ideas about how these tools should be placed and attached to the wall.

2. DECLUTTER THE GARAGE

Before you even think of painting the walls, cleaning the floor, or hanging stuff on the wall, take out all unnecessary items from your garage. If you have a car in there, chances are things attached to it that need to be removed. Once everything has been removed from the room, start throwing away unwanted junk pieces. Do not keep broken furniture or appliances in this space when you already know they won’t work anymore and only serve as a reminder of your unsuccessful DIY projects and previous owner-failures.

3. SORT THROUGH ALL SIGNIFICANT ITEMS

Put similar objects together to be easier for you to clean and arrange the items you want to keep. For example, store your gardening tools in one corner while hanging sports equipment on another area of the wall. Organize your stuff according to size or use color coding (if possible) so it will be easier for you to identify what belongs where. Not only by sight but also when you are in a hurry or just trying to find something specific that has been misplaced.

4. MAKE OPTIMUM USE OF VERTICAL SPACE

There is a possibility that some of your stuff, like brooms and shovels, will not fit in their designated corner. This would be the time to double up on these items while using all available spaces on the wall. Hanging objects vertically will also help maintain a clean garage, especially if there is no way they can be neatly arranged horizontally. Whether you are using the traditional wooden cabinets or modern-day racks, they will do great to hold your things.

5. USE GARAGE CORNERS WISELY

Some people turn this area into a junk pile or an extension of the tool shed. If you want to make your garage look polished from all angles, then place a table in one corner with a couple of chairs around it. It will be used for drinking coffee while planning out your activities for the day or just relaxing. Indeed, high shelves can hardly be used in this part of the house because most people cannot reach them, but it does not also mean that this area should serve as a storage space for your old stuff. Decorate garage corners by hanging potted plants there so they will appear more inviting and cozy even when you are strolling inside an empty room.

If you are so creative and have so much time on your hands, then go ahead and create a gallery wall in your garage. This can be very timely because there are instances when people do not have enough items to fill every inch of the room’s surface with things they want to show off. However, if there is still space left after arranging all your things according to size or category, it would be best to use this area to showcase stunning pieces of art that you made yourself.

By following the tips mentioned above, you will indeed be inspired to create a garage that is more than just an extension of your home. It can serve as an additional living space for your family, or if not for you, then for anyone who wants to fix their car there. In addition, you’ll be able to increase the overall value of your home if you should ever decide to sell it because getting rid of clutter is one way to make a place look bigger and more spacious.

THE IMPORTANCE OF PLUMBERS

One of the most overlooked trades is plumbing. Most people think that plumbers only deal with clogged sinks or clogged toilets, but that’s far from the truth. If we didn’t have plumbers around, the lifestyle we live, the privilege we have of having hot and cold water – wouldn’t be possible without plumbers.

WHAT DO PLUMBERS DO?

  • Plumbers have numerous jobs they do on a daily basis, and that includes more than unclogging toilets.
  • Install pipes, fittings, valves
  • Install appliances such as dishwashers, water heaters, sinks, toilets, bidets, etc.
  • Locate water and gas leaks in pipes
  • Replace broken pipes
  • Opening clogged drains
  • Install clean outs
  • Water softeners And so much more.

PLUMBING IS IMPORTANT

Did you know that the WHO (World Health Organization) declared plumbers as the most important frontline workers? Plumbers help to ensure the world has clean and sanitary water to drink and bathe in, it’s proven that without sanitary water, sustainable health is not possible. Clean and sanitary conditions allow many people to live healthy and it extends life expectancy.

Plumbers also make sure waste ends up in the correct spot. Plumbers make sure that the waste is disposed in a safe manner by separating your clean water from harmful contaminants. If your plumbing is done bad, or not up to plumbing code, it is possible that those waste contaminants could leak into areas it shouldn’t be, and can create a danger to those nearby.

CONSERVATION

One of plumbers main priorities is the conservation of water. Water is a finite resource, which means we don’t have an endless supply, which means we need to be cautious with the way we use it, and find ways to get the most out of it. With appliances in today’s technology, they focus on appliances that are water saving. If you’d like to reuse water and conserve your water a step further, a plumber can help you harvest rainwater.

By using appliances that are water saving, it will actually help you save money in the long run. When you waste water, you still need to pay for it. This is why we suggest ideas to help save water, because water isn’t free and it adds up when it’s being wasted.

There are numerous ways you can conserve your water. The most common appliances that are normally changed to water conservation models are:

  • Toilets
  • Shower heads
  • Bathroom faucet
  • Kitchen faucet

If you’re interested in becoming a plumber, send us your resumes to kevinszabojrplumbing@yahoo.com. Plumbers save the world, don’t you want to be a part of that?


Guest Contributor: Tiffany Powell

CONSTRUCTING PLUMBING SYSTEMS IN MODULAR HOMES AND BUILDINGS

Modular buildings are becoming increasingly popular due to the speed of their construction. The reduced time in construction has a significant impact on the cost of the overall project, which makes it enticing. Contractors can build structures rapidly with a design that takes less space than traditional ones.

People typically think that modular buildings have challenges when it comes to fitting all of their plumbings, but this instance is far from reality. The pipes and other plumbing fixtures are easier to install in a modular setting than in traditional buildings. With proper planning and execution, the plumbings in modular buildings will be functional with a substantial reduction in cost and installation time. 

How Do You Install Plumbing in a Modular Building?

A complete plumbing system, including vent stacks, water supply, and waste lines, are requirements for modular buildings. The connection, installation, and pressure test are necessary for these lines. The modular facility’s supply and waste pipes go through the first floor. The waste and water supply lines on the second level, on the other hand, connect to the water lines that were already existent at the construction phase.

Whether you plan to use city sewage and water or a private septic tank and well, your building will require the appropriate plumbing. Depending on the plan you choose, it will have waste lines, water supply lines, and venting stacks. It is necessary to have all connections tied in and pressure checked to the requisite 35 PSI for waste lines and 95 and 100 PSI for water lines to prevent leakage.

The pipes for waste and water supply are in the kitchen and bathroom parts of the manufacturing facility while they are under construction. Plumbing gets stubbed through on the first level, and if the structure has a second story, it may run up chase walls. After the delivery and setting of the building, your builder will need to hook up the second-story waste and water lines on-site. 

The builder is responsible for linking your well or public water to your building, determining what type of plumbing connections you need. It would be best to install general-purpose access doors with access cover to protect the entry points of the utility areas that you will use to access your plumbing.

Misconceptions About Plumbing in Modular Buildings

Plumbers and professionals typically avoid working on the modular buildings’ plumbing systems. Certain beliefs about it, on the other hand, are untrue. One assumption is that the drain lines have no venting mechanism, which is ludicrous because all drain lines require vents to function correctly; otherwise, pressure will build up, and nothing will move. 

Another common misconception regarding modular buildings is that they come with low-quality pipes that deteriorate over time, which is not the case.

Installing Public Water Pipes

Your modular building’s water source will determine the plumbing connections. Furthermore, installing the pipes’ entrance should be during the foundation, regardless of where the water supply originates. You’ll need to hook up your building to the city’s water supply.

Water Supply

You’ll need to connect the water supply lines to the first-floor plumbing lines stubbed into the modular building’s floor. The water feeds for the second floor must be from the connection between the first and second floors in access panels, typically located near the waste lines for the modular building. It is always preferable to have the access panels on the floor rather than the second-story ceiling.

Sewer System Installation

In terms of technique and setup, connecting sewer pipes is comparable to linking water sources in modular buildings. However, keep in mind that the septic system’s installation should only be after the construction of the entire building.

Waste Lines and Vent Stacks

The water lines on the first floor must connect to the waste pipes in the foundation space of the modular building. However, if you have a two-story building, the waste lines need a connection to the first-floor box, which will be present between the two stories. Placing the box on the second-floor floor is usually tricky since it necessitates the use of additional materials. 

The vent stacks in the attic space, perforated in the roof, can connect to offer an easy exhaust system.

Hot Water Heater Installation

This job will require an electrician to operate the water heater system, either an on-demand system or a storage tank. For the water heating system, there are two possibilities. One option is installing the water heater in the building’s foundation base, while the other is installing it in the conditioned space. Furthermore, it can use both electric and natural gas for water heating.

Plumbing Leaks

Because the plumbing supply lines in these buildings are rarely inside the walls, you won’t have to worry about any wall damages. Additionally, you can find pipe leaks frequently in the insulation, floors, subfloors, or HVAC ducts. If your flooring is composite wood material, it will absorb liquid like a sponge and deteriorate. 

When it happens, it’s usually better and less stressful to bring in new supply lines while shutting down the existing ones rather than repairing them. The last deciding factor in which material to employ will be local plumbing codes.

Takeaway

Prefab buildings will have more variations in the foreseeable future due to the advancement in various construction technologies and methodologies. Driven by the need for a more sustainable approach, more experimental structures will become the foundation for other projects. Make sure to consult with a professional when making decisions about your project and only purchase high-quality products from reputable companies.


Guest Contributor: Chris Jackson

HOW TO CHOOSE THE RIGHT KIND OF PLUMBING FITTINGS AND FIXTURES

When it comes to plumbing systems, many people tend to prioritize inward pipe installation and disregard pipe fittings and pipelines, which are fundamental to ensure that your plumbing is fully-operational and working as it should. Understanding the significance of having a solid pipe framework is critical because if these fittings are not working correctly, it gives room for leakage. 

Plumbing fittings integrate several pieces of plumbing equipment, including lines, fixtures, and the joints that interface these installations. Installing quality pipe fittings and fixtures are essential for a continuous water flow and reliable plumbing framework.

Tips on Choosing the Right Plumbing Fittings And Fixtures

Whether building your property or renovating, you will eventually need to purchase plumbing fittings and fixtures based on your needs. Although these parts are small and appear optional, they help maintain the main plumbing framework. When looking for the ideal pipe fittings and fixtures, you can consider some factors here.

  • Cost – Finding the right fittings and fixtures also means staying within budget without sacrificing quality. Choosing to purchase branded plumbing accessories is expensive, to say the least, since you may end up spending more than you have intended. Asking for recommendations and checking for cheaper options is better before settling on your purchase to avoid exhausting your budget before the project is complete.
  • Quality – When looking for plumbing fittings and fixtures, you must always consider the quality of your purchase item. Installing inexpensive yet low-quality accessories will ultimately lead to a budget disaster since they can easily break and cause leakages. The leakage can also occur through an ingrained pipe that is hard to locate and isolate, making repairs especially expensive. Consider purchasing an item that can benefit you in the long run, just like fire-rated access doors and panels.
  • Material – Identifying your needs will lead you to choose the suitable material for your plumbing fittings and fixtures. Your contractor can give you recommendations if you are clueless about purchasing. Some of the materials used in fittings and fixtures are stainless steel, plastic, aluminum, concrete, copper, and glass, to name a few. 
  • Size – To ensure the stability of your plumbing system, you need to install the fittings and fixtures of the right size to hold the structure in place properly. When shopping for these accessories, do not forget to take the measurements along with you. Purchasing the accessories in the wrong size may delay the construction project and keep you off track when it comes to your budget range.
  • Aesthetic – Fitting and fixtures are considered as plumbing accessories. Therefore, it would be best to purchase items that can blend in perfectly with the overall aesthetic of your home or business. Thankfully, you can choose from several colors and designs.

When choosing the right plumbing fittings and fixtures, you must be extremely careful in deliberating what you need. Taking these buying factors into consideration will assure you that your plumbing system will work properly and last longer.

Types of Plumbing Pipe Fittings

There are various types of plumbing fittings available that have different functions. Plumbers use fittings to connect multiple pipes to regulate or measure the water flow regardless of size. Here are the various fittings used in residential or commercial plumbing systems.

  • Elbow – Elbow fittings usually have 90 degrees and 45 degrees turn and are installed to change the pipe flow direction. The sweep of the elbow fitting shows how fast it can make a transition or change in leadership.
  • Reducer – Reducers are installed to connect pipes with different diameters as it gradually changes in diameter to reduce flow.
  • Tee Type – This fitting is shaped like the letter T and has two inlets arranged at 90 degrees in the main pipeline. 
  • Street Elbows – Street elbows are composed of male and female threads. They are commonly used with galvanized steel and copper pipe, ideally in tight spaces.
  • Cross-Type – This fitting accessory is designed with four openings in four different directions and is commonly used for fire sprinkler systems.
  • Couplings – Couplings are used to connect pipes of the same diameter. It has two types available: compression and regular coupling.
  • Unions – Union fittings have similar functions to couplings. However, union fittings are not fixed and can be removed when needed. 
  • Adaptors – Commonly used in copper or PVC plumbing applications, adaptors are installed to change the end of a non-threaded pipe to male or female ends. 
  • Olet – Plumbers use olet fittings when the inlet pipe size is larger than the outlet pipes in a T-section. Several types of olets are available, such as butt-weldolet, socket weld, threaded, elbow, nipple, lateral, and flange olet.
  • Bushings – Bushing fittings may have a similar function as reducers, but they are different in making an abrupt change in diameter.
  • Plug – Plug is a plumbing accessory used in closing pipe openings during repairs and inspections. 
  • Caps – Caps have similar functions as plug fittings but consist of male and female threads. It is available in rubber, copper, steel, plastic, etc.
  • Valves – Valve fittings regulate water or gas flow through a pipe. There are different types of valves such as gate valves, globe valves, check valves, butterfly valves, and diaphragm valves. 


Types of Plumbing Fixtures

Since fixtures are for extended usage, they are often made with durable materials that resist corrosion, erosion, and water stains. Plumbing fixtures are manufactured with different materials, including PVC, fiberglass, tile, marble, glass, and stainless steel or copper. Here are the different types of plumbing fixtures.

  • Toilets – Toilets may look simple, but they have ingenious systems and designs. It mainly consists of a water tank mounted above the bowl with a large curved drain in the bottom. The toilet is then mounted to the floor with its drain pipe connected and positioned over the sewer pipe. Toilets also vary in some parts of the world and have different types: flush toilets, dry toilets, urinals, and high-tech toilets. 
  • Bathtubs – Commonly found in bathrooms, bathtubs usually have a shower attachment that provides the user versatility. Modern tubs have overflows, drains, and faucets that help in regulating water flow and water drain. Some of the most common bathtubs are Western-style bathtubs, Eastern-style bathtubs, Claw-foot tubs, Whirlpool tubs, and Hot tubs.
  • Sinks – Plumbing sinks are bowls or basins used to hold water in kitchens, bathrooms, and other utility rooms. Many sinks have cold and hot water options depending on users’ needs. The different types of sinks include self-rimming sinks, bottom-mount sinks, solid surface sinks, butler sinks, and stand-alone sinks.
  • Showers – Showers are plumbing fixtures that use a nozzle to stream hot or cold water over a tub or a shower space. There are several variations in the nozzle, but they all have the same function. Standard showers include water showers, electric showers, air showers, steam showers, bucket showers, beach showers.

Each plumbing fixture comes in various styles, colors, and designs. Depending on the fixture, they offer practicality and are often aesthetically pleasing.

Your plumbing system is considered an integral component since it deals with water flow and easter disposal. With this in mind, an effective maintenance program and regular upkeep are crucial to ensure its stability. In addition, it is imperative to equip your water system with necessary parts such as plumbing fittings and fixtures.

Guest Contributor: Chris Jackson

HOW TO PROPERLY TAKE CARE OF ELECTRICITY SUPPLY WHILE RENOVATING YOUR HOME?

Renovating your home can be a daunting task, but with careful planning, it doesn’t have to be. One of the most important things to consider when renovating your home in Australia is how to take care of your electricity supply. Here are a few tips on how to do that.

BEST POWER SOLUTION

One thing to consider when renovating your home in Australia is how you will keep everything powered up while the renovation process takes place. Some things will likely need more power than others, such as having all lights on inside or outside during the day while renovations are being done. If you’re going to need more power supply or a new distributor, it’s best to do an electric comparison first. This should be done before the renovation process begins to avoid any sudden changes in electricity costs.

Renovating your home can also change the cost of electricity for you. This is because there is more power being used at one time than there was before, so it might start to increase your monthly bills. Depending on how long you plan on staying in your home and what renovations will be done, again, it’s important to do an electric comparison beforehand so that you’re aware of any changes that may happen. If your electric bill does increase once everything has been completed, don’t forget about energy-saving tips. These tips can help reduce the amount of energy you use around the house which can save you money in both the short term and long term.

You can also consider taking any items that need extra power off of the main distributor or get an alternative power source and one of the best ways to do this is by using a generator or inverter. These can be used indoors or outdoors depending on how your home is set up and which would work best for you. If possible, make sure that you use an inverter rather than a generator as it will produce less noise, making it ideal for an outdoor environment.

ELECTRICAL SAFETY

Though this may seem like an obvious one, it is still very important to ensure that everyone who is involved in the renovation process knows how to take care of the electricity supply. The last thing you’d want is for someone to accidentally turn off your main power supply while you’re having work done on your home. Having someone around who knows how to safely take care of the electricity supply can help keep everyone safe and prevent accidents.

Also, it is important that everyone knows what can and cannot be done while taking care of the electrical supply. Most of the time, it’s best to consult a qualified electrician before beginning work on your home’s power supply. You certainly don’t want to accidentally cause more damage or make things worse.

CHECK POWER CABLES REGULARLY

One of the most common causes of fires in homes is faulty wiring or electrical cords. To avoid any possible accidents, you should always check these things before using them. Basically, if something looks suspicious, don’t use it until a professional has checked out first. This way, you can be sure that everything is safe and will continue to remain so.

Also, it’s important to look at where the electrical cables are placed before you begin working on your home. This way, you can figure out if anything needs moved or changed for renovations to be completed properly. 

BE CAREFUL WITH POWER TOOLS

Using power tools while renovating your home can help speed up the process considerably, but they’re not always completely foolproof. If you plan on using any power tools during renovations, make sure that everyone knows what they’re doing and how to use them properly and safely.

For example, a multifunction tool may not only cut through wood but can also make holes in walls or create sparks as well. If anyone messes up, it’s best to repair things before working on any electrical fixtures inside. Using power tools may save you some time, but they should only be used if absolutely necessary after taking safety precautions first.

One of the most important things to consider when renovating is how to take care of your electricity supply. Whether you’re doing a DIY project or hiring someone, it’s best to consult an electrician before beginning work on your home’s power supply and make sure that any renovations won’t cause more damage. It can also be helpful to do an electric comparison beforehand so that you know what changes might happen with your monthly bills and look at where electrical cables are placed for safety reasons. If using power tools during renovation, make sure everyone knows how they should be used safely and correctly in order not to injure themselves or anyone else around them.

ARE YOU REMODELING YOUR KITCHEN? HERE’S HOW TO DEAL WITH THE WASTE

You might be wondering what to do with the waste during your kitchen remodeling. You’ll find that there are many different ways of dealing with waste during this process, but you should try to use organic materials as much as possible. It’s important to recycle and compost, but it’s also very important not to put any excess burden on the environment by adding too much waste back into it. Let’s see some solutions for dealing with waste in your kitchen!

LARGE TRASH BINS

One of the simplest solutions for dealing with kitchen remodeling waste is to simply place one or more large trash bins in the area where you’re working. Be sure to keep them far away from food preparation surfaces, and clean them out regularly so that there isn’t anything rotting inside. If you feel that you’ll be making a lot of mess and waste, you can go for Gordon Park skip bin hire to put all that waste in large containers and have them shipped. This is one of the best options because it removes the burden from your shoulders.

REDIRECT YOUR KITCHEN SINK DRAINS

Your sink drains could be another source of organic materials for composting or recycling during your kitchen remodeling project. You can redirect them to large containers so that you can keep organic kitchen waste contained while it’s working its way through the composting process. Be aware that some of these materials might need to be treated before they can go into general compost piles, so don’t just toss everything into one container!

KEEP A DUSTPAN NEARBY

You’ll probably create a lot of dust during your kitchen remodeling project. Even if you’re wearing masks and gloves, there will be small particles in the air (and coating every surface) of your home. You can make it easier on yourself by keeping a small dustpan or shovel nearby at all times. This way, when you knock down insulation or other debris around your home, it can easily get swept up.

USE AS MUCH RECYCLED AND RECYCLABLE MATERIAL AS POSSIBLE

This is true for any project, but it’s very important for kitchen remodeling projects in particular. If you use as much recycled material as possible, then it will be easier to recycle or compost the rest of your waste materials after your project is complete. Even if you have to pay more upfront, you’ll save money later on because there won’t be so much waste to deal with. During your kitchen renovation project always remember your local recycling plant so that you have a place to deposit all of those recycling materials when it’s time for them to go! Not every plant accepts every material, so check beforehand to see what’s accepted and what isn’t. You don’t want to create more waste than necessary during your kitchen renovation project! One way that you can reduce your overall waste despite using many different products is by using reusable materials whenever possible. Instead of buying disposable pans and trays, see if you can find reusable pans and trays that you can bring back with you when your project is over. You’ll also probably be needing lots of cardboard boxes during your kitchen remodeling project so that all of your unwanted materials and belongings can be easily and safely transported to a storage unit or new home.

CLEAN UP PROPERLY

One way to reduce waste during kitchen remodeling projects, or any other type of renovation project for that matter, is to clean up properly after yourself once the job has been completed. Make sure that everything has been completely cleaned before you leave the scene so that you don’t have too much cleaning up to do later on! If something goes wrong, don’t feel pressured into doing more than necessary to fix it. If there are materials that you don’t want around your property anymore, make sure they’re gone before the actual kitchen remodeling project begins. This will save you time later on as well as reduce the overall amount of waste that has to be dealt with after all is said and done! If you have asbestos insulation, take care of it properly by hiring a contractor who specializes in this material before the renovation begins. If there is a problem that can’t be dealt with, then just remember that other types of materials often look very similar so always double-check to make sure you’re not accidentally exposing yourself to something dangerous!

The process of remodeling your kitchen is fun but it can be difficult to deal with the waste materials that are created. These tips will hopefully help you to create as little waste as possible so that you have a safer, cleaner remodeling experience!

8 PROJECTS BEGINNER FLIPPERS SHOULDN’T DIY

Home improvement has the potential to be fun, affordable, and extremely rewarding. But that doesn’t mean every DIY project is worth attempting. In fact, a recent report suggests that 4 in 10 Americans suffer from more DIY fails than successes, and that it takes an average of 5 hours of trial and error before calling in the professionals.

The bathroom is the most common room of the house to suffer at the hands of inexperienced DIY-ers, followed closely by the kitchen and yard. Even though the idea of hauling out your drill and cutting some home improvement costs is tempting, it’s important to remember that some tasks are simply best left to the professionals. 

It doesn’t mean you can never go for DIY projects that are within your range of expertise. It just means knowing when to hand the baton over to an experienced contractor. 

Here are eight DIY projects that beginners (and most intermediates) should never try. 

1.     Electrical Installation 

Aside from the odd light bulb change, almost all electrical installations should be reserved exclusively for professional electricians. The dangers surrounding electrical installations are vast and recurrent, making this form of DIY a very unsafe process to execute, no matter how confident you feel. 

Whether you want to install a new light fixture, replace your electrical panel, or perform a demolition of electrical components, these are all jobs that you should never attempt alone. 

The US Electrical Safety Foundation found that improperly handled electricity is annually responsible for 400 deaths, 4,000 injuries, and up to $1.6 billion in damages to property. So, next time you catch yourself gazing wistfully at the electrical box, promptly identify a good distraction. 

2.     Window Replacement 

Window replacements are tricky to execute because of how precise every component needs to be. Even the tiniest crack or mismeasurement around the walls, framing, and window in question can result in long-term water leaks and mold damage. 

Even though window installation may seem like a straightforward job, it’s the kind of project that requires a meticulous, experienced hand. 

Furthermore, any damage repair needed will not be cheap. And you may wind up spending more money fixing damages than it would have cost for a contractor to do a proper job the first time around. 

3.     Wall Removal 

The demolition or removal of a wall is a highly ambitious home improvement project that amateur DIY-ers should steer well clear of. This is due to the fact that only a professional will be able to tell whether or not a wall is load-bearing, meaning it is an integral support structure of the house. 

If you attempt to remove a wall without having performed the proper load-bearing analysis procedure, you could place yourself, your home, and everyone in it at risk. Having your ceiling cave in is not worth the time or energy it takes to attempt this project. Rather, get a professional to do the work for you. 

4.     Removing Chipped Paint 

Removing old paint from a wall might seem like child’s play. But in reality, it can result in serious health consequencesif you’re not careful. Buildings erected before 1978 (yes, even if they have been remodeled), are likely to contain lead-based paint, which is extremely toxic to humans. 

If you just decide to go for it and strip away the newer layers of paint, you could uncover the lead-based paint chips which lay beneath. In doing so, you put yourself at risk for lead poisoning, which can cause anemia, brain damage, and kidney damage. 

5.     Roof Leak Repair

 Your roof is an integral part of your house, and tampering with it when you don’t have professional experience can cause a lot of damage—while costing you an arm and a leg. If your roof has a leak, doing a simple patch-up job might seem like the best option. But in reality, it’s far more complicated than that.

To repair a roof leak, you have to identify the weak spot and replace the individual shingles (or other roof components) without causing more damage to the surface. A solid roof job should last anywhere between 13-18 years, but amateur repairs could just mean more problems in the long run. 

6.     Painting Kitchen Cabinets 

When it comes to painting the kitchen cabinets, choosing the perfect color is the least of your concerns. The job may seem simple, but there is far more to it than taking a foam roller and applying the latest shade of periwinkle. 

Particularly if the kitchen itself is old, there is likely to be a thick build-up of grease, finger oils, and cooking stains embedded in the surface of the wood. This means that an extensive preparation process is needed before fresh paint can go anywhere near the cabinets. Failing to prep the surfaces properly can lead to flaking paint, bubbles, and unsightly, hard to hide streaks.

7.     Repairing Drywall

If you think you’ve got what it takes to repair broken drywall, think again. This brittle material is finicky enough to deal with when it’s new. But there is so much more to repairing old drywall than what meets the eye. Even a small crack can reveal a huge issue with the joints or fastenings, and a simple patch job can cause more issues in the not-too-distant future.

Whether you are installing, repairing, or removing drywall in your home, there is a substantial amount of expertise needed to accomplish the job properly. Rather, get a quote or estimate from a professional and work the job into your budget than trying to tackle it yourself. 

8.     Adding A Skylight 

Adding a skylight to your ceiling might sound like a whimsical, fun DIY home project. However, the reality of the installation process is far more complex than what you might like to believe. 

The main challenge is around the installation, which is especially tricky when mounting onto a ceiling. The potential for gaps and leakage points becomes even greater with a skylight than with a normal wall window—which, as we’ve already covered, comes with its own set of troubles. 

Wrapping Up

When it comes down to it, just about any major infrastructure repair or installation to your home is best left to the pros. But don’t let that stop you from experimenting with some lower-stakes projects!

Guest Contributor: Nina Sharpe

AN EFFECTIVE GUIDE ON HOW TO MAINTAIN A GOOD INDOOR AIR QUALITY

Poor indoor air quality can have a serious impact on your health and well-being. According to the Environmental Protection Agency, indoor pollutants may be up to 10 times greater than outdoor pollutants. Fortunately, there are steps we can take to improve our home’s air quality such as using a humidifier or installing better insulation. In this blog post, we’ll explore some of the best ways to maintain the good indoor air quality in your home.

1 – HAVE AN AIR PURIFIER INSTALLED

An air purifier can have a huge impact on your home’s indoor air quality. If you’re looking to remove pollutants from the air, such as dust and pet dander, a Rainmate air purifier could be just what you need. There are all sorts of different types, such as HEPA filters or ionic filters, that vary in price and effectiveness. Make sure to research different types so you can be confident that you’re selecting the right one for your home. With the right air purifier installed, you can easily remove bacteria and impurities from your home’s air. Getting an air purifier can be an excellent first step to take for better indoor air quality.

2 – KEEP YOUR HOME WELL INSULATED

In addition to an air purifier, keeping your home well insulated is essential for maintaining good indoor air quality. If the atmosphere lacks insulation, it leaves more room for cold air to escape during the winter, which means warm air escapes as well. This can result in higher electric bills, not to mention a chilly home. There are a few different types of insulation that you can use, such as cellulose insulation or spray foam. If you’re looking to save money on your energy bills, consider having an insulation contractor come to your home to help you find the best insulation for your space.

3 – MAINTAIN YOUR HOME’S HUMIDITY

Maintaining good humidity levels throughout your house is another way to maintain healthy indoor air quality. A humidifier might be necessary if you live in an area with low humidity during the winter. On the other hand, maintaining high humidity levels might be necessary if you live in an area with high humidity. Either way, humidifiers, and dehumidifiers can help maintain a healthy level of indoor air quality. Your humidity levels should be at around 40-50%. If you’re using a humidifier, make sure it’s cleaned regularly so that bacteria doesn’t build up.

4 – VENTILATE YOUR HOME

Ventilation is incredibly important when it comes to maintaining good indoor air quality. Ventilation is a key component in circulating the air throughout your home so that everything stays fresh and clean. During the winter, your windows may be closed up to keep out cold weather and warm air inside. However, this means that pollutants won’t be able to escape. Consider opening your windows for at least 30 minutes every day so that fresh air can come in and pollutants can be exchanged. Proper ventilation can seriously help improve your home’s indoor air quality. Why not consider installing ceiling fans throughout your whole house as this can help promote air movement in your home when necessary. Make sure your home is properly ventilated, especially during the summer months. You don’t want to allow the atmosphere to get stuffy and stagnant that can also lead to poor indoor air quality.

5 – USE THE RIGHT CLEANING PRODUCTS

It’s important to use appropriate cleaning products when you clean your home. Many common household cleaners can be extremely toxic, which is bad for your health and can also impact the indoor air quality of your home. On the other hand, using natural cleaning products – such as a vinegar/water mixture – will improve the atmosphere of your home and help maintain healthy indoor air quality.

6 – USE NATURAL DEODORIZERS

On the same note, you should try to avoid using harsh chemicals and artificial materials for deodorizing your home. Burning incense, using natural deodorizer atmosphere, baking soda, or other such products can add a pleasant aroma to your home without compromising the. It’s a safe and healthy way to maintain good indoor air quality.

Maintaining good indoor air quality is important for our health and well-being. Fortunately, there are many things we can do to achieve this goal, such as using an air purifier, keeping our home well insulated, maintaining humidity levels, ventilating our home properly, and using the right cleaning products. By following these tips, you can keep your home healthy and free from harmful pollutants.

WATER & FLOOD DAMAGE RESTORATION: 4 THINGS YOU SHOULD KNOW ABOUT IT

Water damage can come about in many ways, but it is always inconvenient and costly. Floods are the worst culprits of water damage for many reasons, including the fact that they may affect an entire building or area. Because of this, floodwaters must be pushed out quickly before mold begins to grow. Whether you are suffering from flooding at home or the office, it may be in your best interest to learn more about water damage restoration. These four facts about flood and water damage restoration may help you understand what to do if you suffer from this type of damage.

WHAT ARE THE COMMON CAUSES OF WATER DAMAGE?

One of the most common causes of water damage is leaks. These can happen from several sources, including plumbing, roofs, and even windows. Water seeping through cracks is one of the most difficult types to detect because it goes quietly until it has soaked everything into a soggy mess. Other less noticeable sources include broken appliances that spray water or sewage that backs up into a building due to blockage. Whatever caused your water damage, you need a restoration plan as quickly as possible.

Regardless of how it occurs, water damage often results in additional damage to the building’s structure. Water that remains for too long will weaken the integrity of walls and floors, which means you can expect more problems if they are not repaired immediately. However, avoid trying to repair anything by yourself, and instead call for professional help, by reaching out to reputable water restoration companies. Even a single mistake could make the problem worse and end up costing more money in repairs, time lost from work, and so on.

WHAT ARE THE PROPER PROCEDURES FOR WATER DAMAGE RESTORATION?

As mentioned earlier, water damage restoration is a multi-stage process. The first step in this process should be to turn off the power by shutting off circuit breakers and removing fuses from the fuse box to prevent short-circuiting. You also need to remove personal items that have been soaked. This will prevent them from being damaged further when your building’s structure begins to dry out.

While you are repairing the secondary damage caused by flooding, professionals need to begin drying out your walls and floors. This ensures that mold does not start growing before the building has had a chance to fully dry out. Once everything is ready, humidity can be brought down within 24 hours using dehumidifiers or other equipment designed specifically for this purpose.

THE DIFFERENCE BETWEEN WATER DAMAGE RESTORATION AND FLOOD CLEANUP

Water damage restoration is not the same as flood cleanup. Some companies specialize in one but not the other, even though both types of water damage require similar skills and equipment. However, restoring water damage after floods is more difficult because floodwaters are only the beginning of the problem. They leave after-effects, including mud and other debris that can be hazardous to your health. Flood damage restoration also involves cleaning up floodwaters that may have contaminated anything they touched, including your personal belongings. 

On the other hand, water damage caused by leaks or broken appliances is easier to repair because they are less likely to leave extensive after-effects. This makes them easier to clean up, however they also require professionals with the equipment and skills necessary to restore things such as air conditioning, water heaters, and other plumbing.

WHAT TO DO IF YOU HAVE WATER DAMAGE RESTORATION PROBLEMS

If your building has already suffered water damage during floods or leaks, then you should take steps immediately to prevent further damage. This could include removing sections of walls that have been soaked. However, if you do not want this kind of demolition work done in your building, then you should turn off all power and start drying out your structure. While waiting for professional help, go through the damaged areas and remove items that are valuable enough to risk being damaged by mold or other contaminants left behind by floodwaters.

When working with water damage, it is best to act quickly. A little bit of neglect can lead to big problems down the road that require you to invest more time and money into fixing them. This means that waiting too long before hiring help or starting work yourself could end up costing you even more money in repairs later on. To avoid these kinds of problems hire professionals that you can trust, and work with them to clean up the mess left behind by water damage.

Water damage restoration is not a one-person job. It requires specific skills and experience to get the best results. Even if you try to handle it yourself, there are potential accidents that can’t be dealt with without professional help. However, what you can do is to do your best to prevent these issues from occurring in the first place.  Things like using your dishwasher correctly, not flushing away non-organic substances down toilets, and following guidelines on how to use appliances can reduce the risk of water damage in your home. So, keep these things in mind next time you notice a sign of water damage in your home, act quickly and save yourself from more serious issues, at least.