Regular plumbing maintenance is essential for preventing costly repairs and ensuring the longevity of your plumbing system. By following a comprehensive checklist, you can identify and address potential issues before they escalate into major problems.
The Importance of Preventative Maintenance
Many homeowners neglect preventive plumbing maintenance, often leading to unexpected and expensive repairs. Studies show that a significant portion of homeowners lack a preventative maintenance plan, resulting in financial difficulties when faced with unexpected plumbing bills.
A Comprehensive Checklist
Regular inspections
Schedule annual inspections with a licensed plumber to assess the overall health of your plumbing system. Professional leak detection tools can help identify hidden leaks that may be contributing to water waste or structural damage.
Water heater maintenance
Flush your water heater annually to remove sediment buildup and improve efficiency. Check temperature settings to ensure they are appropriate for your household needs.
Leak detection
Regularly check for signs of leaks, such as damp spots on ceilings or walls, musty odors, or unusually high-water bills. Address minor leaks promptly to prevent further damage.
Inspection for corrosion
Metal pipes can corrode over time, leading to leaks and reduced water flow. Inspect pipes regularly and address any signs of corrosion to prevent serious issues.
Drain cleaning
Clean drains regularly to prevent clogs and ensure proper water flow. Avoid flushing non-biodegradable items down the drain, as they can cause blockages.
You can significantly reduce the risk of plumbing emergencies and extend the lifespan of your bathroom plumbing system by following this comprehensive checklist and scheduling regular plumbing maintenance. To learn more, the resource below provides a visual representation of the key areas for preventative plumbing maintenance.
CJM, a well-known leader in professional cleaning services, has officially launched its premium dust mite removal service, aiming to enhance home hygiene and reduce allergy risks. This new service utilizes cutting-edge technology from the USA and Germany, ensuring effective cleaning of mattresses, sofas, carpets, and curtains. Dust mites, a common allergen causing respiratory issues, are efficiently removed through an eco-friendly process that is safe for children and pets. This technology has been proven to eliminate up to 70% of allergens, improving indoor air quality significantly.
WHY DUST MITE REMOVAL IS CRUCIAL FOR A HEALTHY HOME
Recent studies indicate that 85% of homes contain significant dust mite infestations, often contributing to allergy and asthma flare-ups. Dust mites thrive in warm, humid environments, particularly in mattresses and soft furnishings, and are a leading cause of indoor allergens. Many families unknowingly suffer from the effects of these tiny pests, which can cause respiratory issues, skin irritations, and sleep disturbances. With CJM’s innovative service, households can maintain a clean, allergen-free environment that supports overall well-being.
ADVANCED TECHNOLOGY FROM USA AND GERMANY
CJM’s dust mite removal service is powered by advanced technology sourced from the USA and Germany, ensuring a thorough and safe cleaning process. The use of Hydro Air Cleaner technology provides powerful suction and water filtration to trap dust mites and other microscopic particles, which traditional cleaning methods often miss. Paired with organic-based cleaning solutions, CJM guarantees a chemical-free approach that prioritizes health and safety.
KEY BENEFITS OF USING CJM’S DUST MITE REMOVAL SERVICE
Improved Indoor Air Quality: Dust mites and their waste products are major contributors to poor indoor air quality, leading to respiratory problems. Regular cleaning with CJM significantly improves air quality.
Safe for All Family Members: CJM’s use of eco-friendly cleaning products ensures that no harmful chemicals remain after cleaning, making it safe for children and pets.
Proven Allergy Reduction: The service has been shown to reduce allergens in the home by up to 70%, offering relief for those suffering from allergies and asthma.
Trusted by Thousands of Customers: CJM has been trusted by customers in Bangkok, Chonburi, and Chiang Mai, with positive reviews highlighting noticeable improvements in home cleanliness and health.
Customers who have experienced CJM’s service consistently report significant improvements in their home environment. One client from Bangkok noted, “After using CJM’s dust mite removal service, my son’s asthma attacks reduced dramatically. We now feel safer and more comfortable in our own home.” This sentiment is echoed by hundreds of satisfied customers who have experienced the tangible health benefits of cleaner, dust-free homes.
EXPERTISE AND CERTIFICATIONS OF CJM
CJM prides itself on having a highly trained team of professionals certified by global health and cleaning organizations such as the Asthma and Allergy Foundation of America (AAFA). The use of certified, cutting-edge technology from USA and Germany reinforces CJM’s expertise in dust mite removal, ensuring thorough and safe cleaning for every household.
SCIENTIFIC BACKING ON THE IMPORTANCE OF DUST MITE REMOVAL
According to studies by the World Health Organization (WHO), dust mites are a leading cause of indoor allergies, affecting up to 85% of people suffering from asthma or respiratory issues. Regular dust mite removal is proven to significantly reduce allergens, improving air quality and overall health.
FAQ
Why should I consider dust mite removal? Dust mites are invisible pests that can trigger allergies, asthma, and other respiratory problems. Removing them can drastically improve health and overall living conditions.
How often should I use this service? Experts recommend scheduling dust mite removal every 6 months to maintain a clean, allergen-free home, especially if there are children, seniors, or allergy sufferers in the house.
Is the process safe for my pets and children? Absolutely. CJM uses organic-based cleaning solutions that are safe for both pets and children, ensuring no harmful chemicals are left behind.
How long does the service take? The duration depends on the size of the home and the number of items to be cleaned. Typically, the process takes about 1-2 hours.
CONCLUSION: INVEST IN A HEALTHIER HOME WITH CJM
CJM’s dust mite removal service is not just a cleaning solution, but a vital step towards creating a healthier living environment. With advanced technology and a focus on safety and efficiency, CJM is the perfect partner in your fight against dust mites and allergens. Keep your home safe, clean, and free of allergens with regular professional cleaning from CJM.
Moving to a coastal home in Florida offers beautiful views, beachside living, and year-round sunshine. However, living by the ocean also brings unique challenges, particularly when it comes to protecting your home’s plumbing from saltwater and sand. These natural elements can take a toll on your pipes and fixtures if not properly managed. Preparing your plumbing for this transition is essential to ensuring a smooth move and long-term protection for your home.
In this article, we’ll explore key steps you can take to safeguard your plumbing system before moving to Florida’s coast. With these proactive measures, you can enjoy beach living without worrying about the impacts of saltwater and sand on your home’s pipes.
Finding the Right Moving Company for Your Coastal Move
Moving to a coastal home involves more than just packing up your belongings; it also requires careful planning and preparation, especially when it comes to your home’s plumbing. Working with a reputable moving company can help make the transition smoother. If you’re relocating to a coastal home in Florida, you’ll want a reliable team to handle the heavy lifting and logistics. Florida moving brokers such as nwmoving.com specialize in making long-distance moves as stress-free as possible, allowing you to focus on settling into your new home and addressing any plumbing needs.
Understanding the Impact of Saltwater and Sand on Plumbing
Saltwater and sand are two common environmental factors that come with coastal living. Salt can be highly corrosive to metal plumbing pipes and fixtures, leading to rust and deterioration over time. Sand, on the other hand, can easily infiltrate your plumbing system, clogging pipes and reducing water flow. Both can result in costly repairs if not addressed early on.
By understanding the risks that saltwater and sand pose, you can better prepare your plumbing to handle these challenges. Whether building a new home on the coast or moving into an existing one, implementing the right plumbing practices will make all the difference in maintaining a safe and functional home.
Choosing Salt-Resistant Plumbing Materials
One of the most important steps you can take is to ensure your plumbing system is built with salt-resistant materials. Copper and galvanized steel pipes are particularly vulnerable to saltwater corrosion. Instead, consider installing pipes made from more durable materials like PEX, PVC, or stainless steel. These options are resistant to corrosion and are better suited for the harsh conditions of coastal environments.
Additionally, look for fixtures and fittings that are designed to withstand exposure to saltwater. Brass and bronze fittings, for example, offer greater durability and can better resist the corrosive effects of salt.
Installing Sediment Filters to Combat Sand
Sand can easily infiltrate coastal plumbing systems, especially during storms or when water is sourced from a well. Installing sediment filters on your home’s plumbing system effectively keeps sand and other debris from entering your pipes. These filters will trap sand before it has a chance to clog your system, keeping your water clean and your plumbing functioning smoothly.
Make sure to choose high-quality filters and schedule regular maintenance to ensure they continue working effectively. Checking your filters every few months is especially important if your home experiences frequent storms or heavy rainfall.
Regularly Inspecting and Maintaining Your Plumbing
Coastal environments can be tough on plumbing, so regular maintenance is crucial to preventing issues. Schedule routine inspections of your plumbing system to catch potential problems early. Look for signs of corrosion, leaks, or blockages, and address any concerns immediately.
It’s also a good idea to have a professional plumber inspect your system before and after you move into your new coastal home. They can help identify vulnerabilities in your plumbing and suggest upgrades or repairs that will keep your system running efficiently.
Protecting Outdoor Plumbing Fixtures from Salt Air
Outdoor plumbing fixtures are particularly susceptible to damage from salt air. The constant exposure to salty sea breezes can cause metal fixtures to rust and degrade quickly. To protect these fixtures, consider using corrosion-resistant materials or adding protective coatings.
For example, installing stainless steel or brass outdoor fixtures can prevent rust and extend the lifespan of your plumbing. You can also apply protective sealants to metal parts to shield them from salt air exposure. Regularly cleaning and maintaining outdoor fixtures is another simple yet effective way to keep them in good condition.
Installing Water Softeners to Manage Salt Content
If your home’s water supply comes from a local source that contains high levels of salt, you may want to consider installing a water softener. These devices can remove excess minerals and salts from your water, helping to reduce the impact of salt on your plumbing system.
Water softeners work by exchanging the minerals in hard water with sodium, which helps protect your pipes from scale buildup and corrosion. Installing one of these systems can be especially beneficial if your water supply is drawn from a well or if you frequently experience salty tap water.
Preparing for Storms and Flooding in Coastal Areas
Living near the coast often means dealing with storms and potential flooding, both of which can wreak havoc on your plumbing system. Floodwater can introduce large amounts of sand, silt, and salt into your pipes, leading to blockages and corrosion.
Installing backflow preventers can protect your home’s plumbing from the influx of debris during a flood. These devices stop water from flowing backward into your system, keeping contaminants out and minimizing damage. Additionally, it’s a good idea to inspect your plumbing for leaks or weak spots before hurricane season begins.
Ensuring Proper Drainage Around Your Home
Good drainage is essential for protecting your plumbing system in a coastal home. Heavy rainfall can wash large amounts of sand and debris into your drainage system, causing clogs and backups. Ensuring that your home’s gutters and downspouts are functioning correctly will help direct water away from your foundation and plumbing.
You may also consider installing French drains or other drainage solutions around your property to prevent water pooling near your home. Proper drainage not only protects your plumbing but also helps to preserve the structural integrity of your property.
Consulting with Local Experts for Coastal Plumbing Solutions
Every coastal area has its unique environmental factors that can impact your plumbing. Consulting with a local plumber who understands the challenges of saltwater and sand is one of the best ways to ensure your system is well-prepared. These experts can recommend specific materials, fixtures, and maintenance schedules that suit the conditions in your area.
They can also offer advice on water treatment options, sediment filtration systems, and other preventative measures to protect your plumbing. By working with professionals familiar with coastal living, you can feel confident that your home’s plumbing is built to withstand the elements.
Enjoying Your Coastal Home in Florida with Peace of Mind
Moving to a coastal home in Florida is an exciting adventure, but it comes with its own set of challenges—especially when it comes to plumbing. By preparing your pipes for saltwater and sand, choosing the right materials, and staying proactive with maintenance, you can protect your home’s plumbing and enjoy the beachside lifestyle worry-free.
With the right knowledge and support from local professionals, you’ll be able to navigate these challenges and fully embrace the beauty of coastal living.
Feeling jammed in your small living room? Maximizing a small living room without sacrificing style can feel like a balancing act. With the right small-space furniture solutions, you can create a cozy, functional, and visually appealing living area, even in the tightest quarters.
From multifunctional pieces to custom-built options, this guide walks you through strategies to maximize every square inch of your living room. By focusing on smart design choices and space-saving tips, you’ll discover how to make your tiny living room feel spacious and inviting. Let’s explore some of the best ways to transform your living room into a stylish and efficient haven.
MAXIMIZING FUNCTIONALITY WITHOUT SACRIFICING STYLE
For a small room, multifunctional furniture is key. These pieces serve multiple functions, saving space while keeping your living room organized and neat. For instance, a sleeper sofa can be used as a comfortable seat in the daytime, while at night, as a bed. On the other hand, a convertible coffee table can work both as an eating area and as a working place.
Opt forsmall living room furniture pieces that have hidden storage, such as an ottoman that actually contains a compartment inside or even a bed with drawers, to cut down on clutter and open up your living room.
SCALE AND PROPORTION: CHOOSING THE RIGHT-SIZED FURNITURE
After nailing functionality, it’s time to bring in the size factor. It’s very crucial to choose furniture that’s suitable for your space’s dimensions.
FINDING THE PERFECT FIT
Sofas: Less than 80 inches long work perfectly.
Coffee tables: Keep them under 30 inches wide for good flow.
Chairs: Use armless or sleek profiles.
Remember, lower-profile furniture means there’s some room for more light and air to circulate, making it feel a lot larger.
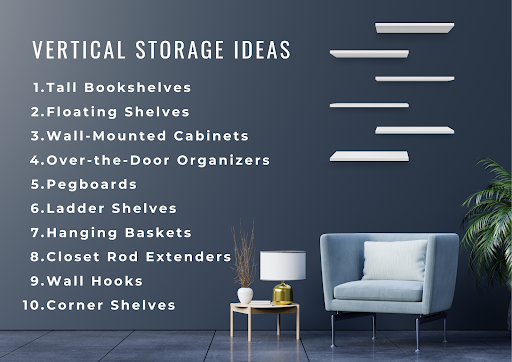
OPT FOR VERTICAL STORAGE SOLUTIONS
For a small living room, the floor space is priceless. So why not go up? This kind of vertical storage solution makes full use of the available space by using the height of your room. Set up high bookshelves, floating shelves, or wall-mounted cabinets in which you can store your items without eating into the precious floor area.
Using the vertical space will cut down on clutter and open a room up. For example, placing a tall bookcase in one corner of the room frees up space in other parts for seating or other decorative pieces.
You can even display your beautiful decoration on open shelves and leave the floor open. Not only does it provide space, but it also shows the personal flair of the living room.
INCORPORATING LIGHTWEIGHT AND TRANSPARENT MATERIALS
The usage of heavy furniture makes a small room feel even smaller. Instead of heavy furniture, opt for lightweight, transparent materials like glass, acrylic, or open-framed pieces to create the illusion of openness and make the room feel lighter.
A perfect example would be things like glass-top coffee tables and chairs made of acrylic, which serve their purpose without visually burdening the room. Another similar technique involves using open-frame shelving, which can do more for a Better Home Inspection of your items but still let light through, making a space much more open.
MODULAR FURNITURE: ADAPTABILITY IS KEY
In tiny spaces, flexibility is essential, and modular furniture excels in this regard. These adjustable pieces ensure that your living space can vary with your needs.
Mix, Match, and Rearrange.
Sectional Sofas: Reconfigure to fit different layouts or events.
Stackable chairs: Packed away when not in use.
Nesting tables: Pull out for guests and fold away for everyday use.
Modular furniture helps you to make the most of your space by adapting to different activities without committing to a specific configuration.
COLOR PALETTES AND LIGHTING: ENHANCING THE PERCEPTION OF SPACE
The right colors and lighting can dramatically affect how spacious your room feels. Let’s explore how to use these elements to your advantage.
BRIGHTEN AND EXPAND
Light, neutral colors: Make walls recede and rooms feel larger.
Mirrors: Reflect light and create the illusion of depth.
Layered lighting: Use a mix of ambient, task, and accent lighting to eliminate dark corners.
By strategically using color and light, you can create an airy atmosphere that feels much larger than its actual dimensions.
HIDDEN STORAGE HACKS TO MAXIMIZE SPACE
With the visual elements of your room taken care of, let’s address one of the greatest challenges in small rooms: storage. This cleverly hidden storage will maintain the neatness and mess-free nature of your living room.
CONCEAL AND REVEAL
Storage Ottoman: Great for storing blankets or magazines.
Coffee Table Drawers: Keep remotes and coasters out of sight.
Pull-Out Sofas: Tuck extra pillows or bed sheets inside.
These hidden storage options can reduce visible clutter, making your room appear more spacious and organized.
INVESTING IN CUSTOM FURNITURE FOR UNCONVENTIONAL LAYOUTS
Some small living rooms have odd layouts, featuring strange corners, sloped ceilings, or even narrow areas. In those cases, custom furniture can be a lifesaver. Since custom pieces are made for your space, they are sure to fit while you make the most of every inch.
Consider built-in shelving for weird nooks or custom corner seating that snugly fits into the tight corners. By designing pieces specifically for your space, you’ll create a functional layout without sacrificing style.
Though custom furniture may require a larger upfront investment, it can save space and create a cohesive, tailored look for your living room.
CONCLUSION: SMALL SPACE, BIG POTENTIAL
Creating a functional and stylish small living room is all about smart choices. From multifunctional furniture to clever storage solutions, every decision can make a big impact. Remember, it’s not just about fitting everything in – it’s about creating a space that feels open, inviting, and uniquely yours. Ready to transform your tiny living room? Start by assessing your space and needs, then implement these tips one by one.
FREQUENTLY ASKED QUESTIONS (FAQS)
1. WHAT TYPE OF FURNITURE WORKS BEST IN A SMALL LIVING ROOM?
Opt for multifunctional and modular furniture. Pieces like sleeper sofas, convertible coffee tables, and nesting tables provide functionality without taking up unnecessary space.
2. HOW CAN I MAKE MY SMALL LIVING ROOM FEEL LARGER?
Use light colors, mirrors, and transparent materials to create the illusion of more space. Avoid bulky furniture, and make sure your lighting enhances the room’s openness.
3. ARE SECTIONALS A GOOD CHOICE FOR SMALL LIVING ROOMS?
Yes, but choose modular sectionals that allow you to reconfigure them based on your needs. Select a slim, low-profile design to avoid overwhelming the room.
In the world of sustainable design, solar panels have emerged as an important aspect of energy efficiency and environmental responsibility. Yet, a simple solar panel installation isn’t enough. The placement of these panels is crucial in maximising their efficiency and, by extension, the overall performance of the building. Properly placed solar panels can significantly reduce energy costs, improve the building’s carbon footprint, and even enhance its market value.
WHY PLACEMENT MATTERS
It might seem that once solar panels are installed, the job is done, but the reality is far more nuanced. The placement of solar panels directly influences their ability to capture sunlight effectively. This, in turn, affects the amount of energy they can generate. Buildings with optimally placed solar panels can see a marked improvement in energy efficiency, leading to lower utility bills and a more sustainable operation.
The optimal placement of solar panels isn’t just about facing them towards the sun; it’s about considering the angle, the geographical location, and even the architectural design of the building itself. For businesses, this translates to better energy management and, ultimately, cost savings—without any sacrifice in power availability.
SOLAR PANEL ORIENTATION AND TILT
One of the most important aspects of solar panel placement is their orientation. In the Northern Hemisphere, panels should generally face south to capture the most sunlight throughout the day.
It should be noted though that the outright maximisation of energy generation may not be the best design strategy for customers needs. By placing 100% of the solar panels facing due south, it could create a spike of generation in the middle of the day where most of it will be exported. A better design would be to place a proportion of the panels facing east and a proportion west. The overall generation will be less that for a system with 100% south facing panels but the midday spike will be much reduced and there will be more usable power in the morning and afternoon. This will increase solar self consumption which will further improve the financial performance of the solar panels.
The tilt of the panels is equally important. A steeper tilt is better for higher latitudes, where the sun is lower in the sky. Conversely, a shallower angle works well in regions closer to the equator. The goal is to position the panels at an angle that maximises their exposure to direct sunlight, ensuring that they operate at peak efficiency throughout the year.
Whilst the most efficient tilt angle is said to be 30 to 40 degrees, this is often not achievable on a roof top because such a steep angle will create dynamic wind loads beyond the structural strength of the building. This means analysis is required to arrive at the optimum trade off between generation goals and ‘build ability’. This is where an experienced solar designer is essential.
The Role of Building Design
The design of the building itself plays a critical role in solar panel placement. Flat roofs offer more flexibility, allowing panels to be positioned at the ideal angle and orientation. However, not all buildings have this luxury. Sloped roofs, for example, might limit placement options, making it essential to carefully consider the angle and direction of the roof during the design phase.
For buildings with limited roof space, innovative solutions such as building-integrated photovoltaics (BIPV) can be used. These systems integrate solar panels directly into the building materials, such as roof tiles or facades, allowing for efficient energy generation without compromising the aesthetic or structural integrity of the building.
SHADING AND OBSTRUCTIONS
Shading is another crucial factor to consider when placing solar panels. Even partial shading from nearby trees, buildings, or other structures can significantly reduce a solar panel’s efficiency. This is because most solar panels are wired in series, meaning that shading on one part of the panel can affect the entire array.
To mitigate this, it’s essential to conduct a thorough analysis of potential shading throughout the year. This includes considering the angle of the sun during different seasons, as well as any potential future developments that could obstruct sunlight. In some cases, advanced technologies like microinverters or power optimisers can be used to minimise the impact of shading on overall energy production.
SEASONAL AND CLIMATIC CONSIDERATIONS
Different seasons bring varying levels of sunlight, and this should be factored into solar panel placement. In regions with long winters or heavy cloud cover, the benefits of solar energy can still be significant, but the placement must account for the lower levels of sunlight. For example, increasing the tilt angle of the panels during winter months can help maximise sunlight capture when the sun is lower in the sky.
Similarly, in hot climates, solar panels can be used to provide additional benefits beyond energy generation. For instance, panels can be strategically placed to provide shade, reducing cooling costs for the building. This dual benefit makes solar panel placement a key component of a building’s overall energy strategy.
THE IMPACT ON BUILDING PERFORMANCE
When solar panels are optimally placed, the benefits to building performance are substantial. Not only does the building become more energy-efficient, but it also becomes more resilient to energy price fluctuations and supply issues. This stability is particularly valuable for businesses, where energy costs can represent a significant portion of operational expenses.
Moreover, buildings with well-placed solar panels often see an increase in property value. As energy efficiency becomes a more desirable feature, especially in commercial real estate, the ability to generate renewable energy on-site becomes a selling point. This is particularly true in markets where sustainability and green building certifications are highly valued.
STRATEGIC SOLAR PANEL PLACEMENT
In conclusion, the placement of solar panels is not just a technical consideration but a strategic one. Proper placement enhances energy efficiency, reduces costs, and contributes to the overall performance of the building. By considering factors such as orientation, tilt, shading, and building design, businesses can maximise the return on their investment in solar energy.
For those looking to incorporate solar energy into their building design, it’s clear that placement is key. Whether you’re retrofitting an existing structure or designing a new building, thoughtful solar panel placement will pay dividends in terms of energy savings and environmental impact. The future of sustainable design is bright, and with the right approach, solar panels can play a central role in powering it.
Water is one of the most essential resources. Whether you’re in a rural area relying on a well for daily water needs or operating a business with a significant water demand, ensuring your well and pump systems are functioning efficiently is critical. Well and pump services are integral to maintaining a reliable water supply and preventing costly breakdowns. In this post, we’ll explore everything you need to know about well and pump services, from common maintenance tasks to troubleshooting and how to choose the right professionals for the job.
THE IMPORTANCE OF WELL AND PUMP SERVICES
For many homeowners, especially in rural areas, well water is the primary or sole source of water. A well can be an excellent option as it offers independence from municipal water systems, and in many cases, it provides cleaner, fresher water. However, wells require regular maintenance to ensure water quality and the proper functioning of the pump system that brings the water into your home.
If your well or pump system fails, the consequences can be frustrating at best and devastating at worst. No water for showers, drinking, cleaning, or cooking can disrupt your day-to-day life. This is why Desert Pump is here to help. These experts ensure your system operates smoothly, helping you avoid potential breakdowns.
COMMON WELL AND PUMP ISSUES
Well and pump systems are not immune to wear and tear, and over time, they may face various issues. Understanding common problems can help you take preventive measures and call for professional help before the situation worsens.
Pump Failure: This is one of the most common issues homeowners face. Your pump might fail due to wear and tear, electrical issues, or even clogging. If your pump isn’t working, you won’t have access to water. Frequent inspections can detect problems early, preventing them from becoming more severe.
Low Water Pressure: Another common problem is low water pressure, which can be caused by various issues such as a faulty pump, a broken pressure switch, or a clogged pipe. Addressing this issue requires a professional diagnosis to avoid guesswork.
Contaminated Water: A properly functioning well should provide clean, drinkable water. If you notice any discoloration, strange tastes, or odors, it’s a sign of contamination. This could be due to bacteria, sediment, or even chemicals seeping into the well. Regular water testing and well cleaning are essential to avoid health risks.
Air in the Pipes: If air gets into your water pipes, you’ll notice spurting water from faucets or odd noises in the pipes. This often points to a problem with the well pump or a leak in the system.
Well Pump Running Constantly: If your well pump is running non-stop, it could lead to higher energy bills and wear out your pump faster. This issue is often caused by a leak in the system or a malfunctioning pressure switch.
ESSENTIAL WELL AND PUMP MAINTENANCE
Maintaining your well and pump system is crucial to ensure long-term reliability and performance. Here are some essential maintenance tips:
Annual Inspections: Schedule annual inspections with a professional well and pump service provider. They will check the water quality, inspect the pump, and evaluate the system’s overall condition. Early detection of problems can prevent costly well and pump repairs.
Water Testing: At least once a year, have your water tested for bacteria, nitrates, and other contaminants. If you notice changes in water quality, get it tested immediately to ensure it’s safe for consumption.
Pump Maintenance: Regular pump maintenance is vital to ensure efficiency and longevity. This includes checking the pressure switch, cleaning the pump, and monitoring for any signs of wear.
Monitor Water Pressure: Monitor your water pressure closely. If you notice a significant drop, call a professional to inspect the pump or well system. Low water pressure can indicate bigger underlying problems.
Clean the Well: Over time, sediment and debris can accumulate in your well, which can affect water quality and pump performance. Periodic well cleaning ensures that your water stays fresh and your system remains efficient.
WHEN TO CALL A PROFESSIONAL
Although homeowners can handle some maintenance tasks, certain situations require the expertise of professionals. Here are some signs you need to contact a well and pump service provider:
Sudden Water Loss: If you wake up one morning with no water, it’s a clear sign that something has gone wrong with your well or pump system.
Strange Noises: If your pump is making odd sounds, it could indicate mechanical failure or damage.
Contaminated Water: If your water has a strange color, taste, or smell, a professional should inspect the system to ensure it’s safe to use.
High Energy Bills: A well pump running continuously or inefficiently can cause a spike in your electricity bill. A professional can diagnose the problem and fix it before it worsens.
HOW TO CHOOSE THE RIGHT WELL AND PUMP SERVICE PROVIDER
Choosing the right professional for your well and pump service is essential for long-term peace of mind. Here are a few suggestions to guide you in making the right choice:
Experience: Look for a company with extensive experience in well and pump services. Experienced professionals are more likely to diagnose issues quickly and offer lasting solutions.
Licensing and Certification: Make sure the company you choose is licensed and certified to perform well and pump services in your area. This guarantees they comply with local laws and industry guidelines.
Reputation: Check reviews and testimonials to get a sense of the company’s reputation. A service provider with consistently positive feedback is more likely to offer reliable and professional services.
Emergency Services: Well and pump issues can occur at any time. Choose a provider that offers emergency services to ensure you can get help when you need it most.
Clear Pricing: Make sure the company offers straightforward pricing without any hidden costs. A reputable well and pump service provider will offer upfront estimates and explain the costs involved in any repairs or maintenance.
SUSTAINABLE WATER SOLUTIONS: GOING GREEN WITH WELL & PUMP SYSTEMS
In recent years, the conversation around sustainable water usage has grown. Well and pump systems can be part of a green solution if managed properly. Here are some ways to make your well system more environmentally friendly:
Solar-Powered Pumps: Investing in a solar-powered pump can reduce your carbon footprint and energy costs. These pumps use solar panels to generate electricity, making them a sustainable alternative to traditional electric pumps.
Water Conservation: Install water-saving fixtures in your home to reduce water usage. Less water demand puts less strain on your well and pump system, extending its lifespan and reducing the energy required to operate it.
Rainwater Harvesting: In areas where water is scarce, consider installing a rainwater harvesting system. This can supplement your well water supply and reduce the overall load on your pump system.
ENSURING A STEADY WATER SUPPLY
A well-functioning well and pump system is crucial to maintaining a steady water supply for your home or business. Regular well and pump maintenance, early detection of issues, and professional servicing will keep your system running efficiently. By understanding the common problems, following essential maintenance tips, and choosing the right service provider, you can ensure your well and pump system delivers clean, reliable water for years to come.
If you’re facing any well or pump issues, don’t hesitate to reach out to Desert Pump. Regular maintenance not only saves you money in the long run but also guarantees that you have access to safe and fresh water every day.
In today’s fast-paced world, junk seems to pile up quicker than ever. Old furniture, broken appliances, outdated electronics, and boxes of stuff you no longer need — it can easily take over your living space. But removing junk is about more than just decluttering; it’s about reclaiming your space, peace of mind, and contributing to a cleaner environment. In this post, we’ll explore why junk removal is important, how it works, and the advantages of hiring a Coastal Clear Junk Removal services.
THE HIDDEN BURDEN OF JUNK
Everyone has experienced the frustration of clutter at some point. Whether it’s an overflowing garage, a spare room that has become a catch-all, or simply an attic packed with items you can’t seem to part with, junk can quickly become overwhelming. Beyond the physical mess, the psychological impact is real. Studies show that clutter can increase stress levels and lead to anxiety. If you’ve ever walked into a cluttered space and felt that instant sense of frustration, you know exactly what I’m talking about.
I remember moving out of my first apartment and being shocked by how much stuff had accumulated over just a few years. Old textbooks, broken chairs, and random kitchen gadgets I thought I needed — all just taking up space. It wasn’t until I finally called a junk removal service that I truly understood the freedom that comes from letting go of the things that no longer serve a purpose.
WHY JUNK REMOVAL IS MORE THAN JUST THROWING THINGS AWAY
The simple act of throwing things away is often easier said than done. For many, parting with items — even ones you don’t use or need — is difficult. There’s an emotional connection, memories attached, or a thought that “maybe I’ll need this one day.” That’s where professional junk removal comes in.
A junk removal service does more than just clear out your space. It helps you make decisions, it handles the heavy lifting, and it ensures that your junk is disposed of in an environmentally responsible way. You can declutter without the stress and guilt of sending everything to a landfill. Many companies will recycle or donate items that are still in good condition.
Let’s face it: as much as we’d all love to recycle and donate everything ourselves, it’s often more than we have time for. Junk removal services take that responsibility off your hands, so you can feel good about decluttering without contributing unnecessarily to waste.
ENVIRONMENTAL BENEFITS OF JUNK REMOVAL
Not all junk is equal. Electronics, furniture, and appliances often contain materials that, when discarded improperly, can harm the environment. A professional junk removal company knows the ins and outs of disposing of different types of items. They follow strict recycling protocols, ensuring that things like metals, plastics, and e-waste are properly handled.
Hiring a junk removal service means you’re contributing to a more sustainable world. By choosing a company that prioritizes recycling and donation, you help keep unnecessary waste out of landfills, reduce your carbon footprint, and promote responsible consumption.
Consider this: according to the EPA, Americans generated 292.4 million tons of municipal solid waste in 2018 alone, with only about 32.1% being recycled. This highlights the importance of choosing responsible junk removal services that can help divert items from landfills and reduce environmental harm.
THE BENEFITS OF GETTING A PROFESSIONAL JUNK REMOVAL SERVICE
While some people might be tempted to tackle junk removal on their own, there are several reasons why hiring professionals can be a better solution:
1. TIME-SAVING CONVENIENCE
In our busy lives, time is often our most precious commodity. Sorting through clutter, loading heavy items into a vehicle, and finding the proper disposal methods can take days — if not weeks. With a professional junk removal service, you can reclaim that time. They do all the work for you, quickly and efficiently.
2. HEAVY LIFTING
Not everyone has the physical strength or ability to move large furniture, appliances, or debris. Junk removal teams are trained to handle these items safely, preventing injury or damage to your property. Trust me, after trying to move an old couch by myself and nearly breaking a window, I learned my lesson.
3. PROPER DISPOSAL
As mentioned earlier, proper disposal is crucial. Junk removal services know how to properly handle different types of waste, ensuring that items are disposed of in environmentally friendly ways. Many companies partner with local charities to donate usable items, which not only keeps them out of landfills but also benefits those in need.
4. STRESS REDUCTION
Clutter can take a toll on your mental health, contributing to stress and anxiety. Letting professionals handle the junk frees you from the mental load of dealing with it yourself. Once the space is cleared, you’ll feel an immediate sense of relief and lightness.
JUNK REMOVAL FOR DIFFERENT SITUATIONS
People call junk removal services for various reasons. Some of the most common include:
1. MOVING
Whether you’re moving to a new home or downsizing, there’s always junk left behind. A junk removal service can help you sort through what to keep and what to discard, making the move much smoother.
2. RENOVATIONS
Home renovations generate a lot of debris, from old drywall to broken appliances. Instead of making countless trips to the dump, a junk removal company can take care of it all at once.
3. ESTATE CLEANOUTS
Cleaning out a loved one’s home can be an emotional and overwhelming process. Junk removal services offer compassionate assistance, helping you sort through and remove items in a respectful way.
4. BUSINESS CLEANOUTS
Businesses accumulate junk just as easily as homes do. Whether you’re upgrading office furniture, decluttering a retail space, or clearing out after a major project, junk removal services can handle commercial cleanouts efficiently.
DIY JUNK REMOVAL VS. PROFESSIONAL SERVICES: WHAT TO CONSIDER
It’s tempting to think, “I can handle this myself,” and for small projects, that might be true. But for larger jobs or ongoing clutter, a professional junk removal service is worth considering. Here are a few key factors to weigh when deciding between DIY and hiring professionals:
Cost: While DIY might seem cheaper upfront, factor in your time, effort, and potential disposal fees. Professional services often bundle everything into one price, offering more value.
Safety: Lifting heavy items or dealing with hazardous materials can be risky. Experts possess the skills and tools necessary to handle it safely.
Environmental Responsibility: Professional junk removal services typically recycle or donate items, reducing the environmental impact. If you DIY, it’s up to you to find the right facilities for proper disposal.
Efficiency: Junk removal services can clear out an entire home or business in a matter of hours, while a DIY approach could take weeks.
TIPS FOR SELECTING THE BEST JUNK REMOVAL SERVICE
With so many junk removal services out there, it’s important to choose one that meets your specific needs. Here are a few recommendations to guide you in selecting the best choice:
Check Reviews: Look for companies with strong customer reviews and a reputation for reliability.
Ask About Recycling Policies: Make sure the company prioritizes recycling and donating items whenever possible.
Get a Quote: Junk removal costs can vary depending on the amount of junk and the location. Request a comprehensive quote in advance to prevent any unexpected costs.
Consider Availability: Choose a company that can accommodate your schedule and offers prompt, reliable service.
FINAL THOUGHTS: CLEARING SPACE, CLEARING MIND
At the end of the day, junk removal is about more than just getting rid of stuff. It’s about creating space for what matters — both physically and mentally. Whether you’re preparing for a move, cleaning out a loved one’s estate, or simply reclaiming your home from clutter, professional junk removal offers a stress-free, responsible way to start fresh.
I know from experience that letting go of things isn’t always easy, but once the clutter is gone, you’ll wonder why you waited so long. So, feel free to seek assistance when needed. Coastal Clear is here to make the process easy and stress-free. You’ll be amazed at how much lighter you’ll feel — both in your home and in your mind.
There are several types of irrigation systems available. They include drip irrigation, sprinklers, and soaker hoses and each with its own set of benefits. The choice of system largely depends on the size of your backyard, the types of plants you have, and your overall watering needs. While initial installation might require a bit of effort and expense, the long-term savings on water and the health of your plants make it well worth the investment.
PLANNING YOUR IRRIGATION SYSTEM
Before diving into installation, it’s crucial to plan your irrigation system. Start by assessing the type of irrigation services your backyard needs. Consider factors such as the types of plants, soil type, and the amount of sunlight different areas receive. This will help you determine the water requirements for each section of your yard.
Next, create a layout and design plan. Sketch a map of your backyard, marking the locations of plants, trees, and lawn areas. Identify zones that may require different irrigation methods, such as drip irrigation for flower beds and sprinklers for the lawn. Proper zoning ensures that each area receives the appropriate amount of water. When choosing the right type of irrigation system, you’ll need to consider the following options:
Drip irrigation: Ideal for gardens, flower beds, and shrubs. It delivers water directly to the root zone, reducing evaporation and water waste.
Sprinkler systems: Best suited for lawns and large areas. They can cover wide spaces but may result in more water loss through evaporation.
Soaker hoses: Great for garden beds, these hoses slowly release water along their length, providing a gentle and even watering.
GATHERING MATERIALS AND TOOLS
Once your plan is in place, it’s time to gather the necessary materials and tools for installation. Having everything ready before you start will make the process smoother and quicker. Here’s a list of essential materials and tools you’ll need:
Irrigation pipes or tubing
Irrigation heads or drip emitters
Connectors and fittings
Pressure regulator
Timer/controller
Shovel, trenching tool, and pipe cutter
Installation Process
With your plan and materials ready, you can begin the installation. Follow these steps to ensure a successful setup:
Mark the layout
Dig trenches
Lay the pipes
Install irrigation heads and drip emitters
Connect to water source
Install the timer or controller
Test the system
Bury the pipes and cover
Maintenance and Optimization
After installation, regular maintenance is essential to keep your irrigation system running efficiently. Here are some tips to help you maintain and optimize your system:
Regular Inspections: Periodically check for leaks, clogs, or damaged components. Fix any issues promptly to avoid water waste.
Seasonal Adjustments: Adjust the watering schedule based on seasonal changes. Reduce watering during cooler months and increase it during hot, dry periods.
Water Conservation: To enhance water conservation, consider adding a rain sensor to your system. This device will automatically shut off the system during rainfall, preventing overwatering.
By maintaining your system, you’ll ensure it continues to operate efficiently, saving water and promoting the health of your plants.
ENDNOTE
Installing an efficient irrigation system in your backyard is a rewarding project that offers numerous benefits. From saving water to ensuring your plants thrive, the advantages are clear. By following the steps outlined above, you can create a system tailored to your specific needs and enjoy a lush, well-irrigated backyard.
It may not seem like it, but winter really does have its advantages. Beyond snow and cold temperatures, winter is the time for curling up in front of a blazing fireplace and settling in for a cozy cold season. Before you can do that, though, you must prepare your home’s plumbing system for its cold season.
The average water bill for a family of four is about $73 per month. That amount varies from summer to winter but damaged plumbing can really bump that price up. To avoid bursting water lines, here are some essential tips for homeowners.
PROTECT THE PIPES
Water runs through pipes all the time but when the thermometer dips below freezing (32 degrees F), the plumbing system works harder to keep things flowing, even if your property is completely waterproofed.
Wrap exposed pipes in foam covering. Insulating hot water pipes raises their temperature about 2 to 4 degrees. Covered pipes reduce the chance of freezing, especially if they lay dormant for a long period of time. Warmer pipes save energy when you lower the temperature of the hot water tank.
Fix or replace leaky pipes that can split and potentially burst.
Open access panels and cabinets for warm “house” air to flow inward toward the plumbing.
Set the house thermostat at no lower than 60 degrees. (You’ll probably want it warmer than that!)
Allow faucets to drip when temperatures are at 32 degrees or below.
By the way, if you’re caring for a home that is unoccupied, set the thermostat above freezing (50-60 degrees is recommended) and allow a small trickle of water to flow through a couple of sink faucets.
OUTSIDE MAINTENANCE
Water freezes easily in outdoor lines. To avoid damage, remove hoses from outdoor spigots. Tighten water shut-off valves because loose or leaking faucets may lead to waterline breaks. Replace stripped, hard-to-turn faucet heads and washers.
GUTTERS AND SEWERS
Cleaning out the house’s gutters after autumn’s leaf drop helps rainwater to flow freely through a downspout. Clogged gutters push water over the sides of the roof, and that may damage siding and crack the building foundation. Clean the gutters at least once every six months.
Underground sewers connect to pipes and water systems. Heavily clogged, gunky sewage systems are no fun to clean, but if they’re not, they can lead to a real mess. While store-bought drain cleaners help with light clogs, thick masses have water backing up out of drains. That messy mass will head for toilets and sinks. Maintaining sewage lines is best done by a professional.
SPRINKLING SYSTEMS
Hose-attached sprinklers are easy to care for — just drain and put them away for the winter. But preparing an automatic watering system for winter ensures its use for the next season. Drain the sprinkler system by
Opening and emptying all valves by hand. Automatic systems may have flush valves that empty themselves.
Air compressors (with 40-50 PSI) are helpful in blowing water out of lines. If you cannot DIY, hire a plumber or irrigation specialist.
After draining water from the system, remove the timer, filter, and pressure regulator. Seal the open faucet to protect it from water, dirt, and bugs.
Tip: A water line break could lead to low water pressure and noticeable dripping. Signs of water leaking are puddles of water, sinking soil, and bubbling water on the ground.
TREE ROOT DAMAGE
Chances are you have a couple of large trees on your Illinois property. Root systems spreading into and under pipes, sewer lines, masonry, and asphalt can damage the house plumbing. Inspect and remove tree roots from live (and dead or chopped down trees) as needed.
At the same time, grass and other plants in the yard grow thickening roots that dig their way underground, through the house’s plumbing.
NEARBY SEWERS
Sewage systems are connected to houses from main lines called laterals. Lines filled with water, shifting soil, and other debris can crack, especially if they freeze in winter’s frigid temperatures. Because roots are strong enough to crush pipes, it’s a good idea to have them inspected periodically.
Frozen pipes are not only a hassle to deal with but the cost of repair or replacing can be through the roof. Protect the pipes and prep your to-do list now to get a head start before the snow falls.
Teri Silver is a journalist and outdoor enthusiast. She and her husband live on 5 acres with a vast lawn, three gardens, a farm, a pond, many trees, and a lot of yard work! The best parts of the year are summer and fall when home-grown veggies are on the dinner table.
Looking for a quick and fairly easy home improvement project for the end of the summer? Remodeling your half-bath can create maximum impact with minimal effort.
It all starts with careful planning. Once you have an idea for your redesign, take some time to budget and shop for the tools and materials you need. Once everything is in order, you’re ready to start your bathroom transformation—and you can have it done before the winter season.
WHAT TO CONSIDER WHEN UPDATING A SMALL BATHROOM
Keep the following points in mind to make your remodeling project easier:
Style
How do you want your bathroom to look? Clean and minimalist? Opulent and romantic? Traditional and practical? Putting together a mood board can help you refine your design aesthetic so you can truly capture the vibe you’re going for. During this creative stage, be sure your bathroom remodel matches the interior design of your home.
Cost
You know what you want to do; now, you need to figure out what you can afford to do. According to Forbes, a small bathroom remodel costs an average of $70 to $225 per square foot. Your budget total will vary depending on the scope of your project (installing a new toilet will be much cheaper than putting in new flooring, for instance), as well as the materials you will be using. Reconfiguring or demoing your bathroom will add extra costs for supplies. Compare the cost of your materials at different stores so you can find the best prices, and add an extra 10% to 20% into your budget to cover unexpected expenses.
Size
Typically half bathrooms are between 16 and 20 square feet. If the goal is to create the illusion of more space, you’ll want to carefully consider color options and furniture that opens up the room.
Timeline
The last thing you want is to schedule a bathroom remodel on the first day of school. Give yourself plenty of time to finish the project, and remember to factor in any summer vacations that you’ll have to work around.
Goals
Are you trying to create more storage? Or do you need to update outdated fixtures or room design? When you have a clear goal, your DIY job is simple and achievable.
3 DIY REMODELING TRENDS FOR BATHROOMS THAT YOU CAN DO YOURSELF
Need some help getting started? Here are three ideas that can inspire your bathroom remodel project.
1. Add Fresh Color
A new coat of paint, a patterned tile wall, or even a shower curtain can give your small bathroom a whole new look. You can be on trend and find a shade that matches Peach Fuzz, the warm hue chosen as Pantone’s Color of the Year for 2024, or go with a cooler light blue, green, gray, or cream.
If you’re painting walls, remember that light colors create the illusion of more space; you can bring in complementary darker hues as a secondary color in accessories like the bathroom mirror or wall sconces. Don’t feel like painting? Wallpaper is another hot design trend for small bathrooms, and you have plenty of choices for colors and patterns.
Tip: Adding wainscoting or beadboard on the bottom half of the walls makes a small bath look more spacious, and you won’t have to hang as much wallpaper.
Finally, you may need to invest in new bath towels, bath mats, or a shower curtain to work with the room’s new color palette.
2. Install a Vanity
A vanity is just as important as any other furniture piece in your home. It can make a powerful design statement, but it’s also going to be used every day because it serves multiple functions, whether brushing your teeth or storing your extra toilet paper in the cabinets.
The square footage of your bathroom plays a large role in the type of vanity you’ll need. Single vanities are best for a powder room (the most common size is 36 inches). Some half bathrooms can accommodate a vanity up to 48 inches.
Vanities offer a wealth of choices when it comes to design style and storage solutions. Many people like the look of a floating vanity because it appears to hover above the floor for a more spacious look, but others may like the modern, hand-crafted look of a console vanity with minimal storage. You’ll also have your choice of colors, finish, hardware, and more. Finally, choose a vanity with useful amenities like electrical outlets or drawer dividers.
3. Put in New Tiles
If you have some DIY experience, a new tile floor will add fresh style to the space. Even if you’re a novice, you probably won’t have to worry about covering a large surface area in a small bathroom.
Tiles that look like stone bring an on-trend natural element to the room, or you can create unique herringbone, circular, or other patterns with colored tiles. If your bathroom has a shower and you have leftover tiles, consider adding a border around the shower for extra appeal.
Keep in mind that this project will require more time than other DIY jobs. Before applying any mortar, lay out the tile on the floor so you can see how it will look and make any necessary cuts to the tiles. It’s also wise to move slowly and carefully to ensure straight lines, as you’ll need to wait while the mortar and grout set.
THE VALUE OF A BATHROOM REFRESH
The time and effort you put into a bathroom remodel pays off. If you’ll be selling your home in the near future, a modernized bathroom can help increase the value. In the meantime, you and your family can enjoy your beautiful new bathroom every day!