DOES ROOF REPAIR AFFECT PLUMBING? AN AUTHORITATIVE INSIGHT FOR HOMEOWNERS

Roof repair is an essential aspect of maintaining the integrity of a home. However, its connection to plumbing might seem distant at first glance. What homeowners may not realize is that these two essential components are more interconnected than one might think. This article will delve into:

  • The connection between roof repairs and plumbing issues
  • In-depth analysis of how roof repairs can lead to plumbing issues
  • Effective solutions and preventive measures to guard against these problems

The relevant scope of roofing, plumbing, roof leaks, and water damage will be our central themes, offering an indispensable guide for homeowners concerned with roof damage and repair costs.

HOW ROOF REPAIRS CAN LEAD TO PLUMBING ISSUES

LEAK PATHWAYS

One of the primary ways roof repairs can impact plumbing systems is through leak pathways. When roof repairs are not properly done, it can result in gaps or cracks that allow water to penetrate the house. Let’s explore the following areas:

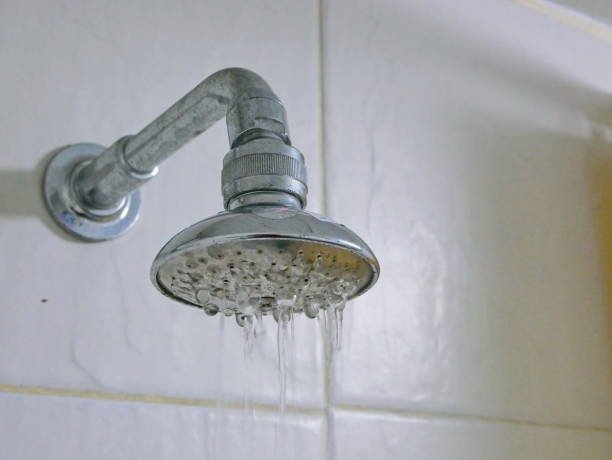
  • Roof Leaks: Roof leaks are not only a cause for alarm due to potential damage to the structure but also because of how they can affect the plumbing system. Improper sealing during roof repairs may allow water to infiltrate the interior walls, where it can reach and corrode plumbing pipes. This can result in weakened connections and, eventually, leaks within the plumbing system.
  • Water Damage in the Attic: A poorly repaired roof may lead to water accumulation in the attic. If the insulation gets wet, it could take a long time to dry, creating an environment suitable for mold growth. The moisture and mold can then spread to areas where plumbing lines run, impacting their functionality.
  • Sealing & Flashing Mistakes: Repairing the roof without taking proper care to seal gaps or fix flashing can lead to rainwater seeping into places it shouldn’t. It can find its way to the plumbing vents, causing blockages or even freezing in colder climates, which may lead to pipe bursts.

Personal Experience: In my 20 years as a roofing professional, I’ve seen homeowners suffer from unexpected plumbing issues after a shoddy roof repair job. One client had to deal with a series of pipe leaks that originated from water entering through gaps left in the roof repair. This water found its way to the plumbing system, causing long-term damage.

VENT PIPE CONNECTION

Roofing and plumbing systems are often interconnected through vent pipes. These essential components deserve attention:

  • Connection with Roofing: The vent pipe, part of the drain-waste-vent system, protrudes through the roof. During roof repairs, mishandling around the vent pipe area can lead to problems. If not sealed properly, rainwater can enter, leading to potential leaks within the walls where plumbing pipes reside.
  • Importance of Proper Sealing: Proper sealing around the vent pipe is vital during roof repairs to prevent water intrusion. Any mistake here can directly impact the plumbing system.
  • Roofers and Plumbers Collaboration: Ensuring a seamless connection between the roof and the vent pipe requires collaboration between roofers and plumbers. It underscores the importance of hiring professionals who understand both roofing and plumbing systems.

In conclusion, the interconnection between roof repairs and plumbing is not merely coincidental. It is a complex relationship that requires careful consideration and handling.

SOLUTIONS AND PREVENTIONS

REGULAR INSPECTIONS

Routine inspections are a homeowner’s first line of defense against unforeseen complications arising from roof repairs that may impact plumbing.

  • The Role of Inspections: Regularly scheduled inspections can identify potential problem areas before they escalate. By spotting issues early, homeowners can address them before they lead to significant damage.
  • Identifying Roof Damage: Inadequate roof repair jobs might not always be visible to the untrained eye. Professional inspections can highlight these weak points, ensuring they’re addressed promptly.
  • Checking Vent Pipes: A crucial part of these inspections is checking the vent pipes. They should be appropriately sealed, free from blockages, and in optimal condition to ensure the plumbing system remains unaffected.

Real-Life Example: I once worked with a homeowner who made it a point to have their roof inspected every year. During one of these routine checks, we discovered a minor roof leak near a vent pipe. Had it gone unnoticed, the damage could have spread to the plumbing system. This forward-thinking approach saved them significant repair costs.

PROPER SEALING

Correctly sealing gaps, especially around vent pipes and flashings is vital to prevent water ingress that can affect plumbing.

  • Importance of Quality Sealants: Using high-quality sealants ensures a long-lasting barrier against water intrusion. Cheaper, low-quality products might not provide adequate protection in the long run.
  • Attention to Flashings: Flashings, especially around chimneys and vent pipes, are common areas for leaks. Ensuring these are well-sealed during roof repairs can help prevent complications with the plumbing system.
  • Hiring Experienced Roofers: An experienced roofer understands the importance of thorough sealing. Their expertise can be invaluable in safeguarding your home against potential plumbing issues resulting from roof repairs.

CONSULTING PROFESSIONALS

While DIY has its merits, consulting professionals, especially for complex tasks like roof repair, is often the best course of action.

  • Roof Plumber Consultations: Not many homeowners are aware, but there’s a specialization within plumbing called roof plumbing. These professionals are adept at understanding the nuances between roofing and plumbing. Consulting with them can offer valuable insights.
  • Expertise in Roofing Systems: Roofers with years of experience can provide homeowners with guidance on the best practices to prevent any inadvertent damage to the plumbing system during repairs.
  • Integrated Approach: Collaborating with both roofing and plumbing experts ensures an integrated approach to home repairs. It offers the best chance to avoid issues that span both domains.

Personal Anecdote: In my early days of roofing, I was approached by a distressed homeowner facing recurrent plumbing issues post a roof repair. On investigating, I realized the vent pipes had been damaged during the roofing process. This prompted me to always collaborate with a trusted plumbing team, ensuring both systems were in harmony.

FAQ SECTION

1. Can minor roof repairs impact plumbing? 

Yes, even minor roof repairs, if not done correctly, can have consequences on the plumbing system. Especially if they are near vent pipes or flashings which can allow water to seep in.

2. How often should I inspect my roof to avoid potential plumbing issues? 

Annual inspections are recommended, but if you reside in areas prone to harsh weather conditions, a post-storm check can be beneficial.

3. Can a clogged gutter affect my plumbing? 

While clogged gutters primarily impact the roof and foundation, they can contribute to water accumulation, which, if near vent pipes, could have repercussions on the plumbing system.

4. What should I look for when hiring a roofer to ensure my plumbing remains unaffected? 

Look for roofers with experience, positive reviews, and those who are willing to collaborate with plumbing professionals for a holistic approach.

CONCLUSION

The symbiotic relationship between roofing and plumbing is undeniable. As homeowners, understanding this connection can save both heartache and money. Proper roof repairs, routine inspections, and a collaborative approach with professionals are the keys to a harmonious home where the roof and plumbing coexist without issue. It’s not merely about fixing a leak or replacing a tile; it’s about ensuring every action taken on the roof resonates positively throughout the home, plumbing included.

WHY IS MY SHOWER PRESSURE LOW?

LOW SHOWER PRESSURE

Low shower pressure can be frustrating and perplexing for many homeowners. Picture stepping into the shower, expecting a rejuvenating stream of water, only to be greeted by a weak trickle. It’s a common problem that can disrupt your daily routine and leave you unsatisfied. You must consider the importance of adequate water pressure for the overall shower experience. The correct water pressure ensures thorough cleansing and contributes to a relaxing and refreshing moment. In this guide, we’ll delve into the reasons behind low shower pressure and explore practical steps to diagnose and resolve the issue, ensuring your shower time remains an enjoyable escape.


UNDERSTANDING SHOWER PRESSURE

WHAT IS SHOWER PRESSURE?

Shower pressure refers to the force with which water flows from the showerhead. The rate at which water supplies the shower and the resistance within the plumbing system determines the tension. When you turn on the battery, the water pressure directly affects the intensity of the water stream. A higher pressure delivers a more robust and refreshing flow, while low-pressure results in a feeble dribble.

Water pressure plays a pivotal role in the grand tapestry of a comfortable shower. Beyond cleansing, it massages and relaxes your muscles, turning an ordinary shower into a revitalising experience.


IDEAL SHOWER PRESSURE RANGE

For an optimal shower experience, the recommended water pressure range typically falls between 40 to 60 pounds per square inch (psi). This range strikes a balance between water conservation and user satisfaction. Pressure below this range can lead to lacklustre showers, while excessive force might lead to wastage of water and potentially damage plumbing fixtures.

Shower pressure impacts not only the intensity of the water but also its delivery. Inadequate pressure can result in inconsistent water flow and temperature fluctuations, diminishing the overall enjoyment of your shower.


CAUSES OF LOW SHOWER PRESSURE

WATER SUPPLY ISSUES

Problems within the main water supply line often trace back to low shower pressure. Issues such as water leaks, pipe corrosion, or clogs can significantly affect the pressure. Leaks and corrosion restrict the flow of water, while clogs obstruct it. These problems can occur due to aging pipes, poor maintenance, or even sediment and debris in the water supply.


CLOGGED SHOWERHEAD

Mineral deposits and debris are notorious culprits for low shower pressure. Over time, these particles can accumulate within the small openings of the showerhead, impeding the flow of water. As a result, the once-invigorating spray transforms into a weak drizzle, leaving you dissatisfied.

The impact of clogs goes beyond just pressure; it can also cause uneven water distribution, leading to a rough shower experience. A clogged showerhead can also contribute to water wastage, as you may need more time to rinse it off.


FAULTY PRESSURE REGULATOR

Pressure regulators are like the conductors of an orchestra, ensuring that every fixture in your home receives the right amount of water pressure.

When these regulators malfunction, they disrupt the harmony of your shower.

 A faulty regulator can lead to inconsistent pressure, causing fluctuations in water flow during your storm. This issue might require a closer inspection and potential adjustment or replacement.


DIAGNOSING LOW SHOWER PRESSURE

CHECKING OTHER FIXTURES

Before you panic about low shower pressure, examining other faucets in your home is a good idea.  If the pressure issue isolates the shower, it’s more likely a localised problem.

However, noticing consistently low pressure across multiple fixtures could indicate a more significant problem in your plumbing system requiring immediate attention.


ASSESSING THE SHOWERHEAD

To pinpoint whether a clogged showerhead is to blame, start by removing the showerhead from the shower arm. Inspect it closely for mineral deposits or debris accumulation. If you find any, a thorough cleaning is in order. Soak the showerhead in vinegar and water to dissolve mineral buildup. Use a small brush or toothpick to remove debris from the openings gently. This cleaning ritual can restore your showerhead’s performance and bring back the invigorating flow.


PROFESSIONAL INSPECTION

If the low-pressure issue persists after cleaning the showerhead and examining other fixtures, it might be time to call a professional plumber. Plumbers have specialised tools, such as pressure gauges, to measure water pressure throughout your plumbing system accurately. These gauges can help identify any pressure-related problems and guide the appropriate solutions.


FIXING LOW SHOWER PRESSURE

CLEANING THE SHOWERHEAD

To clean your showerhead effectively, follow these steps:

●      Unscrew the showerhead from the shower arm.

●      Mix equal parts white vinegar and water in a plastic bag.

●      Submerge the showerhead in the solution and secure the bag around it using a rubber band.

●      Leave it overnight to allow the vinegar solution to dissolve mineral deposits.

●      Remove the bag, scrub the openings gently with a brush or toothpick, and rinse the showerhead thoroughly.

●      Reattach the clean showerhead to the shower arm.

●      Vinegar’s natural acidic properties break down mineral deposits, restoring water flow and pressure.


CHECKING AND REPLACING PIPES

Inspecting pipes for corrosion or leaks requires a keen eye. Here’s how to do it:

●      Examine exposed pipes for rust, greenish stains, or visible leaks.

●      If you suspect corrosion, gently scrape the affected area to see if the metal beneath is intact.

●      If you find significant corrosion or leaks, it’s advisable to consult a plumber for further assessment.

●      The plumber might recommend replacing the affected pipes to restore proper water pressure in severe corrosion or irreparable leaks.


FIXING PRESSURE REGULATOR

Identifying a faulty pressure regulator and addressing it can make a significant difference in your water pressure. Follow these steps: 

●      Locate the pressure regulator, often where the main water line enters your home.

●      Check for any visible signs of damage, such as leaks or dents.

●      If you suspect the regulator is malfunctioning, you might want to adjust it if it’s adjustable or replace it entirely if necessary.

●      Consult the manufacturer’s instructions for adjusting or replacing the pressure regulator.

●      Once the adjustment or replacement is complete, test the water pressure in your shower to ensure it’s within the recommended range.

CONSIDERING WATER PRESSURE BOOSTING

If you’re consistently experiencing low water pressure throughout your home, consider installing a water pressure-boosting system. These systems can help amplify the pressure of the water supply, ensuring that you enjoy a satisfying shower every time. However, while these systems can improve pressure, they might also increase water consumption and energy usage. Before making a decision, weigh the advantages against potential drawbacks.


GET A PROPER SHOWER MAINTENANCE

Low shower pressure is a common issue that can significantly impact your daily routine and overall comfort. We’ve explored the various causes of this problem, from water supply issues to clogged showerheads and faulty pressure regulators. Diagnosing and addressing the root cause can restore your shower to its full invigorating potential. 

Regular maintenance, such as cleaning your showerhead and inspecting pipes, can go a long way in preventing and mitigating low-pressure issues.  And remember, when in doubt, feel free to seek professional help in repairing your showers, installing a showerhead, cleaning, plumbing, and many more. Especially if the problem seems complex or beyond your expertise. Adequate shower pressure isn’t just a matter of convenience.

HOW TO MAXIMIZE CLOSET SPACE

Maximizing Closet Space: Clever Hacks for Efficiency and Organization
Closets are more than just storage spaces; they are versatile assets that can serve various purposes beyond their conventional roles. With creativity and smart organization, you can maximize closet space to its full potential, transforming it into an efficient and organized hub for your belongings.
Let’s explore the many uses of closets, examine the strategies for maximizing space, and look into the clothing hacks for organized storage.
 
The Many Uses of a Closet 
Closets are commonly associated with storing clothes, but they can also serve numerous other functions. Consider these alternative uses to optimize every inch of your closet space:
 
1. Home Office Nook: Convert a compact closet into a cozy home office. Install shelves for books, a desk for your computer, and task lighting to create a productive workspace.
2. Mini Library: For book enthusiasts, closets can be turned into mini libraries with built-in shelves and seating. A tranquil reading nook awaits just a few adjustments away.
3. Craft Station: Organize crafting supplies neatly by repurposing a closet. Add hooks for hanging tools, shelves for materials, and a fold-out table for crafting activities.
4. Pantry Extension: Overflowing pantry? Use a closet for additional food storage. Install adjustable shelves, clear containers, and labels to keep items easily accessible.
5. Entertainment Center: Mount a TV on the closet wall, add shelves for media devices, and store DVDs or video games inside. It’s a creative way to integrate entertainment into your space.
 
Maximizing Closet Space
To make the most of your closet space, employ these effective strategies:
1. Hat Storage: Optimize your closet’s layout by utilizing hooks or pegs mounted on the inner side of the closet door for hat storage. This space-efficient method preserves shelf space and arranges your hats neatly, making them readily accessible.
2. Utilize Hanging Space: Maximize vertical space by introducing a second hanging rod. Capitalize on this arrangement by placing shorter items like shirts on the upper rod and longer items like dresses on the lower rod. An alternative approach involves cascading hangers, allowing you to store multiple garments vertically. 
3. Modular Shelving: Elevate organization with modular shelving systems that adapt to accommodate items of varying sizes. This adaptive nature enables you to tailor the closet’s setup to your specific storage needs, efficiently utilizing available space.
4. Under-Shelf Baskets: Transform underutilized space beneath shelves into valuable storage by attaching under-shelf baskets. This innovative solution is ideal for stowing away smaller articles such as scarves, socks, and accessories, ensuring clutter-free organization.
5. Clear Storage Containers: Simplify item identification and minimize closet clutter by opting for clear storage containers. This method keeps your belongings in order and contributes to a visually uncluttered closet environment. 
By implementing these practical and space-conscious strategies, you can unlock the true potential of your closet, achieving an organized and efficient storage solution for all your belongings.
 
Clothing Hacks When Putting Them Away
Clothing organization within your closet can significantly enhance daily routines and save valuable time. Implement the following clothing hacks for an optimized closet space:
1. Roll Instead of Fold: Opt for rolling instead of folding When storing garments such as T-shirts and jeans. This approach conserves space and minimizes wrinkles, ensuring your clothes are ready to wear. 
2. Color Coordination: Arrange your clothing items according to their color spectrum. This simple method accelerates finding specific pieces and adds a visually appealing aspect to your closet.
3. Shoe Racks or Cubbies: Utilize shoe racks or cubbies to effectively organize your footwear collection, keeping them off the closet floor. This practice maintains a sense of order while preventing shoe-related clutter.
4. Seasonal Rotation: Make use of vacuum-sealed bags or containers to store out-of-season attire. As seasons transition, rotate your clothing selection, ensuring your closet remains well-organized and clutter-free.
5. Slim Hangers: Replace bulky hangers with slender alternatives to maximize your hanging space. Velvet or flocked hangers free up additional room and prevent garments from slipping off, keeping your closet tidy and manageable.
 
Conclusion
Closets are valuable assets that can serve multiple purposes beyond conventional storage. You can optimize your closet’s potential by embracing creative uses and employing space-maximizing strategies. From efficient hat storage to smart clothing organization hacks, your closet can become an organized haven for your belongings, enhancing functionality and aesthetics in your living space.
So, don’t underestimate the power of an organized closet. Take advantage of the tips and strategies suggested to make the best use of your closet. It’s a small step towards a more organized and stress-free lifestyle.
 
Written by Taylor McKnight, Author for Cap America

6 BENEFITS OF HAVING AN AT-HOME GYM

Physical activity has never been so important, thanks to tech advancement and unanticipated global paradigm shifts like the ones brought about by Covid-19, leading to sedentary lifestyles.

It is recommended by Physical Activity Guidelines for Americans, to derive benefits associated with physical activity, you could aim to spend between 2 ½ to 5 hours in a week of moderate to vigorous-intensity activity. These are coupled with two days a week of muscle-strengthening workouts. One way of achieving such fitness thresholds is having an at-home gym.

This article will take a closer look at what an at-home gym entails and the top 6 reasons why having one is worth your investment.


WHAT’S AN AT-HOME GYM ANYWAY?

Any space with essential exercise equipment within your home can make an at-home gym. It’s a space where you can do squats, lunges, lifts, and sweat your way to a healthier body without leaving your home. It doesn’t have to look complicated like a high-tech training facility or take up a whole room like a professional gym. Even a corner or a designated spot can transform into your fitness sanctuary tailored just for you and your family workout.

WHAT DO YOU NEED FOR YOUR IN-HOME GYM?

Building an at-home gym doesn’t require fancy machinery or an Olympic-sized budget. All you need are a few key pieces of gear to get started. A basic item would be an exercise mat. With a mat, the stage is already set. Other essential items are dumbbells, resistance bands, a stability ball, and a jump rope. If you are not ready to expend cash, you can improvise according to the list of alternatives below:

•   Dumbbells – filled water bottles, sand filled bags, and filled backpacks

•   Stability Ball – a sturdy chair or your couch

•   Resistance Bands – bungee or elastic cords

•   Jump Rope – an imaginary rope or a no longer for use rope

•   Yoga Matt – a soft carpet


SO, WHY SHOULD YOU HAVE AN AT-HOME GYM?

 The benefits of your in-house working facility are numerous, and the main ones include the following:

1.         Ultimate Convenience

Gym hours coincide with peak hours, and dealing with traffic jams can be draining. At times bad weather can keep you holed up at home or in your workplace, leaving you with no alternative but skipping your physical session. With an at-home gym, your workout schedule bends to your will, and you can easily access your home gymnasium anytime, forward-pushing your fitness progress.

2.         Time-Saver

Your at-home gym is a time saver that helps you fit workouts into your busy life without the hustle of commuting. Further, preparing for the gym typically involves many activities, from packing your gym essentials to selecting the right workout attire, unlike your at-home fitness space, eliminating the need for extensive preparation.

3.         Non-judgment Zone

Ever felt self-conscious at the gym? In your home gym, the only eyes on you are your own unless you have a pet, partner, or family who is your enthusiastic cheerleader. A public gym can be limiting if you do not feel confident about your body and fear making mistakes when working out. The privacy of an at-home gym makes one less conscious and workout without reservation and care in the world.

4.         Customized Workouts

You’re your gym’s boss, meaning workouts are tailored to your preferences. If you want to dance while lifting weights or practice your warrior pose between sets, you unreservedly go for it. You can vary the exercises with your gym using youtube videos, Facebook Live, or Youtube streaming. You can choose the music during your workouts and your desired general environment.

5.         Money-Saver Supreme

An at-home gym may require a small initial investment, but it pays off in the long run. It’s a significant saving for your pocket as monthly gym fees are no more. Plus, think about the gas money you’ll save by skipping the drive to the gym. 

6.         Consistency and commitment

The ease of accessibility is a real motivation. Rain or shine, tired or energized, your equipment’s waiting for you, making it easier to stay on track with your fitness goals. When the gym is right at your nose, you expend less effort forming a desirable goal-achieving exercise regimen. You have fewer excuses, and the only option is to hit the ground running at your scheduled sessions.


SO, SHOULD YOU GET AN AT-HOME GYM?

If you want to be on top of your fitness journey, a dedicated workout space at home is the way. Remember, it’s not about the size of your gym or the fanciness of your equipment. It’s about creating a space that encourages you to move, sweat, and enjoy the process. Ultimately, your at-home gym isn’t just a place to work out; it reflects your commitment to your well-being. Setting up should not be daunting. Start small and progressively add equipment that supports your training on essential exercises, aiding you in reaching your fitness and health goals.


Written by Taylor McKnight, Author for ProHealthCareProducts

PETS IN RENTAL PROPERTIES: GUIDELINES FOR LANDLORDS IN NEW JERSEY

Renting a home is a significant decision for individuals and families, and for many, this includes their beloved pets. As a landlord in New Jersey, accommodating tenants with pets can present unique challenges and opportunities. Striking a balance between ensuring a comfortable living environment for both tenants and their furry companions requires careful consideration and well-defined guidelines. In this article, we’ll explore essential guidelines for landlords in New Jersey when it comes to allowing pets in rental properties. By understanding legal obligations, implementing pet-friendly policies, and fostering open communication, you can create a harmonious space where both tenants and their pets can thrive.


Know the Legal Landscape

While New Jersey does not have specific statewide laws that address pets in rental properties, landlords still need to be aware of certain legal aspects. It’s crucial to familiarize yourself with federal fair housing laws that prohibit discrimination based on disabilities. If a tenant has a service animal or emotional support animal, you are generally required to make reasonable accommodations for them, even if you have a “no pets” policy.


Set Clear Pet Policies

Before allowing pets in your rental property, establish clear pet policies that outline the terms and conditions. Consider factors such as the number and size of pets allowed, specific breeds, and any required vaccinations. Clearly communicating these policies in the lease agreement helps avoid confusion and ensures that tenants are aware of their responsibilities.


Screen Potential Tenants and Their Pets

As a landlord, you have the right to screen potential tenants and their pets to ensure they’re a good fit for your property. Request information about the pet’s size, breed, and behavior history. Additionally, you can ask for references from previous landlords to gauge the pet’s behavior in previous rental situations.


Charge Pet Deposits or Fees

Many landlords opt to charge a pet deposit or non-refundable pet fee. This helps cover potential damages or additional cleaning costs that might arise due to the presence of pets. While New Jersey law does not specify limits for pet deposits, it’s important to ensure that any fees are reasonable and clearly outlined in the lease agreement.


Set Expectations for Cleanliness

Include guidelines for maintaining cleanliness in the lease agreement. Address issues like waste disposal, indoor accidents, and general cleanliness related to pets. Encourage tenants to keep common areas tidy and establish protocols for cleaning up after their pets.


Address Noise Concerns

Pets, particularly dogs, can sometimes create noise disturbances that might affect other tenants or neighbors. To mitigate this, include clauses in the lease agreement that address noise levels and expectations for keeping pets quiet, especially during nighttime hours. This can help maintain a peaceful living environment for everyone.


Include Liability Clauses

It’s advisable to include liability clauses in the lease agreement that outline the tenant’s responsibility for any damages caused by their pets. This can protect you as a landlord from potential disputes or legal issues arising from pet-related damages.


Regular Property Inspections

Implement regular property inspections to assess the condition of your rental property, particularly if pets are present. These inspections provide an opportunity to address any pet-related concerns, such as damages or sanitation issues. Effective communication with tenants during these inspections fosters accountability and helps maintain a positive landlord-tenant relationship.


Maintain Open Communication

Encourage open communication with tenants about pet-related matters. If any issues arise, whether they involve other tenants, neighbors, or pet behavior, address them promptly and professionally. Creating a channel for communication helps prevent conflicts and ensures that concerns are dealt with in a timely manner.


Conclusion

Navigating the realm of pets in rental properties as a New Jersey landlord involves a delicate balance between providing a comfortable living space and maintaining the property’s condition. By adhering to the guidelines outlined in this article, you’re better equipped to make informed decisions that benefit both your tenants and their furry companions. Remember, while there might not be specific statewide laws governing this area, understanding your legal obligations under New Jersey landlord-tenant law is crucial. Setting clear pet policies, addressing cleanliness and noise concerns, and fostering open communication are all integral to creating a harmonious living environment for everyone. By embracing these practices, you’re not only enhancing the appeal of your rental property but also fostering positive tenant relationships that contribute to a thriving and responsible community. As you navigate the world of rental properties and pets, remember that a well-considered approach ultimately contributes to a property that is welcoming, well-maintained, and enjoyable for both tenants and their four-legged friends.

GETTING TO KNOW YOUR NEIGHBORS AFTER MOVING IN

Moving to a new home in an unfamiliar neighborhood is an exciting time. Of course, it does come with certain challenges, such as overcoming the intimidation of meeting the neighbors. Even the most extroverted among us may have trouble reaching out to strangers and putting their best foot forward.

If you’ve just landed somewhere new or are making plans to, it helps to know how best to go about it ahead of time. To help point you in the right direction, here are a few strategies you could try when getting to know your new neighbors.


Be Friendly

 While this first suggestion may seem like a no-brainer, there is definitely something to making yourself approachable. Be sure to wave and smile to everyone. Even if you’re still in the throes of moving day, it’s advantageous to make eye contact, say hello and be receptive to people. Doing so shows you’re open to getting to know them, even if right now isn’t a great time.

As you settle in, continue to carry out these simple acts. When the opportunity presents itself, you can shift the greeting into a casual exchange. Such introductory conversations could be on the local schools, sports teams, career paths or something as simple as the weather. Don’t wait too long though. You want to progress past simply waving sooner rather than later. Otherwise, you could be stuck at this awkward stage for months or even years.


Stroll Through the Neighborhood 

The chance to strike up a conversation typically won’t land in your lap. It’s best to be proactive about it. A great way to do just that is to take walks. Beneficial as exercise for you and your dog if you have one, these walks present openings to “bump into” the neighbors informally. Plus, dogs also make it easy for others to find you approachable and initiate conversations. 

Plan for the most opportune time of day and to take a leisurely route. That way, you could chance upon people when they’re outside and free to talk. You’ll also want to think of some conversation starters beforehand, such as commenting on their home. If all goes well, let the people you meet know your name, where you live and that you look forward to seeing them in the future.


Invite People Over

One approach to get to know several people all in one go is to throw a housewarming party. While you may be thinking of just having over friends and family, adding your neighbors to the guest list is a great way to show them your eagerness for moving past being strangers. The affair doesn’t have to be fancy or impressive. Simply set a date for a casual, BYOB backyard get-together and fire up the grill.

As mentioned above, be ready with things to talk about. Ask personal questions such as where they’re from, what they do for work and so on. It could also be constructive to seek their advice. Whether you’re looking for a local landscaper or the best pizza in town, these topics are safe and easy while still being productive. The same goes for offering help. Volunteering to assist on a neighbor’s upcoming project or with an HOA event shows you’re here to lend a hand. The more you put in, the more you get out as the saying goes.


Remember to Be a Good Neighbor

There are few do’s and don’ts when it comes to meeting the neighbors as well as staying in their good graces. Things to keep in mind include:

1.     Don’t ask for a bunch of favors — one or two over time is okay depending on the ask.

2.     Don’t be overly defensive or passive aggressive.

3.     Do keep excessive noise to a minimum.

4.     Do clean up after pets and kids.

5.     Don’t be intrusive or a gossip.

6.     Do set your own boundaries early on and respect those made by others.

As you explore the neighborhood and get to know its residents, don’t forget that building relationships takes time and effort. If you keep at it, you may just make connections that last a lifetime.


Author bio: Stan Caramalac is the founder and CEO of Move Central. He started the company because he truly believed that moving could be simple as long as it was done efficiently. He strives to help people make their moves smoother and less stressful. Caramalac and his team proudly serve San Diego, Orange County, Los Angeles and the Bay Area. 


Resources

https://agworkers.com/the-dos-and-donts-of-meeting-new-neighbors

HOW TO KEEP YOUR HOME’S WINDOWS SPOTLESS FOR LONGER

This post will examine quick and easy methods for getting and keeping windows clean, which will ultimately save time and effort. Discover how to make your streak-free window cleaning solution using common home items. Learn the value of using the proper equipment, such as squeegees and microfiber cloths, to guarantee thorough cleaning without leaving any residue behind. Look into preventive steps to reduce the accumulation of dirt and grime on windows, such as adding screens and routine cleaning. You can have clear, dazzling windows that improve your house’s visual appeal and brightness while lowering the frequency of window cleaning by using these useful ideas.

TIPS FOR KEEPING YOUR HOME’S WINDOW SPOTLESS FOR LONGER

CHOOSE THE RIGHT CLEANING SUPPLIES

Using the appropriate cleaning products is essential when attaining streak-free, spotless windows. Cleaning your windows using a microfiber cloth or squeegee assures that there will be no lint left behind, leaving them glistening and pristine. Your windows will maintain their luster for longer, thanks to the high-quality components that eliminate residue and stains. Use these powerful tools to easily enjoy a bright and lovely view outside your home while also reducing the amount of care required regularly. Enhancing the aesthetic value of your living space by making it easier to keep streak-free windows requires taking the necessary precautions and acquiring the necessary cleaning tools.

THE ART OF PROPER WINDOW CLEANING TECHNIQUES

Mastering the right methods is essential for achieving immaculate, streak-free results while washing windows. Before you begin washing your windows, make sure they are completely dry. Cleaning windows in the bright sunshine might lead to streaking because the heat dries cleaning solutions too rapidly. Ensure the squeegee is at the right angle and you’re making smooth, even strokes to remove water and clean effectively. Wipe away any leftover moisture with a microfiber towel after squeegeeing to get a spotless and crystal-clear surface. Following these steps can keep your house looking its best with clean, welcoming windows.

REGULAR WINDOW MAINTENANCE AND INSPECTION

Cleaning and inspecting windows regularly is essential if you want them to stay immaculate for a long time. First, ensure your windows are in good working order by checking for broken seals, cracks, and loosened hardware regularly. Taking care of little problems before they become big ones helps keep your windows in good shape for longer. Condensation between the panes of a double-paned window might indicate a seal leak that requires immediate treatment. If you want your windows to last as long as possible and continue looking as good as new, you should clean them twice a year using the methods and materials article discussed. Adhering to these guidelines will keep your windows in great shape for years, guaranteeing a pristine view.

WEATHERPROOFING YOUR WINDOWS

Cleaning and energy efficiency might both benefit from weatherproofing your windows. Look into weatherproofing methods, such as sealing the window frames with caulk or weather stripping. This will keep your house cleaner longer by limiting the dust, filth, and moisture that can enter your windows. By having them professionally sealed, you reduce the time and effort required to maintain and clean your windows. Maintain the weatherproofing by regularly inspecting the weather stripping and caulking for wear and replacing it if necessary. If you follow the steps in this article, you’ll have cleaner windows and experience fewer drafts and heat loss, which will positively affect your utility expenses.

APPLY PROTECTIVE COATING

Keeping your home’s windows spotless for an extended period requires the implementation of a protective coating. Opting for a durable and high-quality protective coating can create a shield against dirt, grime, and environmental pollutants, minimizing the accumulation of stains and debris on the glass surface. This coating acts as a barrier, repelling water and preventing it from sticking to the windows. Regular cleaning maintenance becomes more manageable. When searching for the ideal protective coating, you have several options available in the market, including reputable brands like DFI Solutions. Exploring these options will help you find the best-suited protective coating that aligns with your specific needs and requirements. By investing in a reliable protective coating solution for your windows, you can enjoy a cleaner and clearer view with fewer cleaning efforts and longer intervals between cleanings.

CONCLUSION

Keeping your windows clean has dual benefits: it improves your home’s curb appeal and lets you see clearly outside. You can extend the time between window cleanings by using the correct cleaning products, developing efficient cleaning routines, and performing frequent maintenance and inspections. Using window coverings and weatherproofing your windows can further extend the time between cleanings by shielding them from the elements and hiding fingerprints. These easy-to-implement suggestions will have you basking in the glow of sparkling windows and taking in the splendor of the outside world in no time. Enjoy the advantages of clean, shiny windows by learning the art of window care.

 Guest Contributor: Stephanie Snyder

PLUMBING MAINTENANCE – WHO IS RESPONSIBLE, LANDLORDS OR TENANTS?

Ah, the famous age-old question: who’s responsible for plumbing maintenance? Landlords or tenants? Many generations have given their contribution to resolving this problem in the past. To quote an Allen Ginsberg poem: I saw the best minds of my generation… We’ll stop right there. This isn’t a boring poetry reading, and the question raised at the beginning certainly isn’t something great thinkers have struggled with for centuries. Although, since you’re reading this text, you might wonder: really, who’s responsible for plumbing maintenance? You might’ve encountered some problems in your new apartment, or maybe you’re checking out your options before you move in. Whatever’s the case – we’re here to help you out. Stay tuned for some helpful info.

FIRST THOUGHT – BEST THOUGHT (OR IS IT?)

Your first thought might be: well, the landlord is responsible for its tenants’ quality of living; therefore, he’s accountable for anything that goes wrong with plumbing. That could be the truth. But, there’s a catch. In most states, the landlord is responsible for hiring someone to take care of plumbing emergencies. Is a leaky tap an emergency? Probably not. What classifies as an emergency is a question to ponder (consider checking your state law). For example, if you notice there’s no running water, that’s undoubtedly an emergency. The landlord is definitely responsible for that one. In most cases, you’ll find these problems classified as emergencies:

         Serious leaks in your bathroom or kitchen;

         Damaged, non-working water heater;

         Burst water pipes;

         Toilet with an active overflow.

Landlords are definitely responsible for resolving a plumbing emergency. A leaking tap probably doesn't fit into that category. Check your state law.
Landlords are definitely responsible for resolving a plumbing emergency. A leaking tap probably doesn’t fit into that category. Check your state law.

 Can the landlord also be responsible for minor repairs?

There isn’t a straight answer to this one. You might want to check the lease agreement and see if you can find the solution there. If the problem you’ve encountered is somehow listed in the agreement, and if the landlord’s responsibility is evident, you have your answer. Otherwise, if the issue isn’t a subject of the lease agreement, you’ll need to check state real estate laws. Some of them have repair and deduct statutes. These rules make the landlord deduct the repair cost (paid by the tenant) from the monthly rent. A quick tip: there are some repairs (even though they look minor) you shouldn’t try to do by yourself. For example, low water pressure is an issue that pros should handle.

ADDITIONAL INFO THAT MIGHT COME IN HANDY

Let’s say you’ve made a deal with the landlord. He’ll deduct the repair costs from the rent for the next month. Now imagine this scenario: your landlord’s antique kitchen table gets damaged in the process. We guess you know who’s responsible for that. To ensure this doesn’t happen, consider hiring experts such as those at golansmoving.com and see if they can do something to help you store valuable items during the process.

To safeguard your belongings and avoid any potential disputes, consider taking precautions. Before the repair work commences, it’s a wise idea to document and store valuable items properly. Hiring experienced professionals like those at golansmoving.com can offer assistance in storing precious and delicate items safely during the renovation process. By opting for professional storage solutions, you can have peace of mind, knowing that your possessions are in capable hands.

It's very important to store valuable things somewhere they can't be damaged while the renovation process enfolds. The best way, of course, is to rent storage space.
It’s very important to store valuable things somewhere they can’t be damaged while the renovation process enfolds. The best way, of course, is to rent storage space.

DIPLOMACY IS KEY

It might be better if we mentioned this earlier, but before you quote the law and everything, see if talking to your landlord can seal the deal. Keeping a good relationship with your landlord is something that will guarantee you peace of mind when plumbing issues (or any other issues with the apartment you’re renting) occur. Also, it really isn’t pleasurable to stay in an apartment where the owner acts indifferent. There’s no need to be super-formal or something. Of course, if talking doesn’t get you what you think you legally deserve, then quoting the law is the way to go. But, as we’ve noted at the beginning, it shouldn’t be your first option.

Being on good terms with your landlord can create a harmonious living environment and foster mutual respect. In some cases, landlords might be more willing to address plumbing issues promptly and responsibly if they sense a cooperative tenant-landlord relationship. However, if amicable discussions don’t lead to the desired outcome, knowing your rights and quoting relevant laws can serve as a fallback option.

AN EXAMPLE: WHAT’S IT LIKE IN CHICAGO?

In this paragraph, we’ll pinpoint some of the rights tenants have when renting in Chicago. For example, the landlord can’t evict you without a judge’s order and must take care of a pest infestation when it occurs. Also, you shouldn’t worry that he will come unannounced. What about plumbing maintenance? Suppose the tenants (or their guests) are not responsible for the damage done. In that case, landlords are obliged to take responsibility in accordance with the City of Chicago’s Residential Landlord and Tenant Ordinance (commonly known as CRLTO). Make sure you check that out. In other words: be familiar with your rights. A well-informed tenant is a good tenant. As if you already didn’t know that, right?

Familiarizing yourself with the CRLTO and other relevant laws can prevent potential disputes and give you the knowledge needed to protect your rights as a tenant. Being well-informed about your rights and responsibilities can help create a healthy and respectful landlord-tenant relationship.

Know your rights! Being well-informed is a must nowadays. If you're a Chicago resident, consult the CRLTO.
Know your rights! Being well-informed is a must nowadays. If you’re a Chicago resident, consult the CRLTO.

SHOULD YOU SUE THE LANDLORD?

Hopefully, there won’t be a reason for that. Most landlords will quickly resolve the issue you’re dealing with. If, for some reason, the landlord ignores fixing the problem, you have all the rights in the world to mention a potential legal action (after you consult the lease agreement or the state law, of course). But, as we’ve already said, that scenario is really not so popular. You’ll rarely stumble upon a landlord who will make you want to take legal action.

In the vast majority of cases, tenants will not need to resort to suing their landlords. The key to successful resolution lies in open communication, cooperation, and understanding. By being diplomatic and informed, you can minimize the likelihood of disputes and foster a more comfortable living arrangement for everyone involved.

FINAL WORDS

That’s all, folks! Hopefully, we’re closer than ever to find the answer to the question of who’s obliged to hire professionals for plumbing maintenance. The best way to sum up this article is: know your rights! Make sure to check the lease agreement, consult the state’s real estate law, and before you start thinking about taking legal action – talk to your landlord. As we’ve mentioned, there’s a slim chance you’ll need to go to court because your toilet is overflowing. Being diplomatic, cooperative, and well-informed will increase the chances of finding a satisfactory resolution, ensuring a pleasant and stress-free living experience in your rented property.

Guest Contributor: Sophia Perry

WHAT ARE THERMALLY BROKEN WINDOWS, AND WHY DO YOU NEED THEM?

By Ramarex

A study in 2018 revealed, “Around 318,891 homes are affected by dampness and have approx. 252,855 houses have visible mold.”

Molds and dampness are correlated with asthma, allergies, skin rashes, and severe respiratory tract diseases. Therefore, to cater to this, a viable solution in the form of thermally broken windows was introduced. 

In this article, we will discuss everything about thermally broken windows and how it benefits you in the long run.

Stay with us!


WHAT IS THERMALLY BROKEN WINDOWS?

If you want to improve the energy efficiency of your windows and prevent heat transfer through their frame, you need thermally broken windows.

That’s because thermally broken windows incorporate a “thermal break” in the frame, creating a barrier to reduce heat transfer. The insulated barrier is usually made of reinforced polyamide—a type of plastic with a low thermal conductivity that prevents the heat from entering inside or leaving the house. 

However, in premium quality windows, this insulated material is made of aluminum, which is more powerful and durable than polyamides to maintain a comfortable temperature within the house.

Fun fact: In Australia, around 90% of the windows installed are Aluminum.

In short, thermally broken windows are high-performance insulated windows against heat and cold induction through a feature termed “thermal break”.


WHAT ARE THE TYPES OF THERMAL BREAKS?

It might surprise you but there are different methods to achieve the thermal breaks in your windows.

POLYAMIDE STRIPS:

Polyamide has low thermal conductivity since it’s a non-metallic material. It is mainly used in Aluminium window frames where it is inserted in between the outer and inner parts of the frame to prevent heat transfer.

INSULATING FOAM:

To create an insulating layer that prevents heat transfer, insulating foam is usually injected between the window frame sections. The foam expands and hardens to create a thermal barrier, and ultimately reduces heat transfer.

THERMAL INSERTS:

Many materials, including fiberglass or reinforced polyamide, are used as thermal inserts. They are placed within the window frame and create a thermal bridge that increases energy efficiency in the long run.

All the three types of thermal breaks are beneficial and suitable for specific window frames, materials, and designs. Your window manufacturer will guide you about what’s best for you.


WHY SHOULD YOU INSTALL THERMALLY BROKEN WINDOWS IN YOUR HOME?

There are major advantages of thermally broken windows and that’s the real cause of their immense popularity. Some of the advantages of thermally broken windows are stated below:

EXCEPTIONAL THERMAL PERFORMANCE

As mentioned earlier, these windows incorporate a thermal break in their frame that reduces heat transfer. It also allows you to maintain a pleasant temperature, regardless of extreme weather conditions.

In winter, your windows will keep the heat inside, and in summer, they will keep the heat out of your house, maintaining a comfortable indoor temperature without using considerable energy.  

Fun fact: Thermally broken windows are warmer in winter and cooler in summer. No more insane power bills for heating or cooling your home! 

REDUCED CONDENSATION

Condensation occurs when warm, humid air trapped inside your house comes in close contact with a window surface. This allows moisture to form water droplets through the process called condensation.

Condensation is a nightmare to deal with considering it’s the root cause of dampness and mold, ultimately severe health problems.

However, thermally broken windows, in combination with proper heating and ventilation result in reduced condensation and keep your home nice, warm, and dry all around.

HAPPY, HEALTHY HOMES

A healthy home is a happy home with no traces of moisture, mold, pollution, and noise. However, a study in 2018 revealed that 318,891 homes are affected by dampness and. 252,855 houses have visible mold.

The numbers are huge!

And so are the health risks, including asthma, allergies, skin rashes, and other respiratory issues.

Therefore, to mitigate these concerns, the use of thermally broken windows is recommended in order to live a stress-free, healthy life with no signs of moisture and mold that affect your physical and mental health.

INCREASED PROPERTY VALUE

Your home is your asset. Therefore, you should always invest in it wisely. Nowadays, with the increasing popularity of eco-friendly homes, the demand for thermally broken windows has considerably increased.

Buyers are looking for properties that are energy-efficient to minimize their living costs and maximize their living standards in terms of comfort, durability, and quality. 

NOISE REDUCTION (SOUNDPROOFING)

If you live on a busy street, the need for privacy and serenity becomes paramount.

To achieve a level of comfort in busy areas amid the hustle and bustle, homeowners always appreciate the soundproof windows that cancel out the outside noise of traffic, pets, or just general noise.

Luckily, the thermal break in your thermally broken windows provides amazing soundproofing that separates your inside from the outside world effectively.  

BIGGER SAVINGS 

Sure, the installation of thermally broken windows might pose a serious challenge to your budget. But, over time, your low utility bills will outweigh the total cost of installation.

That’s because when you install thermally broken windows, you use minimum energy to heat or cool your home, resulting in reduced power bills.

VERSATILITY

Since we have around a thousand different styles of windows in Australia, you might wonder if thermally broken windows are limited in operational styles.

The answer is a plain NO!

Surprisingly, thermally broken windows are easily found in all of the operational styles, and finding a manufacturer that creates your favorite style in these windows should never be a problem.

You can get thermally broken windows in various styles, including single and double-hung windows, sliding windows, picture windows, casement windows, and much more—you name it.

Also, you can request customized windows in shapes or patterns from certain manufacturers at an additional cost.


THERMALLY BROKEN WINDOWS VS. DOUBLE GLAZING—WHICH IS BETTER?  

Now, to answer the most interesting question: What should I go for? Double glazed windows or Thermally broken windows?

Because over many years, homeowners have been using double glazed windows to keep their buildings, homes, and even offices comfortable in extreme weather.

Double glazing works by interrupting the transfer of heat through condensation—A layer of air (particularly, argon gas) is added between the two glass panes that are separated by non-conductors.  

However common and popular, the efficiency of double glazed windows is compromised because of its window frames.

For example, on a cold winter night, feel the inside of your aluminum joinery of your double glazed windows. You’ll realize that the inside is just as chilly as the outside.

That’s because the window frames are not targeted for the thermal break technique. And just like glass, the window frames (mainly Aluminium) are great conductors of heat or cold.

Therefore, the performance of double glazing is not as outstanding as the thermally broken windows where heat transfer through the entire window is reduced by separating the inside and outside of the window via a poor conductor.  

So, if you’re living in Australia, installing thermally broken windows for your home, buildings, or offices is highly recommended. Since Australia can get really hot in summer and cold in winter, you will appreciate the comfortable internal temperature while reducing your energy bills.


For professional assistance, it’s always best to consult a window specialist in your local area in Australia.

TRANSITIONING YOUR BACKYARD FROM SUMMER TO FALL

As the sun begins to set earlier and the crisp autumn air sets in, it’s time to say goodbye to summer and welcome the season of fall. With nature putting on a display of colors, transitioning your backyard from the vibrant days of summer to the cozy ambiance of fall is an opportunity to create a warm and inviting outdoor space.

TIDY UP AND CLEAR OUT:

Before diving into the fall decor, start by tidying up your backyard. Clear away any summer toys, pool accessories, or worn-out outdoor furniture. Give your garden a thorough clean, removing dead plants and debris from the summer. Trim any overgrown bushes and plants to maintain a neat appearance.

FALL-INSPIRED COLORS:

Infuse your backyard with the warm and rich hues of fall. Replace the bright summer-themed accessories with fall-inspired colors such as deep reds, rustic oranges, golden yellows, and earthy browns. Introduce throw pillows, blankets, and outdoor rugs in these autumnal shades to create a cozy atmosphere in your seating areas.

COZY SEATING NOOKS:

Fall is the perfect season to create cozy nooks in your backyard where you can relax and enjoy the changing landscape. Arrange your outdoor furniture closer together to encourage intimate gatherings. Add cushions, blankets, and soft throws to make your seating areas more comfortable, inviting guests to linger outdoors longer.

ILLUMINATE WITH WARM LIGHTING:

As the days grow shorter, lighting becomes crucial in creating an inviting ambiance. Swap out bright summer lights for softer, warmer lighting options. String fairy lights across fences and pergolas, or hang lanterns to add a touch of enchantment. You can also include fire pits or outdoor heaters to provide warmth on cooler evenings.

HARVEST DECORATIONS:

Celebrate the fall harvest season by incorporating natural elements into your backyard decor. Utilize pumpkins, gourds, and squashes as festive centerpieces or scattered around the garden. Create a charming display of hay bales, corn stalks, and dried corn husks to bring a rustic touch to your outdoor space.

EMBRACE FALL FLOWERS:

While summer blooms may be fading, there are plenty of fall flowers that can breathe new life into your backyard. Plant autumnal flowers such as mums, pansies, and asters, which thrive in cooler temperatures and add vibrant splashes of color to your garden.

RUSTIC ACCENTS:

Incorporate rustic accents to evoke a sense of autumn charm in your backyard. Utilize wooden crates, vintage wheelbarrows, or antique garden tools as decorative elements. Repurpose old barrels into planters for your fall flowers, and create DIY wreaths using dried leaves and twigs to adorn your outdoor walls.

COZY OUTDOOR DINING:

Extend the joy of dining outdoors by setting up a cozy outdoor eating area. Invest in a sturdy patio table and chairs, layering them with soft tablecloths and autumn-themed napkins. Light some candles and use charming wooden trays to serve hot beverages or hearty fall dishes.

FOLIAGE AND LEAVES:

Capitalizing on the natural beauty of the season, incorporate fallen leaves into your outdoor decor. Collect colorful leaves to create stunning leaf garlands or scatter them around your seating areas for an organic touch.

CREATE A FIRE PIT AREA:

One of the best ways to savor the crisp fall evenings is by gathering around a fire pit. Create a designated area in your backyard for a fire pit, and surround it with comfortable seating for a cozy gathering spot for family and friends.

Transitioning your backyard from summer to fall is an opportunity to celebrate the changing seasons and embrace the unique beauty that autumn brings. By incorporating warm colors, cozy accents, and nature’s bounty, you can create a magical outdoor space that will make you fall in love with the charm of the season. So, grab a blanket, brew a cup of hot cider, and enjoy the enchantment of fall in your backyard oasis.