HOW TO MAXIMIZE CLOSET SPACE

Maximizing Closet Space: Clever Hacks for Efficiency and Organization
Closets are more than just storage spaces; they are versatile assets that can serve various purposes beyond their conventional roles. With creativity and smart organization, you can maximize closet space to its full potential, transforming it into an efficient and organized hub for your belongings.
Let’s explore the many uses of closets, examine the strategies for maximizing space, and look into the clothing hacks for organized storage.
 
The Many Uses of a Closet 
Closets are commonly associated with storing clothes, but they can also serve numerous other functions. Consider these alternative uses to optimize every inch of your closet space:
 
1. Home Office Nook: Convert a compact closet into a cozy home office. Install shelves for books, a desk for your computer, and task lighting to create a productive workspace.
2. Mini Library: For book enthusiasts, closets can be turned into mini libraries with built-in shelves and seating. A tranquil reading nook awaits just a few adjustments away.
3. Craft Station: Organize crafting supplies neatly by repurposing a closet. Add hooks for hanging tools, shelves for materials, and a fold-out table for crafting activities.
4. Pantry Extension: Overflowing pantry? Use a closet for additional food storage. Install adjustable shelves, clear containers, and labels to keep items easily accessible.
5. Entertainment Center: Mount a TV on the closet wall, add shelves for media devices, and store DVDs or video games inside. It’s a creative way to integrate entertainment into your space.
 
Maximizing Closet Space
To make the most of your closet space, employ these effective strategies:
1. Hat Storage: Optimize your closet’s layout by utilizing hooks or pegs mounted on the inner side of the closet door for hat storage. This space-efficient method preserves shelf space and arranges your hats neatly, making them readily accessible.
2. Utilize Hanging Space: Maximize vertical space by introducing a second hanging rod. Capitalize on this arrangement by placing shorter items like shirts on the upper rod and longer items like dresses on the lower rod. An alternative approach involves cascading hangers, allowing you to store multiple garments vertically. 
3. Modular Shelving: Elevate organization with modular shelving systems that adapt to accommodate items of varying sizes. This adaptive nature enables you to tailor the closet’s setup to your specific storage needs, efficiently utilizing available space.
4. Under-Shelf Baskets: Transform underutilized space beneath shelves into valuable storage by attaching under-shelf baskets. This innovative solution is ideal for stowing away smaller articles such as scarves, socks, and accessories, ensuring clutter-free organization.
5. Clear Storage Containers: Simplify item identification and minimize closet clutter by opting for clear storage containers. This method keeps your belongings in order and contributes to a visually uncluttered closet environment. 
By implementing these practical and space-conscious strategies, you can unlock the true potential of your closet, achieving an organized and efficient storage solution for all your belongings.
 
Clothing Hacks When Putting Them Away
Clothing organization within your closet can significantly enhance daily routines and save valuable time. Implement the following clothing hacks for an optimized closet space:
1. Roll Instead of Fold: Opt for rolling instead of folding When storing garments such as T-shirts and jeans. This approach conserves space and minimizes wrinkles, ensuring your clothes are ready to wear. 
2. Color Coordination: Arrange your clothing items according to their color spectrum. This simple method accelerates finding specific pieces and adds a visually appealing aspect to your closet.
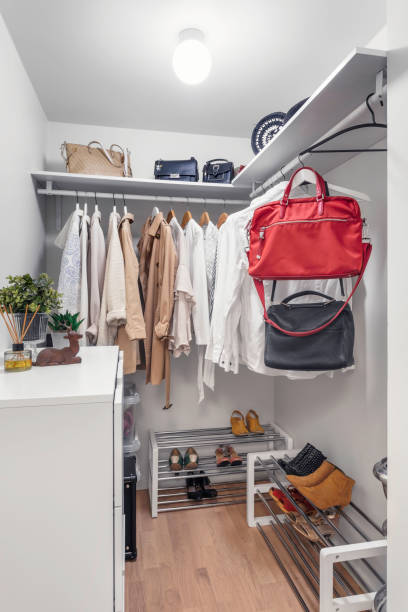
3. Shoe Racks or Cubbies: Utilize shoe racks or cubbies to effectively organize your footwear collection, keeping them off the closet floor. This practice maintains a sense of order while preventing shoe-related clutter.
4. Seasonal Rotation: Make use of vacuum-sealed bags or containers to store out-of-season attire. As seasons transition, rotate your clothing selection, ensuring your closet remains well-organized and clutter-free.
5. Slim Hangers: Replace bulky hangers with slender alternatives to maximize your hanging space. Velvet or flocked hangers free up additional room and prevent garments from slipping off, keeping your closet tidy and manageable.
 
Conclusion
Closets are valuable assets that can serve multiple purposes beyond conventional storage. You can optimize your closet’s potential by embracing creative uses and employing space-maximizing strategies. From efficient hat storage to smart clothing organization hacks, your closet can become an organized haven for your belongings, enhancing functionality and aesthetics in your living space.
So, don’t underestimate the power of an organized closet. Take advantage of the tips and strategies suggested to make the best use of your closet. It’s a small step towards a more organized and stress-free lifestyle.
 
Written by Taylor McKnight, Author for Cap America

6 BENEFITS OF HAVING AN AT-HOME GYM

Physical activity has never been so important, thanks to tech advancement and unanticipated global paradigm shifts like the ones brought about by Covid-19, leading to sedentary lifestyles.

It is recommended by Physical Activity Guidelines for Americans, to derive benefits associated with physical activity, you could aim to spend between 2 ½ to 5 hours in a week of moderate to vigorous-intensity activity. These are coupled with two days a week of muscle-strengthening workouts. One way of achieving such fitness thresholds is having an at-home gym.

This article will take a closer look at what an at-home gym entails and the top 6 reasons why having one is worth your investment.


WHAT’S AN AT-HOME GYM ANYWAY?

Any space with essential exercise equipment within your home can make an at-home gym. It’s a space where you can do squats, lunges, lifts, and sweat your way to a healthier body without leaving your home. It doesn’t have to look complicated like a high-tech training facility or take up a whole room like a professional gym. Even a corner or a designated spot can transform into your fitness sanctuary tailored just for you and your family workout.

WHAT DO YOU NEED FOR YOUR IN-HOME GYM?

Building an at-home gym doesn’t require fancy machinery or an Olympic-sized budget. All you need are a few key pieces of gear to get started. A basic item would be an exercise mat. With a mat, the stage is already set. Other essential items are dumbbells, resistance bands, a stability ball, and a jump rope. If you are not ready to expend cash, you can improvise according to the list of alternatives below:

•   Dumbbells – filled water bottles, sand filled bags, and filled backpacks

•   Stability Ball – a sturdy chair or your couch

•   Resistance Bands – bungee or elastic cords

•   Jump Rope – an imaginary rope or a no longer for use rope

•   Yoga Matt – a soft carpet


SO, WHY SHOULD YOU HAVE AN AT-HOME GYM?

 The benefits of your in-house working facility are numerous, and the main ones include the following:

1.         Ultimate Convenience

Gym hours coincide with peak hours, and dealing with traffic jams can be draining. At times bad weather can keep you holed up at home or in your workplace, leaving you with no alternative but skipping your physical session. With an at-home gym, your workout schedule bends to your will, and you can easily access your home gymnasium anytime, forward-pushing your fitness progress.

2.         Time-Saver

Your at-home gym is a time saver that helps you fit workouts into your busy life without the hustle of commuting. Further, preparing for the gym typically involves many activities, from packing your gym essentials to selecting the right workout attire, unlike your at-home fitness space, eliminating the need for extensive preparation.

3.         Non-judgment Zone

Ever felt self-conscious at the gym? In your home gym, the only eyes on you are your own unless you have a pet, partner, or family who is your enthusiastic cheerleader. A public gym can be limiting if you do not feel confident about your body and fear making mistakes when working out. The privacy of an at-home gym makes one less conscious and workout without reservation and care in the world.

4.         Customized Workouts

You’re your gym’s boss, meaning workouts are tailored to your preferences. If you want to dance while lifting weights or practice your warrior pose between sets, you unreservedly go for it. You can vary the exercises with your gym using youtube videos, Facebook Live, or Youtube streaming. You can choose the music during your workouts and your desired general environment.

5.         Money-Saver Supreme

An at-home gym may require a small initial investment, but it pays off in the long run. It’s a significant saving for your pocket as monthly gym fees are no more. Plus, think about the gas money you’ll save by skipping the drive to the gym. 

6.         Consistency and commitment

The ease of accessibility is a real motivation. Rain or shine, tired or energized, your equipment’s waiting for you, making it easier to stay on track with your fitness goals. When the gym is right at your nose, you expend less effort forming a desirable goal-achieving exercise regimen. You have fewer excuses, and the only option is to hit the ground running at your scheduled sessions.


SO, SHOULD YOU GET AN AT-HOME GYM?

If you want to be on top of your fitness journey, a dedicated workout space at home is the way. Remember, it’s not about the size of your gym or the fanciness of your equipment. It’s about creating a space that encourages you to move, sweat, and enjoy the process. Ultimately, your at-home gym isn’t just a place to work out; it reflects your commitment to your well-being. Setting up should not be daunting. Start small and progressively add equipment that supports your training on essential exercises, aiding you in reaching your fitness and health goals.


Written by Taylor McKnight, Author for ProHealthCareProducts

PETS IN RENTAL PROPERTIES: GUIDELINES FOR LANDLORDS IN NEW JERSEY

Renting a home is a significant decision for individuals and families, and for many, this includes their beloved pets. As a landlord in New Jersey, accommodating tenants with pets can present unique challenges and opportunities. Striking a balance between ensuring a comfortable living environment for both tenants and their furry companions requires careful consideration and well-defined guidelines. In this article, we’ll explore essential guidelines for landlords in New Jersey when it comes to allowing pets in rental properties. By understanding legal obligations, implementing pet-friendly policies, and fostering open communication, you can create a harmonious space where both tenants and their pets can thrive.


Know the Legal Landscape

While New Jersey does not have specific statewide laws that address pets in rental properties, landlords still need to be aware of certain legal aspects. It’s crucial to familiarize yourself with federal fair housing laws that prohibit discrimination based on disabilities. If a tenant has a service animal or emotional support animal, you are generally required to make reasonable accommodations for them, even if you have a “no pets” policy.


Set Clear Pet Policies

Before allowing pets in your rental property, establish clear pet policies that outline the terms and conditions. Consider factors such as the number and size of pets allowed, specific breeds, and any required vaccinations. Clearly communicating these policies in the lease agreement helps avoid confusion and ensures that tenants are aware of their responsibilities.


Screen Potential Tenants and Their Pets

As a landlord, you have the right to screen potential tenants and their pets to ensure they’re a good fit for your property. Request information about the pet’s size, breed, and behavior history. Additionally, you can ask for references from previous landlords to gauge the pet’s behavior in previous rental situations.


Charge Pet Deposits or Fees

Many landlords opt to charge a pet deposit or non-refundable pet fee. This helps cover potential damages or additional cleaning costs that might arise due to the presence of pets. While New Jersey law does not specify limits for pet deposits, it’s important to ensure that any fees are reasonable and clearly outlined in the lease agreement.


Set Expectations for Cleanliness

Include guidelines for maintaining cleanliness in the lease agreement. Address issues like waste disposal, indoor accidents, and general cleanliness related to pets. Encourage tenants to keep common areas tidy and establish protocols for cleaning up after their pets.


Address Noise Concerns

Pets, particularly dogs, can sometimes create noise disturbances that might affect other tenants or neighbors. To mitigate this, include clauses in the lease agreement that address noise levels and expectations for keeping pets quiet, especially during nighttime hours. This can help maintain a peaceful living environment for everyone.


Include Liability Clauses

It’s advisable to include liability clauses in the lease agreement that outline the tenant’s responsibility for any damages caused by their pets. This can protect you as a landlord from potential disputes or legal issues arising from pet-related damages.


Regular Property Inspections

Implement regular property inspections to assess the condition of your rental property, particularly if pets are present. These inspections provide an opportunity to address any pet-related concerns, such as damages or sanitation issues. Effective communication with tenants during these inspections fosters accountability and helps maintain a positive landlord-tenant relationship.


Maintain Open Communication

Encourage open communication with tenants about pet-related matters. If any issues arise, whether they involve other tenants, neighbors, or pet behavior, address them promptly and professionally. Creating a channel for communication helps prevent conflicts and ensures that concerns are dealt with in a timely manner.


Conclusion

Navigating the realm of pets in rental properties as a New Jersey landlord involves a delicate balance between providing a comfortable living space and maintaining the property’s condition. By adhering to the guidelines outlined in this article, you’re better equipped to make informed decisions that benefit both your tenants and their furry companions. Remember, while there might not be specific statewide laws governing this area, understanding your legal obligations under New Jersey landlord-tenant law is crucial. Setting clear pet policies, addressing cleanliness and noise concerns, and fostering open communication are all integral to creating a harmonious living environment for everyone. By embracing these practices, you’re not only enhancing the appeal of your rental property but also fostering positive tenant relationships that contribute to a thriving and responsible community. As you navigate the world of rental properties and pets, remember that a well-considered approach ultimately contributes to a property that is welcoming, well-maintained, and enjoyable for both tenants and their four-legged friends.

GETTING TO KNOW YOUR NEIGHBORS AFTER MOVING IN

Moving to a new home in an unfamiliar neighborhood is an exciting time. Of course, it does come with certain challenges, such as overcoming the intimidation of meeting the neighbors. Even the most extroverted among us may have trouble reaching out to strangers and putting their best foot forward.

If you’ve just landed somewhere new or are making plans to, it helps to know how best to go about it ahead of time. To help point you in the right direction, here are a few strategies you could try when getting to know your new neighbors.


Be Friendly

 While this first suggestion may seem like a no-brainer, there is definitely something to making yourself approachable. Be sure to wave and smile to everyone. Even if you’re still in the throes of moving day, it’s advantageous to make eye contact, say hello and be receptive to people. Doing so shows you’re open to getting to know them, even if right now isn’t a great time.

As you settle in, continue to carry out these simple acts. When the opportunity presents itself, you can shift the greeting into a casual exchange. Such introductory conversations could be on the local schools, sports teams, career paths or something as simple as the weather. Don’t wait too long though. You want to progress past simply waving sooner rather than later. Otherwise, you could be stuck at this awkward stage for months or even years.


Stroll Through the Neighborhood 

The chance to strike up a conversation typically won’t land in your lap. It’s best to be proactive about it. A great way to do just that is to take walks. Beneficial as exercise for you and your dog if you have one, these walks present openings to “bump into” the neighbors informally. Plus, dogs also make it easy for others to find you approachable and initiate conversations. 

Plan for the most opportune time of day and to take a leisurely route. That way, you could chance upon people when they’re outside and free to talk. You’ll also want to think of some conversation starters beforehand, such as commenting on their home. If all goes well, let the people you meet know your name, where you live and that you look forward to seeing them in the future.


Invite People Over

One approach to get to know several people all in one go is to throw a housewarming party. While you may be thinking of just having over friends and family, adding your neighbors to the guest list is a great way to show them your eagerness for moving past being strangers. The affair doesn’t have to be fancy or impressive. Simply set a date for a casual, BYOB backyard get-together and fire up the grill.

As mentioned above, be ready with things to talk about. Ask personal questions such as where they’re from, what they do for work and so on. It could also be constructive to seek their advice. Whether you’re looking for a local landscaper or the best pizza in town, these topics are safe and easy while still being productive. The same goes for offering help. Volunteering to assist on a neighbor’s upcoming project or with an HOA event shows you’re here to lend a hand. The more you put in, the more you get out as the saying goes.


Remember to Be a Good Neighbor

There are few do’s and don’ts when it comes to meeting the neighbors as well as staying in their good graces. Things to keep in mind include:

1.     Don’t ask for a bunch of favors — one or two over time is okay depending on the ask.

2.     Don’t be overly defensive or passive aggressive.

3.     Do keep excessive noise to a minimum.

4.     Do clean up after pets and kids.

5.     Don’t be intrusive or a gossip.

6.     Do set your own boundaries early on and respect those made by others.

As you explore the neighborhood and get to know its residents, don’t forget that building relationships takes time and effort. If you keep at it, you may just make connections that last a lifetime.


Author bio: Stan Caramalac is the founder and CEO of Move Central. He started the company because he truly believed that moving could be simple as long as it was done efficiently. He strives to help people make their moves smoother and less stressful. Caramalac and his team proudly serve San Diego, Orange County, Los Angeles and the Bay Area. 


Resources

https://agworkers.com/the-dos-and-donts-of-meeting-new-neighbors

HOW TO KEEP YOUR HOME’S WINDOWS SPOTLESS FOR LONGER

This post will examine quick and easy methods for getting and keeping windows clean, which will ultimately save time and effort. Discover how to make your streak-free window cleaning solution using common home items. Learn the value of using the proper equipment, such as squeegees and microfiber cloths, to guarantee thorough cleaning without leaving any residue behind. Look into preventive steps to reduce the accumulation of dirt and grime on windows, such as adding screens and routine cleaning. You can have clear, dazzling windows that improve your house’s visual appeal and brightness while lowering the frequency of window cleaning by using these useful ideas.

TIPS FOR KEEPING YOUR HOME’S WINDOW SPOTLESS FOR LONGER

CHOOSE THE RIGHT CLEANING SUPPLIES

Using the appropriate cleaning products is essential when attaining streak-free, spotless windows. Cleaning your windows using a microfiber cloth or squeegee assures that there will be no lint left behind, leaving them glistening and pristine. Your windows will maintain their luster for longer, thanks to the high-quality components that eliminate residue and stains. Use these powerful tools to easily enjoy a bright and lovely view outside your home while also reducing the amount of care required regularly. Enhancing the aesthetic value of your living space by making it easier to keep streak-free windows requires taking the necessary precautions and acquiring the necessary cleaning tools.

THE ART OF PROPER WINDOW CLEANING TECHNIQUES

Mastering the right methods is essential for achieving immaculate, streak-free results while washing windows. Before you begin washing your windows, make sure they are completely dry. Cleaning windows in the bright sunshine might lead to streaking because the heat dries cleaning solutions too rapidly. Ensure the squeegee is at the right angle and you’re making smooth, even strokes to remove water and clean effectively. Wipe away any leftover moisture with a microfiber towel after squeegeeing to get a spotless and crystal-clear surface. Following these steps can keep your house looking its best with clean, welcoming windows.

REGULAR WINDOW MAINTENANCE AND INSPECTION

Cleaning and inspecting windows regularly is essential if you want them to stay immaculate for a long time. First, ensure your windows are in good working order by checking for broken seals, cracks, and loosened hardware regularly. Taking care of little problems before they become big ones helps keep your windows in good shape for longer. Condensation between the panes of a double-paned window might indicate a seal leak that requires immediate treatment. If you want your windows to last as long as possible and continue looking as good as new, you should clean them twice a year using the methods and materials article discussed. Adhering to these guidelines will keep your windows in great shape for years, guaranteeing a pristine view.

WEATHERPROOFING YOUR WINDOWS

Cleaning and energy efficiency might both benefit from weatherproofing your windows. Look into weatherproofing methods, such as sealing the window frames with caulk or weather stripping. This will keep your house cleaner longer by limiting the dust, filth, and moisture that can enter your windows. By having them professionally sealed, you reduce the time and effort required to maintain and clean your windows. Maintain the weatherproofing by regularly inspecting the weather stripping and caulking for wear and replacing it if necessary. If you follow the steps in this article, you’ll have cleaner windows and experience fewer drafts and heat loss, which will positively affect your utility expenses.

APPLY PROTECTIVE COATING

Keeping your home’s windows spotless for an extended period requires the implementation of a protective coating. Opting for a durable and high-quality protective coating can create a shield against dirt, grime, and environmental pollutants, minimizing the accumulation of stains and debris on the glass surface. This coating acts as a barrier, repelling water and preventing it from sticking to the windows. Regular cleaning maintenance becomes more manageable. When searching for the ideal protective coating, you have several options available in the market, including reputable brands like DFI Solutions. Exploring these options will help you find the best-suited protective coating that aligns with your specific needs and requirements. By investing in a reliable protective coating solution for your windows, you can enjoy a cleaner and clearer view with fewer cleaning efforts and longer intervals between cleanings.

CONCLUSION

Keeping your windows clean has dual benefits: it improves your home’s curb appeal and lets you see clearly outside. You can extend the time between window cleanings by using the correct cleaning products, developing efficient cleaning routines, and performing frequent maintenance and inspections. Using window coverings and weatherproofing your windows can further extend the time between cleanings by shielding them from the elements and hiding fingerprints. These easy-to-implement suggestions will have you basking in the glow of sparkling windows and taking in the splendor of the outside world in no time. Enjoy the advantages of clean, shiny windows by learning the art of window care.

 Guest Contributor: Stephanie Snyder

PLUMBING MAINTENANCE – WHO IS RESPONSIBLE, LANDLORDS OR TENANTS?

Ah, the famous age-old question: who’s responsible for plumbing maintenance? Landlords or tenants? Many generations have given their contribution to resolving this problem in the past. To quote an Allen Ginsberg poem: I saw the best minds of my generation… We’ll stop right there. This isn’t a boring poetry reading, and the question raised at the beginning certainly isn’t something great thinkers have struggled with for centuries. Although, since you’re reading this text, you might wonder: really, who’s responsible for plumbing maintenance? You might’ve encountered some problems in your new apartment, or maybe you’re checking out your options before you move in. Whatever’s the case – we’re here to help you out. Stay tuned for some helpful info.

FIRST THOUGHT – BEST THOUGHT (OR IS IT?)

Your first thought might be: well, the landlord is responsible for its tenants’ quality of living; therefore, he’s accountable for anything that goes wrong with plumbing. That could be the truth. But, there’s a catch. In most states, the landlord is responsible for hiring someone to take care of plumbing emergencies. Is a leaky tap an emergency? Probably not. What classifies as an emergency is a question to ponder (consider checking your state law). For example, if you notice there’s no running water, that’s undoubtedly an emergency. The landlord is definitely responsible for that one. In most cases, you’ll find these problems classified as emergencies:

         Serious leaks in your bathroom or kitchen;

         Damaged, non-working water heater;

         Burst water pipes;

         Toilet with an active overflow.

Landlords are definitely responsible for resolving a plumbing emergency. A leaking tap probably doesn't fit into that category. Check your state law.
Landlords are definitely responsible for resolving a plumbing emergency. A leaking tap probably doesn’t fit into that category. Check your state law.

 Can the landlord also be responsible for minor repairs?

There isn’t a straight answer to this one. You might want to check the lease agreement and see if you can find the solution there. If the problem you’ve encountered is somehow listed in the agreement, and if the landlord’s responsibility is evident, you have your answer. Otherwise, if the issue isn’t a subject of the lease agreement, you’ll need to check state real estate laws. Some of them have repair and deduct statutes. These rules make the landlord deduct the repair cost (paid by the tenant) from the monthly rent. A quick tip: there are some repairs (even though they look minor) you shouldn’t try to do by yourself. For example, low water pressure is an issue that pros should handle.

ADDITIONAL INFO THAT MIGHT COME IN HANDY

Let’s say you’ve made a deal with the landlord. He’ll deduct the repair costs from the rent for the next month. Now imagine this scenario: your landlord’s antique kitchen table gets damaged in the process. We guess you know who’s responsible for that. To ensure this doesn’t happen, consider hiring experts such as those at golansmoving.com and see if they can do something to help you store valuable items during the process.

To safeguard your belongings and avoid any potential disputes, consider taking precautions. Before the repair work commences, it’s a wise idea to document and store valuable items properly. Hiring experienced professionals like those at golansmoving.com can offer assistance in storing precious and delicate items safely during the renovation process. By opting for professional storage solutions, you can have peace of mind, knowing that your possessions are in capable hands.

It's very important to store valuable things somewhere they can't be damaged while the renovation process enfolds. The best way, of course, is to rent storage space.
It’s very important to store valuable things somewhere they can’t be damaged while the renovation process enfolds. The best way, of course, is to rent storage space.

DIPLOMACY IS KEY

It might be better if we mentioned this earlier, but before you quote the law and everything, see if talking to your landlord can seal the deal. Keeping a good relationship with your landlord is something that will guarantee you peace of mind when plumbing issues (or any other issues with the apartment you’re renting) occur. Also, it really isn’t pleasurable to stay in an apartment where the owner acts indifferent. There’s no need to be super-formal or something. Of course, if talking doesn’t get you what you think you legally deserve, then quoting the law is the way to go. But, as we’ve noted at the beginning, it shouldn’t be your first option.

Being on good terms with your landlord can create a harmonious living environment and foster mutual respect. In some cases, landlords might be more willing to address plumbing issues promptly and responsibly if they sense a cooperative tenant-landlord relationship. However, if amicable discussions don’t lead to the desired outcome, knowing your rights and quoting relevant laws can serve as a fallback option.

AN EXAMPLE: WHAT’S IT LIKE IN CHICAGO?

In this paragraph, we’ll pinpoint some of the rights tenants have when renting in Chicago. For example, the landlord can’t evict you without a judge’s order and must take care of a pest infestation when it occurs. Also, you shouldn’t worry that he will come unannounced. What about plumbing maintenance? Suppose the tenants (or their guests) are not responsible for the damage done. In that case, landlords are obliged to take responsibility in accordance with the City of Chicago’s Residential Landlord and Tenant Ordinance (commonly known as CRLTO). Make sure you check that out. In other words: be familiar with your rights. A well-informed tenant is a good tenant. As if you already didn’t know that, right?

Familiarizing yourself with the CRLTO and other relevant laws can prevent potential disputes and give you the knowledge needed to protect your rights as a tenant. Being well-informed about your rights and responsibilities can help create a healthy and respectful landlord-tenant relationship.

Know your rights! Being well-informed is a must nowadays. If you're a Chicago resident, consult the CRLTO.
Know your rights! Being well-informed is a must nowadays. If you’re a Chicago resident, consult the CRLTO.

SHOULD YOU SUE THE LANDLORD?

Hopefully, there won’t be a reason for that. Most landlords will quickly resolve the issue you’re dealing with. If, for some reason, the landlord ignores fixing the problem, you have all the rights in the world to mention a potential legal action (after you consult the lease agreement or the state law, of course). But, as we’ve already said, that scenario is really not so popular. You’ll rarely stumble upon a landlord who will make you want to take legal action.

In the vast majority of cases, tenants will not need to resort to suing their landlords. The key to successful resolution lies in open communication, cooperation, and understanding. By being diplomatic and informed, you can minimize the likelihood of disputes and foster a more comfortable living arrangement for everyone involved.

FINAL WORDS

That’s all, folks! Hopefully, we’re closer than ever to find the answer to the question of who’s obliged to hire professionals for plumbing maintenance. The best way to sum up this article is: know your rights! Make sure to check the lease agreement, consult the state’s real estate law, and before you start thinking about taking legal action – talk to your landlord. As we’ve mentioned, there’s a slim chance you’ll need to go to court because your toilet is overflowing. Being diplomatic, cooperative, and well-informed will increase the chances of finding a satisfactory resolution, ensuring a pleasant and stress-free living experience in your rented property.

Guest Contributor: Sophia Perry

WHAT ARE THERMALLY BROKEN WINDOWS, AND WHY DO YOU NEED THEM?

By Ramarex

A study in 2018 revealed, “Around 318,891 homes are affected by dampness and have approx. 252,855 houses have visible mold.”

Molds and dampness are correlated with asthma, allergies, skin rashes, and severe respiratory tract diseases. Therefore, to cater to this, a viable solution in the form of thermally broken windows was introduced. 

In this article, we will discuss everything about thermally broken windows and how it benefits you in the long run.

Stay with us!


WHAT IS THERMALLY BROKEN WINDOWS?

If you want to improve the energy efficiency of your windows and prevent heat transfer through their frame, you need thermally broken windows.

That’s because thermally broken windows incorporate a “thermal break” in the frame, creating a barrier to reduce heat transfer. The insulated barrier is usually made of reinforced polyamide—a type of plastic with a low thermal conductivity that prevents the heat from entering inside or leaving the house. 

However, in premium quality windows, this insulated material is made of aluminum, which is more powerful and durable than polyamides to maintain a comfortable temperature within the house.

Fun fact: In Australia, around 90% of the windows installed are Aluminum.

In short, thermally broken windows are high-performance insulated windows against heat and cold induction through a feature termed “thermal break”.


WHAT ARE THE TYPES OF THERMAL BREAKS?

It might surprise you but there are different methods to achieve the thermal breaks in your windows.

POLYAMIDE STRIPS:

Polyamide has low thermal conductivity since it’s a non-metallic material. It is mainly used in Aluminium window frames where it is inserted in between the outer and inner parts of the frame to prevent heat transfer.

INSULATING FOAM:

To create an insulating layer that prevents heat transfer, insulating foam is usually injected between the window frame sections. The foam expands and hardens to create a thermal barrier, and ultimately reduces heat transfer.

THERMAL INSERTS:

Many materials, including fiberglass or reinforced polyamide, are used as thermal inserts. They are placed within the window frame and create a thermal bridge that increases energy efficiency in the long run.

All the three types of thermal breaks are beneficial and suitable for specific window frames, materials, and designs. Your window manufacturer will guide you about what’s best for you.


WHY SHOULD YOU INSTALL THERMALLY BROKEN WINDOWS IN YOUR HOME?

There are major advantages of thermally broken windows and that’s the real cause of their immense popularity. Some of the advantages of thermally broken windows are stated below:

EXCEPTIONAL THERMAL PERFORMANCE

As mentioned earlier, these windows incorporate a thermal break in their frame that reduces heat transfer. It also allows you to maintain a pleasant temperature, regardless of extreme weather conditions.

In winter, your windows will keep the heat inside, and in summer, they will keep the heat out of your house, maintaining a comfortable indoor temperature without using considerable energy.  

Fun fact: Thermally broken windows are warmer in winter and cooler in summer. No more insane power bills for heating or cooling your home! 

REDUCED CONDENSATION

Condensation occurs when warm, humid air trapped inside your house comes in close contact with a window surface. This allows moisture to form water droplets through the process called condensation.

Condensation is a nightmare to deal with considering it’s the root cause of dampness and mold, ultimately severe health problems.

However, thermally broken windows, in combination with proper heating and ventilation result in reduced condensation and keep your home nice, warm, and dry all around.

HAPPY, HEALTHY HOMES

A healthy home is a happy home with no traces of moisture, mold, pollution, and noise. However, a study in 2018 revealed that 318,891 homes are affected by dampness and. 252,855 houses have visible mold.

The numbers are huge!

And so are the health risks, including asthma, allergies, skin rashes, and other respiratory issues.

Therefore, to mitigate these concerns, the use of thermally broken windows is recommended in order to live a stress-free, healthy life with no signs of moisture and mold that affect your physical and mental health.

INCREASED PROPERTY VALUE

Your home is your asset. Therefore, you should always invest in it wisely. Nowadays, with the increasing popularity of eco-friendly homes, the demand for thermally broken windows has considerably increased.

Buyers are looking for properties that are energy-efficient to minimize their living costs and maximize their living standards in terms of comfort, durability, and quality. 

NOISE REDUCTION (SOUNDPROOFING)

If you live on a busy street, the need for privacy and serenity becomes paramount.

To achieve a level of comfort in busy areas amid the hustle and bustle, homeowners always appreciate the soundproof windows that cancel out the outside noise of traffic, pets, or just general noise.

Luckily, the thermal break in your thermally broken windows provides amazing soundproofing that separates your inside from the outside world effectively.  

BIGGER SAVINGS 

Sure, the installation of thermally broken windows might pose a serious challenge to your budget. But, over time, your low utility bills will outweigh the total cost of installation.

That’s because when you install thermally broken windows, you use minimum energy to heat or cool your home, resulting in reduced power bills.

VERSATILITY

Since we have around a thousand different styles of windows in Australia, you might wonder if thermally broken windows are limited in operational styles.

The answer is a plain NO!

Surprisingly, thermally broken windows are easily found in all of the operational styles, and finding a manufacturer that creates your favorite style in these windows should never be a problem.

You can get thermally broken windows in various styles, including single and double-hung windows, sliding windows, picture windows, casement windows, and much more—you name it.

Also, you can request customized windows in shapes or patterns from certain manufacturers at an additional cost.


THERMALLY BROKEN WINDOWS VS. DOUBLE GLAZING—WHICH IS BETTER?  

Now, to answer the most interesting question: What should I go for? Double glazed windows or Thermally broken windows?

Because over many years, homeowners have been using double glazed windows to keep their buildings, homes, and even offices comfortable in extreme weather.

Double glazing works by interrupting the transfer of heat through condensation—A layer of air (particularly, argon gas) is added between the two glass panes that are separated by non-conductors.  

However common and popular, the efficiency of double glazed windows is compromised because of its window frames.

For example, on a cold winter night, feel the inside of your aluminum joinery of your double glazed windows. You’ll realize that the inside is just as chilly as the outside.

That’s because the window frames are not targeted for the thermal break technique. And just like glass, the window frames (mainly Aluminium) are great conductors of heat or cold.

Therefore, the performance of double glazing is not as outstanding as the thermally broken windows where heat transfer through the entire window is reduced by separating the inside and outside of the window via a poor conductor.  

So, if you’re living in Australia, installing thermally broken windows for your home, buildings, or offices is highly recommended. Since Australia can get really hot in summer and cold in winter, you will appreciate the comfortable internal temperature while reducing your energy bills.


For professional assistance, it’s always best to consult a window specialist in your local area in Australia.

TRANSITIONING YOUR BACKYARD FROM SUMMER TO FALL

As the sun begins to set earlier and the crisp autumn air sets in, it’s time to say goodbye to summer and welcome the season of fall. With nature putting on a display of colors, transitioning your backyard from the vibrant days of summer to the cozy ambiance of fall is an opportunity to create a warm and inviting outdoor space.

TIDY UP AND CLEAR OUT:

Before diving into the fall decor, start by tidying up your backyard. Clear away any summer toys, pool accessories, or worn-out outdoor furniture. Give your garden a thorough clean, removing dead plants and debris from the summer. Trim any overgrown bushes and plants to maintain a neat appearance.

FALL-INSPIRED COLORS:

Infuse your backyard with the warm and rich hues of fall. Replace the bright summer-themed accessories with fall-inspired colors such as deep reds, rustic oranges, golden yellows, and earthy browns. Introduce throw pillows, blankets, and outdoor rugs in these autumnal shades to create a cozy atmosphere in your seating areas.

COZY SEATING NOOKS:

Fall is the perfect season to create cozy nooks in your backyard where you can relax and enjoy the changing landscape. Arrange your outdoor furniture closer together to encourage intimate gatherings. Add cushions, blankets, and soft throws to make your seating areas more comfortable, inviting guests to linger outdoors longer.

ILLUMINATE WITH WARM LIGHTING:

As the days grow shorter, lighting becomes crucial in creating an inviting ambiance. Swap out bright summer lights for softer, warmer lighting options. String fairy lights across fences and pergolas, or hang lanterns to add a touch of enchantment. You can also include fire pits or outdoor heaters to provide warmth on cooler evenings.

HARVEST DECORATIONS:

Celebrate the fall harvest season by incorporating natural elements into your backyard decor. Utilize pumpkins, gourds, and squashes as festive centerpieces or scattered around the garden. Create a charming display of hay bales, corn stalks, and dried corn husks to bring a rustic touch to your outdoor space.

EMBRACE FALL FLOWERS:

While summer blooms may be fading, there are plenty of fall flowers that can breathe new life into your backyard. Plant autumnal flowers such as mums, pansies, and asters, which thrive in cooler temperatures and add vibrant splashes of color to your garden.

RUSTIC ACCENTS:

Incorporate rustic accents to evoke a sense of autumn charm in your backyard. Utilize wooden crates, vintage wheelbarrows, or antique garden tools as decorative elements. Repurpose old barrels into planters for your fall flowers, and create DIY wreaths using dried leaves and twigs to adorn your outdoor walls.

COZY OUTDOOR DINING:

Extend the joy of dining outdoors by setting up a cozy outdoor eating area. Invest in a sturdy patio table and chairs, layering them with soft tablecloths and autumn-themed napkins. Light some candles and use charming wooden trays to serve hot beverages or hearty fall dishes.

FOLIAGE AND LEAVES:

Capitalizing on the natural beauty of the season, incorporate fallen leaves into your outdoor decor. Collect colorful leaves to create stunning leaf garlands or scatter them around your seating areas for an organic touch.

CREATE A FIRE PIT AREA:

One of the best ways to savor the crisp fall evenings is by gathering around a fire pit. Create a designated area in your backyard for a fire pit, and surround it with comfortable seating for a cozy gathering spot for family and friends.

Transitioning your backyard from summer to fall is an opportunity to celebrate the changing seasons and embrace the unique beauty that autumn brings. By incorporating warm colors, cozy accents, and nature’s bounty, you can create a magical outdoor space that will make you fall in love with the charm of the season. So, grab a blanket, brew a cup of hot cider, and enjoy the enchantment of fall in your backyard oasis.

HOME MAINTENANCE HACKS TO MASTER ASAP

Being a homeowner requires you to take care of your home, but this process doesn’t always have to be difficult. With the appropriate information and a few nifty tricks, you can simply manage your property and stop minor problems from becoming expensive repairs. Here are seven home maintenance tips to grasp right away that will help you keep your residence in great shape and save you time and money over time, from performing regular inspections to taking on smaller projects:

REGULAR INSPECTIONS: THE KEY TO SPOTTING PROBLEMS EARLY

The basis of effective house upkeep is routine examination. They assist you in seeing possible problems before they develop into larger ones. At least once every six months, give your residence a thorough inspection from top to bottom. Look for any indications of leaks, cracks, or other defects that require quick repair. Pay attention to the plumbing, foundation, roof, and gutters. Early detection might spare you from costly repairs and future fees. To keep a secure and comfortable living space, pay attention to the HVAC system and electrical wiring and make sure they are in good operating order as well.

THE MAGIC OF CAULK: SEAL IT TO PROTECT IT

Although caulk may not seem like a fantastic tool, it is one of the best for home maintenance. In order to stop air leaks and water penetration, it aids in sealing gaps and cracks around windows, doors, and other sensitive locations. An easy DIY project that can significantly improve your house’s energy efficiency is applying caulk. To maintain your property well-insulated and protected, keep an eye on the caulked areas and reapply as necessary. Additionally, to ensure long-lasting protection against moisture, think about using specialized caulks such as silicone-based ones for damp areas like bathrooms and kitchens.

ODD JOBS: TACKLING MINOR REPAIRS

Dealing with minor repairs as soon as possible is crucial since they can accumulate over time if neglected. It’s important to take care of these odd jobs as soon as possible, including noisy doors, leaking faucets, loose cabinet handles, and unsteady furniture. Don’t be afraid to use reputable handyman services for more difficult projects or if you don’t have the required equipment or abilities. A knowledgeable handyman can effectively handle numerous tasks, saving you time and guaranteeing that your home is kept in excellent condition. Remember that hiring a professional handyman can help you avoid repeated problems by bringing knowledge as well as useful suggestions on preventive maintenance.

THE ART OF PRESSURE WASHING: REVIVE YOUR HOME’S EXTERIOR

The exterior of your house may gather dust, grime, and mold over time, reducing its curb appeal. When it comes to improving the outside appearance of your home, a pressure washer may make all the difference. Pressure washing may blast years of collected dirt off of siding, decks, driveways, and fences, giving your house a clean, well-kept appearance. When using a pressure washer, always abide by the manufacturer’s directions and safety precautions. To further safeguard your landscaping and the environment while giving your residence a facelift, think about using eco-friendly cleaning products.

A GREEN THUMB FOR A LUSH LAWN: LAWN CARE TIPS

A well-kept lawn makes your house seem better overall and creates a pleasant atmosphere. Maintaining a lush, green lawn requires routine maintenance. Regularly cut your lawn to the right height for the sort of grass you have, water it deeply but sparingly, and fertilize it during the growing season. In addition, keep an eye out for weeds and take early action to resolve any potential pest or disease issues. You may benefit from an attractive outside area all year long by spending a little time maintaining your lawn. Consider installing a rainwater collecting system to use rainwater for irrigation in order to increase sustainability.

ENERGY-EFFICIENT UPGRADES: SAVINGS AND SUSTAINABILITY

Maintaining your property includes making your house more energy-efficient as well as addressing issues. Energy can be saved significantly by making small improvements like adding LED lighting, programmable thermostats, and weatherstripping. Your home’s insulation can also assist keep the interior at a reasonable temperature while lowering your energy costs. To further improve your house’s sustainability, think about replacing old appliances and windows with more energy-efficient ones. These improvements will eventually not only help the environment and save you money. A more self-sufficient residence can also be made by looking into the potential of renewable energy sources like solar panels to further lessen your carbon footprint.


Any homeowner should become an expert at house upkeep hacks. Regular checks assist in identifying problems early, sparing you from expensive repairs, while simple upgrades help to maintain the functionality and aesthetic appeal of the residence. You may take advantage of a well-maintained and cozy dwelling for many years to come by putting these tips into practice and being proactive.

Guest Contributor: Chloe Taylor

WHAT TO KNOW BEFORE YOU RENOVATE YOUR HOME

Renovating your home can be an immensely satisfying experience. It enables you not only to improve your own living standards but also to be reminded of your handiwork every single day. Whether it’s something as simple as repainting a wall or as major as replacing your roof, there’s nothing like the feeling of living within a completed project of yours.
However, it would be natural if you’re feeling a little daunted by the challenge that’s ahead of you. Trying to renovate your home is far from easy and might require more work than you initially anticipated. 
This is why it’s vital that you have a clear plan of action before you start and tackle the project with the right mindset. For instance, if you’re taking on a ground-up renovation project, then it’s best to start with the big tasks first — which will soak up the most time and resources — as well as target areas in your home which will move the needle the most by adding value to it.
Lastly, you’ll need to get a solid budget in place, so you can complete the project without overleveraging yourself or leaving yourself out of pocket.
This is what you need to know before you renovate your home: 
 
Start with the big jobs first
When you’re embarking on a home improvement project, you might be struggling to know where to start. While this will depend entirely on the particular property and the challenge you have ahead of you, it’s generally best for you to start with the big jobs first.
This is because the bigger jobs will take more time to complete and will therefore tend to drag on. The last thing you want is to start with minor tasks like painting walls or plastering ceilings when you need to replace your shingle roof Florida.
What’s more, if these larger and structurally integral elements aren’t dealt with first, then you could suffer damage to the smaller jobs that you wrongly prioritized.
  
Target areas that add the most value to your home
Another way to prioritize your home improvement projects is to work out which areas will add the most value to your home. This way, any money you’re spending will have the highest return on your investment, and you’ll find it easier to sell your property for a higher price.
These areas could include replacing your roof, creating a more open-plan living space by knocking through dry walls, extending your home, or renovating your loft or cellar.
 
Have a budget in place first 
Of course, attempting to renovate your home is impossible if you don’t have the necessary budget in place first. One of the most common mistakes that homeowners make when they are trying to renovate their property is that they get carried away with selecting the finest materials and a large workforce to get the project over the line without seriously considering the cost implications.
Therefore, set a clear budgetary red line before you start, and make sure that you stay below that as you go along.